Programming on the Server Side
34 The Database
 Learning Outcomes
When you have completed this chapter, you will be able to:
- Explain the differences between SQL, MySQL, and phpMyAdmin.
- Create and manage a database table using MySQL and phpMyAdmin.
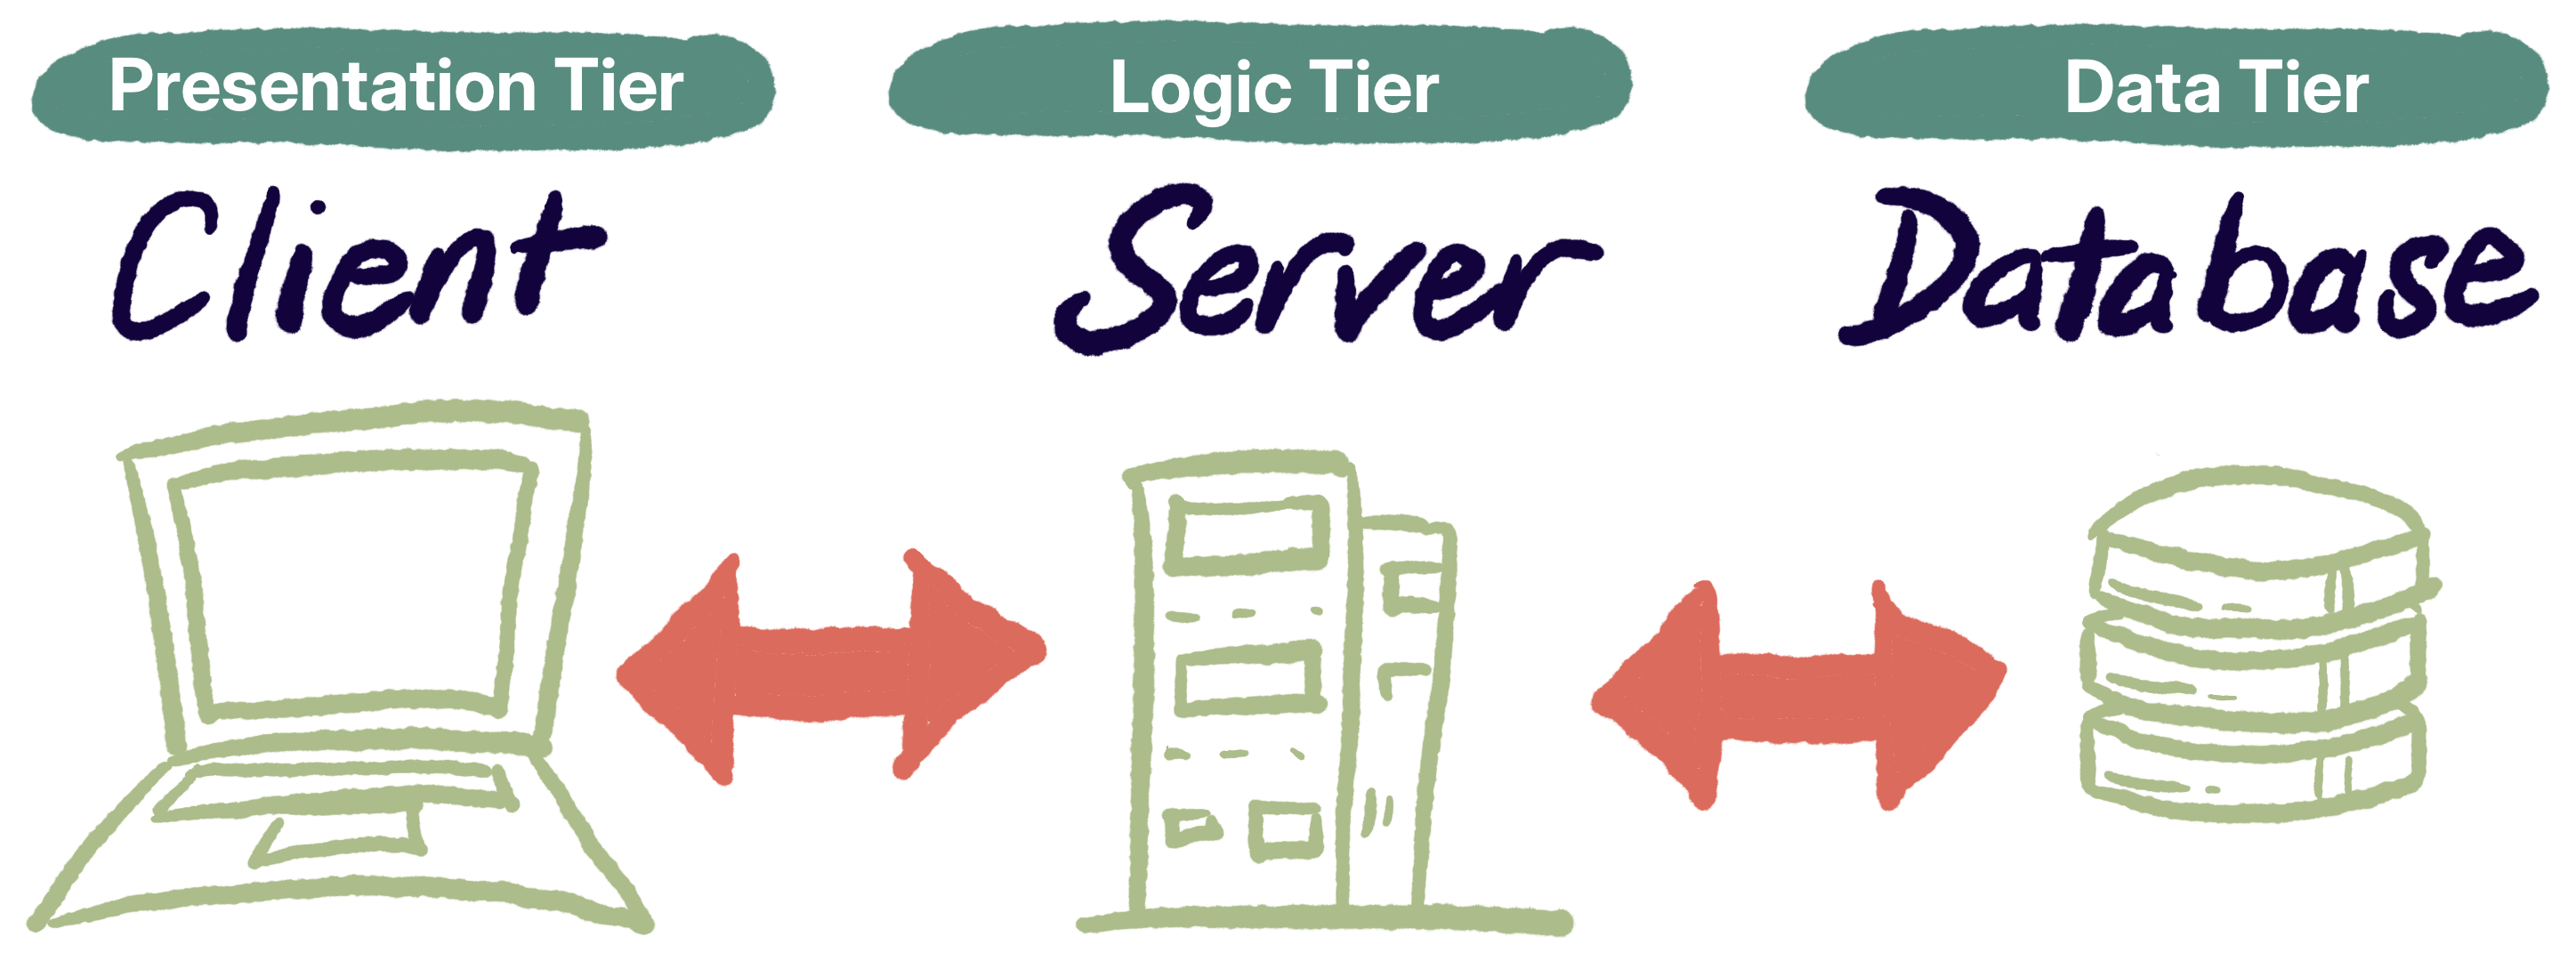
Most web apps maintain a database that stores information about users, products, schedules, purchases, and so on. Since the database is on the server, a server-side scripting language is used to retrieve, update, and store information in the database in response to requests from the client.
Figure 1 below shows the standard Three-tier Architecture for a web app. When HTTP Requests arrive from the presentation tier, a server-side script in the logic tier sends commands in a query language to the database on the data tier. Then it returns a response to the presentation tier, possibly including the results of those database queries.
 Connections
JavaScript and PHP are fully functional, Turing-complete programming languages. HTML and CSS are declarative languages and are not Turing-complete. The most recent version of SQL is technically both declarative and Turing-complete, though we will just be using it as a query language. We will not be using SQL to solve programming problems.
The most common type of database for web apps is a relational database implementing SQL. For this course, we will use the MySQL Database Management System and we will assume a LAMP-like software stack (e.g. XAMPP) that implements the phpMyAdmin database interface.
What are SQL and MySQL?
SQL stands for Structured Query Language. SQL is a standardized language for talking to a relational database. Like HTML and CSS, SQL is a declarative language. You use SQL to declare what you want done, but not how the system should do it.
 Gotcha: DBMS Differences
In this textbook we will assume the use of MySQL. Other DBMS systems are implemented slightly differently and have different quirks. So some of the advice we give here might not apply to other DBMS’s, and some of the SQL examples might not work exactly as written on other DBMS’s.
MySQL is a Relational Database Management System (DBMS or RDBMS) that communicates through SQL. There are many other DBMS’s that also communicate via SQL.
What is a Relational Database?
A relational database consists of a set of tables and relationships between those tables. A database table has rows and columns. Each row is a record in the database, and each column is a field. In Object-Oriented Programming terms, a row is analogous to an object and the columns are analogous to the instance variables of the object. Database fields (columns) have strict types associated with them.
In this book, we will introduce just four basic SQL commands (insert, delete, update, and select) along with some basics of database management using phpMyAdmin. We will keep our data models very simple (one or two tables at most) and we will stick mostly to the SQL data types for integers (int), strings (char, varchar and text) and dates (date). If you are a student in a computer science or software engineering program, you will probably eventually take a course on database theory in which you will go much deeper into the theory and practice of databases and data modeling.
An Example Database Table
Here’s an example table that stores polls. It could be used on a website that allows users to create polls for fun and then share links to them in messaging apps or on social media.
Table Name: Poll
| ID | Title | Question | UserID | Option1 | Option2 |
| 1 | Poll1 | How are you? | ss1234 | Great | Lousy |
| 3 | Poll2 | Who are you? | ss1234 | Me | Nobody |
| 4 | Poll234 | Why? | fd3423 | Why not? | Dunno. |
| 5 | My Poll | Hello? | ss1234 | Hi! | Go away. |
| 7 | Your Poll | Is that you? | ss1234 | No | Yes |
| 9 | My Poll | Where’s the Beef? | fd3423 | I ate it | I’m vegetarian |
Each row of the table represents a poll, with a title, a question, and several options (only two are shown for brevity). Each of these pieces of information is stored in a named column (field) in the table, and each holds some string data (SQL type varchar).
Connections
A row in a database table can be modelled as an object with an instance variable for every field. A database table could be modelled as a two-dimensional array, or as a list of objects.
Each poll also has an ID that serves as a primary key of type integer. A primary key must be unique in each row (i.e., there can’t be two polls with ID=23). This property is enforced by the DBMS. It’s always a good idea to have a primary key so that you can unambiguously specify a single row in the table when you talk to the database.
Finally, each poll also has a UserID field (also varchar) that specifies who created and owns that poll. The database in this example would probably also contain a second table with information about each user, and it would have a UserID column as well. So UserID represents a relationship between the Poll table and a table of Users. If UserID is the primary key of the Users table, then the UserID column here represents what is known as a foreign key, specifying a link to another table’s primary key.
Creating a Database with phpMyAdmin
phpMyAdmin is a tool to manipulate MySQL databases through a web interface. It’s written in PHP (hence the name).
Assuming you have XAMPP running on your local machine, you can log in to phpMyAdmin using http://localhost/phpmyadmin/ (remember you may have to specify a port). No login information is required. If you are working with a school or commercial hosting platform, chances are there is a similar URL to get to phpMyAdmin on that server, though you may have to access it by first logging in to a web hosting control panel such as cPanel, and then enter a MySQL userid and password to get access.
When developing a full-stack web app, it’s not generally a good idea to make changes of any kind to the live, public version of the app. So most developers will use XAMPP or a similar local server to develop the code and database locally, then upload the app and its database tables to a live server when it’s ready.
 Do It Yourself
It’s time to fire up XAMPP, start phpMyAdmin, and create your first database. We’re going to assume you’re using XAMPP for this. Installation instructions for XAMPP are in the Get Your Own Web Server chapter.
Step 1: Start up XAMPP and then press the Apache and MySQL start buttons on the control panel.
Step 2: In Chrome, go to http://localhost/phpmyadmin/. You should see a view like the one below. The databases are listed on the left. There will probably be one or two there already – don’t mess with those, but feel free to explore them.
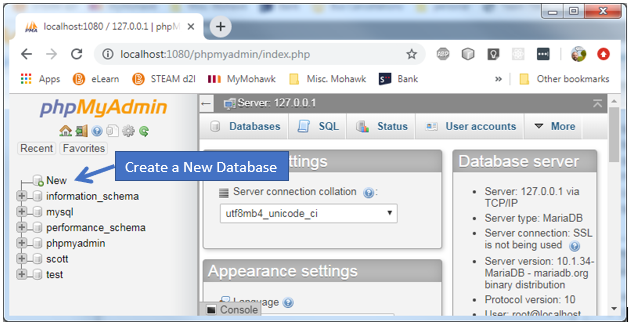
Step 3: Create a new database by pressing the “new” button as indicated above. Then fill in a database name and press the create button, as shown below. Call it my_polls_app.

Congratulations, you just created a new database!
A Very Quick Tour of phpMyAdmin
Figure 2 below shows a database named scott which contains three tables. NewTestTable is selected, which has opened the Browse view, showing the contents of the table. This table has three columns (ID, Name, and Age) and several rows of data. The tabs along the top allow you to change the view and take various actions. We will explore those tabs in the upcoming Do It Yourself boxes.

Creating a New Table
In this textbook, we’ll assume you’re using phpMyAdmin to create and manage your tables. You can always add a table by pressing the “new” button in the left panel, under the name of your database (see Figure 2 above).
Do It Yourself
A database isn’t much good without any tables in it. Here are some step-by-step instructions for creating a poll table in your new, empty database.
Step 1: In the left sidebar, click the name of the database you just created. You will see a form to create your first table, as shown below.
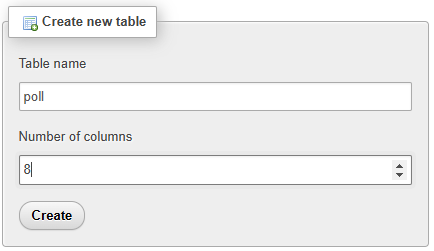
Step 2: Fill in the name of the table and the number of columns you want, then hit create. For now, create a table called poll with eight columns. (You can always change the number of columns later if you change your mind). You will see a view something like the one below:

Step 3: Each row in the above form stands for a column in the table you’re creating. Each one must be at least partially filled-in. In the above picture, the form has been filled in to more-or-less match the poll table example earlier. The column names match those in the previous example.
- You have to specify a type for each column. We’re using int for the ID and VARCHAR (a string type) for everything else.
- Each VARCHAR field has a Length filled in, which represents a maximum. If we try to store longer strings, they will be truncated.
- In the Default column, we’ve decided to allow the userid to be NULL (a poll doesn’t have to have an owner). We’re also allowing option3 and option4 to be NULL (so a poll can have 2, 3, or 4 options).
- Finally, we have checked the A_I (auto_increment) field for ID, which automatically sets the Index to PRIMARY. This means that ID is the primary key. We will not be allowed to have two rows with the same ID, but because of the auto_increment feature, we don’t have to specify an ID when adding polls – MySQL will pick an unused one for us automatically.
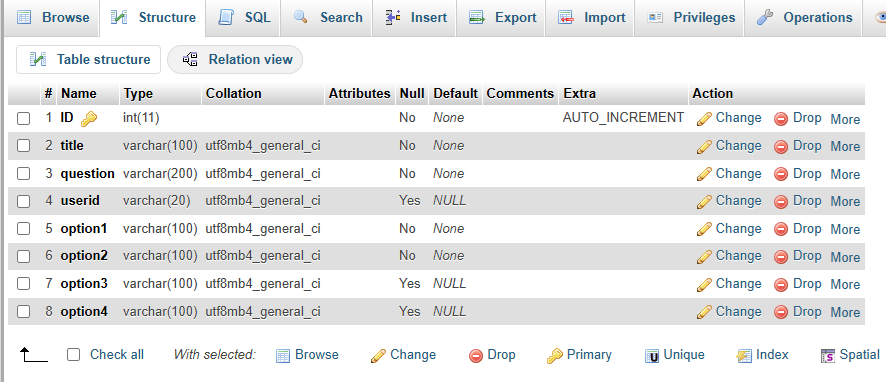
Step 4: When the table above is filled in, scroll down, cross your fingers, and press Save. If it works, the table will show up in the list in the left sidebar and you will be looking at the Structure view as shown below. From this screen you have complete control over table structure. You can change, add, and delete (drop) columns all you want.
Troubleshooting: phpMyAdmin is not always very communicative. If you get a generic error message when submitting the form in Step 4, pay attention to where it puts your cursor after you close the dialog box. Wherever your cursor is, that’s the field it’s complaining about.
Connections
JavaScript and PHP are both dynamically typed, meaning that variables and fields do not have a type attached. SQL fields are statically typed. There is a type attached to a field and only values of that type may be stored there.
An Aside on Data Types
SQL is statically-typed. Columns (fields) have types attached and those types must be respected. You can’t put “hello” in a column of type INT, for example.
SQL supports many data types, but the only ones you are likely to need for the examples and exercises in this textbook are INT (integers), DOUBLE (floating point numbers), CHAR (a string with a fixed length), VARCHAR (a string with a maximum length), TEXT (a string of any length), and DATE (a string in the form “YYYY-MM-DD”).
Inserting Rows
Now you have a table, it’s time to put some data in it. You can do this on the Insert tab of phpMyAdmin.
Do It Yourself
Here’s a step-by-step guide for inserting new rows in your poll table.
Step 1: Make sure your poll table is selected in the left sidebar, and go to the Insert tab.
Step 2: Fill in some values and press Go (see figure below). Note that you don’t have to fill in an ID because of the auto_increment feature, and you don’t need a userid, option3, or option4 either because they are allowed to be NULL.

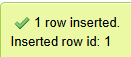 Step 3: Press Go. If it works, it will send you to a very busy page that shows you the exact syntax of the SQL INSERT query it just executed on your behalf. Don’t worry about anything except the success or failure message. You’re looking for green, like the message shown at right. If you see red, read the error message, then try again.
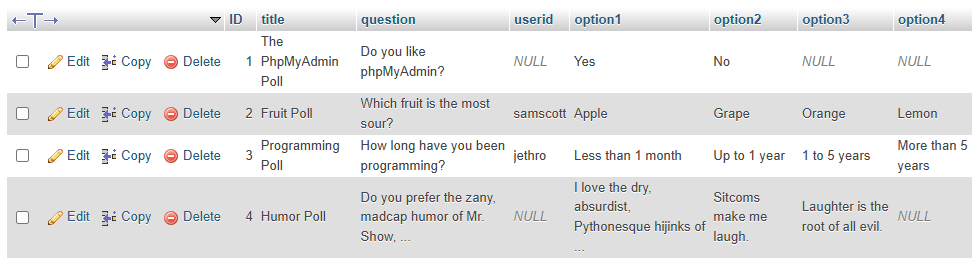
Step 4: Go to the Browse tab to see the row you just inserted.
Step 5: Insert a few more rows this way, and then go take a look in the Browse tab to admire your work. You should see your table displayed in a way that is similar to the figure below. Note that you can delete rows from the Browse screen. You can also search, sort, and double-click field values to change them.
Exporting and Importing Tables
Eventually, you will need to get a local database table onto your server. You do this by exporting the table you want from the local database, then importing it into a database on your server.
Do It Yourself
Here’s a step by step guide on exporting and importing tables.
Step 1: Select your poll table in the left sidebar. This is important – if the wrong items are selected, you will end up exporting the wrong thing.
Step 2: Go to the Export tab. Don’t worry about any of the fields there, just press the Export button. If you were exporting your poll table, the browser should download a file called poll.sql. You can open this and take a look – it contains all the SQL queries necessary to recreate this table in another database.
Now you have a backup of your database.
Step 3: If you have a remote server, you should go there now and use phpMyAdmin to log in and create a new database for your table. If you don’t have a remote server, just create a new database on your local server. You could call it poll_app_2 for example.
Step 4: Select the database you’re importing into in the left sidebar. Make sure the database name is selected, not a table name.
Step 5: Go to the Import tab, press Choose File and select the poll.sql file you exported. Then scroll down and press Import and cross your fingers.
If all goes well, you should now have a copy of the poll table in the new local or remote database. Congratulations!
 Check Your Understanding
 Coding Practice
- On your local phpMyAdmin, create a new database. If you’re using a school-provided server as the remote, it would be a good idea to make your database name match the one you’re using on the remote server.
- Create a new table in the database to store student information for a course your currently taking (or a made-up one if you’re not in a course right now). Here’s an example of what it could look like:
-
-
- First Name
- Last Name
- Student ID
- Seven Numeric grades (Four assignments, Two tests, One project)
- Course Start Date
- Course Completion date
- Student reflection (three or more paragraphs written by the student)
-
Make sure the table has an auto-incrementing primary key. Make sure numeric grades have a default of 0, start date defaults to this year’s fall term start date, and that Student Reflection and completion date can be NULL.
- Insert records for five different students using the INSERT tab on phpMyAdmin.
- Delete one of the records
- Browse the table and then update one of the students’ grades by double clicking it
- Export the table from phpMyAdmin, and Import it into a different local or remote database.
- Go back to the poll table you created in the Do it Yourself boxes. Go to the Structure tab and add 4 new columns. These columns are going to be used to store the number of votes for each option. Make sure you give them an appropriate type and default value.

Feedback/Errata