Programming on the Server Side
37 PDO for SELECT
 Learning Outcomes
When you have completed this chapter, you will be able to:
- Write a PHP application that retrieves database records with a SELECT query and writes the information into the HTTP response using HTML to give it structure.
- Use database information in a PHP program to write custom code into the HTTP response for simple session management (e.g., GET parameters in href, hidden input elements)

The SQL SELECT query is a little different from UPDATE, INSERT, and DELETE because if it succeeds, it returns a result set consisting of rows and columns of data from the database. When the SELECT query is sent using PHP Data Objects (PDO), the rows of the result set will be presented by default as associative arrays.
PHP Associative Arrays
 Connections
The PHP array type supports indexes of type int, but it also supports indexes of other types, allowing it to be used like a JavaScript associative array, but with a few key differences.
- JavaScript associative arrays are equivalent to objects, but PHP associative arrays are not.
- PHP associative array literals use
[ square brackets ]instead of{ braces }. - PHP associative array literals require “quotes” around the key values and use
"property" => valueinstead of the JavaScriptproperty: valuesyntax. - You can loop through a PHP associative array directly with the foreach loop.
PHP Associative Arrays have some similarities to JavaScript Associative Arrays, but there are also some key differences. Working through the Do it Yourself box below will show you everything you need to know.
 Do It Yourself
Download associative_arrays.php from the Full Stack Example Pack and load it into a browser through a local server. Then take a look at the code to see examples of associative array literals, echo statements with associative arrays, and the foreach loop. Map each PHP statement to the output displayed on the web page.
You will see an example of how to build an associative array one key at a time:
$user = [];
$user["studentid"] = "928374532";
$user["age"] = 22;
$user["access"] = true;
And with a single associative array literal:
$user = ["studentid" => "6534654754", "age" => 18, "access" => false];
You will see examples of how to output associative array items in echo statements and using var_dump for debugging:
echo "<p>Your Userid: $user[studentid]</p>";
echo "<p>Your Userid: $user[$key]</p>";
var_dump($user);
And you will see an example of how to iterate through an associative array using the PHP foreach loop to extract keys and values like this:
foreach ($user as $key => $value) {
    echo "<p>$key: $value</p>";
}
Try modifying the code in associative_arrays.php to add and remove key-value pairs to the $user array and make sure you can echo the values and make sense of the results.
Using PDO for SELECT
To SELECT and display data from the database on a web page using PDO requires five steps.
- Connect to the Database
- Prepare the SQL query
- Execute the SQL query
- Check to make sure it worked
- Retrieve the results
Steps 1 through 4: Connect, Prepare, Execute, Check
We covered these first four steps in the PHP Data Objects (PDO) chapter for UPDATE, INSERT and DELETE. Here’s what preparing, executing, and checking a SELECT query could look like.
$command = "SELECT `firstname`, `lastname` FROM `grades` WHERE `final_exam` > ? ORDER BY `final_exam`";
$stmt = $dbh->prepare($command);
$params = [50];
$success = $stmt->execute($params);
if ($success) {
   /* it worked! */
}
The only thing different about Steps 1 through 4 is that the rowCount() method, which was introduced for UPDATE, INSERT, and DELETE, is officially undefined for SELECT. It may work with some Database Management Systems but it’s not guaranteed to work, so you should not rely on it.
Step 5: Retrieve the Results
The $stmt->execute() method fetches an array known as a result set. The result set contains the columns you asked for in the SELECT clause, but only for the rows that matched the WHERE clause (it may contain 0 rows).
To retrieve the first row from the result set and store it in an array named $row, use this statement:
$row = $stmt->fetch();
Each row is an associative array in which the keys are the column names you asked for in the SELECT statement. Printing the columns from the SELECT statement shown above could look something like this:
echo "<li>$row[lastname], $row[firstname]</li>";
To get the second row, use the same statement again, and again for the third and so on. When there are no more rows, $stmt->fetch() will return null. The null value casts to false in PHP’s weak type system, but every non-empty array casts to true. So you can use a loop like the one below to repeatedly assign the next row from the result set to $row, stopping when there are no more rows:
while ($row = $stmt->fetch()) {
    echo "<li>$row[lastname], $row[firstname]</li>";
}
Connections
Note the use of assignment operator (=) instead of a comparison operator such as == or === in the while and if statements above. This is not a typo. In most languages with a C-like syntax, the assignment operator can be embedded into other expressions and returns the value that was assigned. This was explained previously in Gotcha boxes in the JavaScript Type System and Getting Started with PHP chapters.
If you’re expecting at most one row (e.g. you searched for a value on the primary key field or if you used LIMIT 1 in the SELECT statement) you can use an if statement instead, like this:
if ($row = $stmt->fetch()) {
    echo "<li>$row[lastname], $row[firstname]</li>";
} else {
    echo "<li>No name found!</li>";
}
Do It Yourself
Get the select folder from the Full Stack Example Pack and modify the connect.php script to add your login information. If you didn’t already do this in the last chapter, then in XAMPP or similar, get grades.sql from the data folder and import it into an existing database to get the grades table.
Run the example.php code by loading it into a browser through a server. It should show you the names of any student in the grades table with a final exam grade greater than 50, presented in an HTML unordered list. Try changing the $limit variable to change the number of records retrieved. What do you expect to happen if you set the limit too high?
Debugging: Using the var_dump() function is a great way to see the full contents of each row, especially if you are getting an index error when you try to access it. Try adding a call to var_dump($row) inside the while loop to display the full contents of each row. You might notice that the associative array contains the information twice – once using the column names as keys, and again using integer keys.
Optional: If you are used to thinking in an object-oriented way, it might occur to you that it would be a good idea to create an array of objects from the result set. If you’d like to see what that could look like in action, the example_oo.php and user.php files in the select folder give you an idea of how it could work.
Writing Code from Data
 Gotcha: Case Sensitivity
SQL is not case sensitive by default, but PHP is. If the column name in the database is AAA and you retrieve it with SELECT *, you’re looking for $row["AAA"]. But you can also retrieve the same column with SELECT aaa. If you do that, the query will succeed (because SQL ignores case) but now you’re looking for $row["aaa"] (because PHP does not ignore case). For this reason, it’s probably a good idea to always use lowercase names in the database.
In the previous section, you saw how to use SELECT queries to customize the contents of a page. But there are lots of cases in which you might want to use data from a SELECT query to customize the HTML, CSS, and maybe even JavaScript code in your HTTP Response.
For example, you might want to show a list of student names, but allow the user to click each name to go to a view page where you can view the entire student record. Then you might want to be able to click a button on the view page to delete or update that student record. One way to do this is to use the results of your SELECT query to customize a link element’s href attribute. Another way is by using input elements of type="hidden".
Do It Yourself
Writing the HREF Attribute
Get the select_to_code folder from the Full Stack Example Pack and modify the connect.php script to add your login information. If you didn’t already do this in the last chapter, then in XAMPP or similar, get grades.sql from the data folder and import it into an existing database to get the grades table.
Run the example.php code by loading it into a browser through a server. It should show you the names of the students in the grades table, but this time each name should be a clickable link. This is accomplished by selecting the primary key (student_id) from the database along with the student names:
$command = "SELECT `firstname`, `lastname`, `student_id` FROM `grades` ORDER BY `lastname`";
Then when the code outputs the data, it uses $row[student_id] to write a GET parameter named id directly into the href attribute of an <a> element. The code for this is below, with critical parts underlined.
while ($row = $stmt->fetch()) {
    echo "<li><a href='showsingleuser.php?id=$row[student_id]'>";
    echo "$row[firstname] $row[lastname]";
    echo "</a></li>";
}
The links look something like this when they arrive at the browser:
<li><a href='showsingleuser.php?id=6'>Drizzt Do'Urden</a></li>
The showsingleuser.php file retrieves the id parameter and uses it to launch a SELECT query to retrieve and display the rest of the user information. Note that the code in showsingleuser.php is just “proof of concept”. It uses a var_dump() to display the information retrieved. Making this more user-friendly is left for an exercise.
Optional: There’s another version of this code in example_oo.php that uses user.php to accomplish the same thing in an object oriented way.
Do It Yourself
Writing a Hidden Input Element
Get the select_to_code folder from the Full Stack Example Pack and modify the connect.php script to add your login information. If you didn’t already do this in the last chapter, then in XAMPP or similar, get grades.sql from the data folder and import it into an existing database to get the grades table.
Run the example.php code by loading it into a browser through a server and click a link to get to showsingleuser.php.
The showsingleuser.php file gets the student id from a GET parameter. It uses a SELECT query to get the rest of the user information to display it, and then it creates a special delete form using the id using a special input element with type="hidden":
<form action="deleteuser.php" method="post">
    <input type="hidden" name="id" value="<?= $row["student_id"] ?>">
    <input type="submit" value="Yes, Please!">
</form>
An input element with type="hidden" will send a parameter when the form is submitted, but it does not appear on the page or allow the user to change its value attribute. So you can fix its value to be whatever you want. This is handy for passing values along from page to page. (It’s actually a primitive form of session management because it lets you keep track of the user from one page to the next. See the PHP Session Management chapter for a more sophisticated way to do this.)
When the user presses the submit button in this form, a POST request will be launched to deleteuser.php with the value set to the id of the student that is being displayed. Then deleteuser.php can use an SQL DELETE query to remove the student record from the table. Note that the code in deleteuser.php just “proof of concept”. The deleteuser.php file simply reports that it received a delete request rather than performing the delete. Finishing it is left as an exercise.
Displaying Data in Tables
Sometimes data from a database is best displayed using a tabular format, like a spreadsheet. There is a table HTML element that can be used for this purpose. The basic HTML tags are <table>, <tr> (table row) for a row inside the table, and <td> (table data) for a cell inside a row. You can also optionally specify table header rows using <thead> and the table body rows using <tbody>, and you can use <th> for a table header element instead of <td>.
The full structure is shown below:
<table>
    <thead>
        <tr><th>heading 1</th><th>heading 2</th></tr>
    </thead>
    <tbody>
       <tr><td>First column, first row</td><td>Second column, first row</td></tr>
       <tr><td>First column, second row</td><td>Second column, second row</td></tr>
    </tbody>
</table>
You can get more info on useful table elements and attributes at w3schools.
Tables have some drawbacks. It’s harder to make them flexible, and the default table styles don’t usually look that great. But with a little styling, they can sometimes be a good choice for getting a lot of data on the page in an organized fashion. Here’s what the table above might look like without any CSS style rules applied:
| heading 1 | heading 2 |
|---|---|
| First column, first row | Second column, first row |
| First column, second row | Second column, second row |
You can set CSS styles on any of the tr, td, th, or other elements to make things look better. Here are a few tips:
- Set the CSS property border-collapse: collapse on the table element to prevent extra space and/or double borders around each td and th element.
- Use the CSS element element selector (see the Flexible Design chapter) to style tr elements differently for the thead and tbody.
- Use the CSS :nth-child() pseudo-class to style just the even or odd rows of a table for a nice striped effect. For example, tbody tr:nth-child(even) selects only the tr elements that are an even numbered children of the tbody element.
Get more info on table styling at w3schools.
Do It Yourself
Displaying an Associative Array in a Table
Get the tables.php file from the Full Stack Example Pack and run it by loading it into a browser through XAMPP or a similar server. You will see an example of a table that was produced by looping over a PHP associative array, using the above tips to create a striped effect.
Here’s the PHP while loop that dumps the keys and values of an associative array into the HTML of the page:
foreach ($user as $key => $value) {
    echo "<tr><td>$key</td><td>$value</td></tr>";
}
And here’s the CSS rule that creates the striped effect:
tbody tr:nth-child(odd) {
    background-color: lightgray;
}
Try changing even to odd in the above rule. Does it have the effect you expected? What happens if you change tbody to thead, or remove tbody altogether? Do these changes have the effects you expected?
Web Apps Based on C.R.U.D.
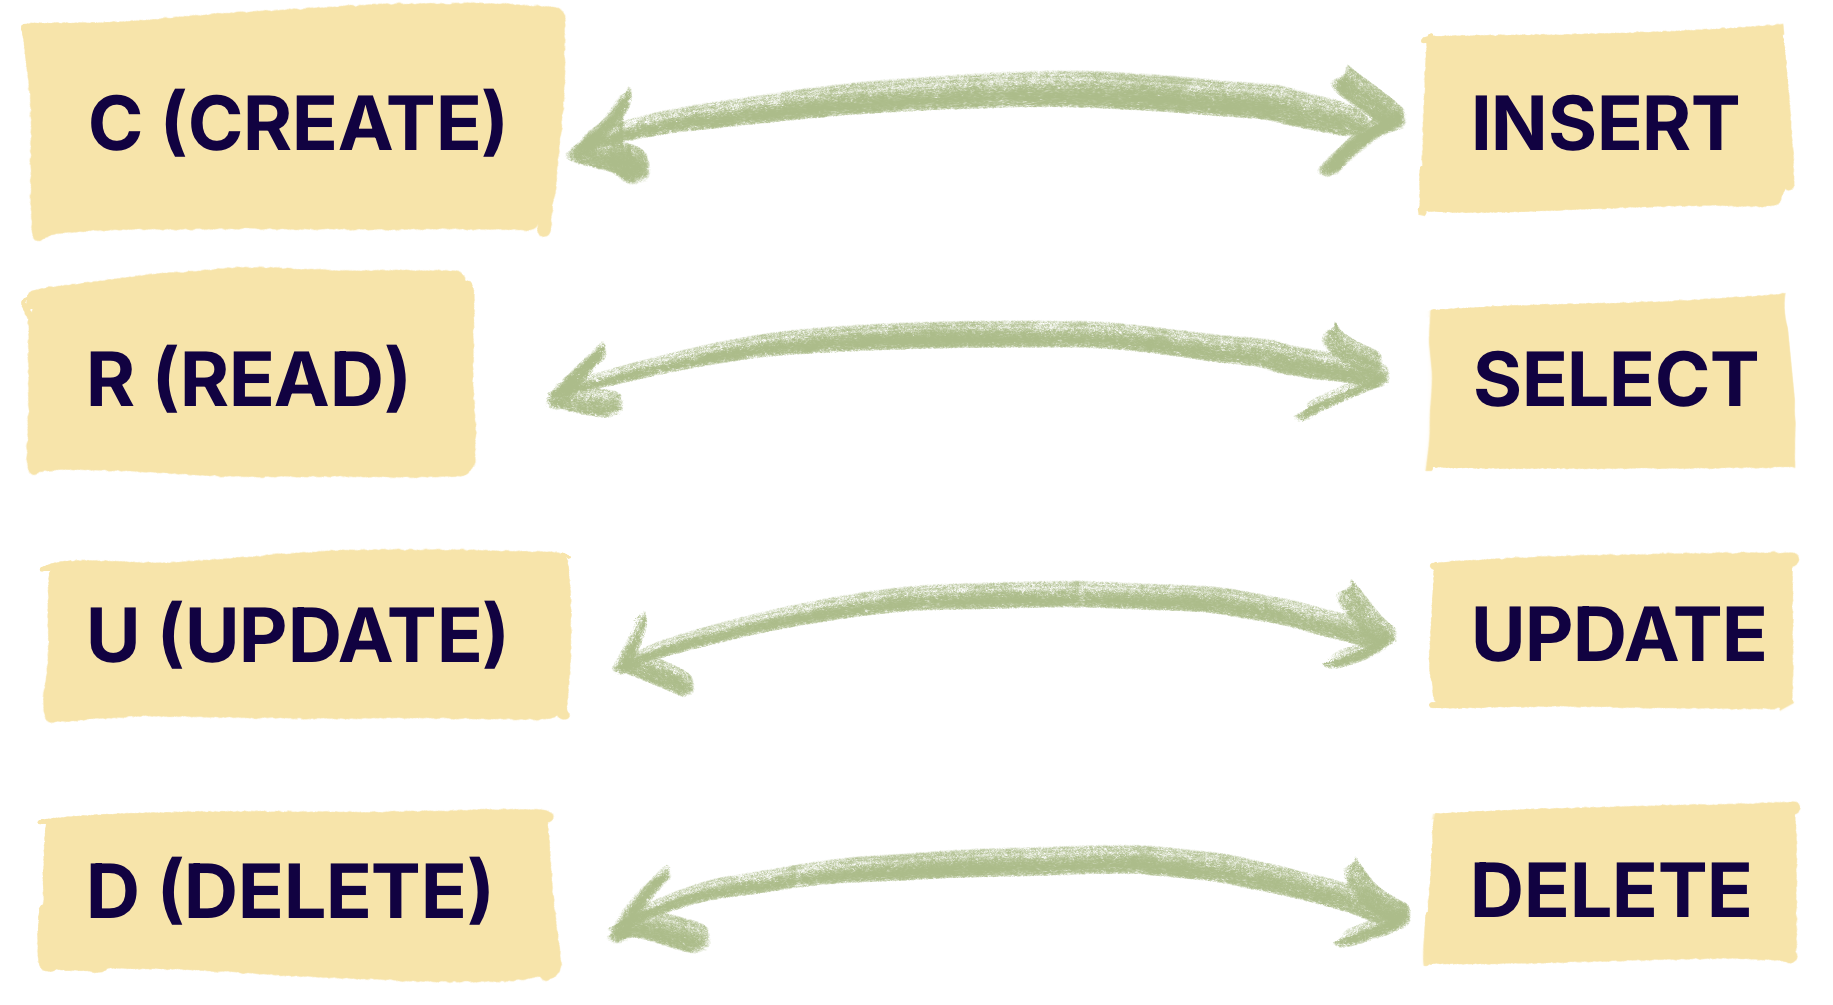
Congratulations! You now have most of the tools you need to write a basic CRUD-based web app. The acronym “CRUD” stands for the four basic database operations: Create, Read, Update, and Delete data. Most web apps, from shopping sites to discussion forums, can be viewed by the software developer as nothing more than an elaborate, constrained, user-friendly database interface. When users add posts or put things in a shopping cart, they’re Creating database records (via INSERT if it’s an SQL database). When they view a product list or a list of discussion topics, they’re Reading records from the database (via SELECT). When they change or remove discussion posts or items from the shopping cart, they’re Updating or Deleting database records (via UPDATE or DELETE).
 Check Your Understanding
 Coding Practice
- Finish the code for showsingleuser.php in the select_to_code folder of the sample code. It should display the name, dates, and grades for the selected user, formatted nicely.
- Change example.php so that it retrieves the first name, last name, student id, and midterm and final exam grades from the database and then displays each row from the result set as a row of an HTML table element with columns for name (first and last), id, midterm, and final. The link to showsingleuser.php should be on the student name. Use CSS to make it look good.
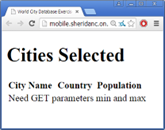
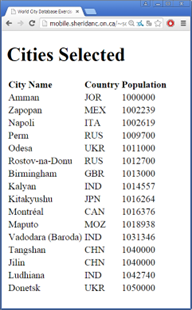
- Get the world.sql file from the data folder of the Full Stack Example Pack. This file contains three tables: City, Country and CountryLanguage. Import it into a database through phpMyAdmin. Create a web app that receives two GET parameters called min and max, then displays a sorted list of all the cities with the given population range. Your list should include the city name, the country code and the population. If min or max is not present, you should output an error message. Below are two examples of what the output might look like (the example output uses a table element with minimal styling, but you can present the data however you like). In the first case, no parameters were sent, in the second case
min=1000000andmax=1050000.
Note: This database uses the ISO8859-1 character set, which must be converted to utf-8 in order for the non-English characters to display properly. You can use the iconv function as shown below to convert a string before displaying it if necessary.
$str = iconv("ISO8859-1", "utf-8", $str);
(Optional) If you have been following the optional sections above on object-oriented programming, you can use the City class defined in city.php in the data folder of the Full Stack Example Pack for this exercise. Each time you retrieve a row, create a new City object and push it into an array. Then when it’s time to display the cities, use the toTableRow method to create each row of the table.
- Finish the code for deleteuser.php from the select_to_code examples of the Full Stack Example Pack. When you’re done, it should tell the user the name of the student who is about to be deleted (using a SELECT query) and then ask if they are sure they want to delete. Give them “yes” and “no” options (either links or buttons). The no option should send them back to the showsingleuser.php, sending the id. The yes option should send them to a new PHP file that does the DELETE operation for the selected id and prints a success message if all went well (e.g. “Student Drizzt Do’Urden was deleted.”).(Optional) Create a JavaScript timeout on the delete page to wait for 5 seconds, then redirect back to example.php (you can di a bit of research on your own to figure out how to do the redirect).
- Modify your solution to the cities.php exercise from the last section so that the name of each city can be clicked. When it’s clicked, the user should be redirected to cityupdate.php. This page should have a form showing the name of the city and should have an input field pre-filled with the current population of that city. If the user changes and submits the form, it should direct to changepop.php where it updates the population for that city with the new information, then prints a success message.

Feedback/Errata