Introduction to Web Apps
3 Get Your Own Web Server
 Learning Outcomes
When you have completed this chapter, you will be able to:
- Host a simple web page on your local machine using XAMPP
- Relate your machine’s local file structure to the structure of a URL.
This section walks you through the process of installing a LAMP-like software stack on your own machine. This is not really essential until you get to the Programming on the Server Side section of this book, so it could safely be skipped for now. But going through this process will help you to understand the process of hosting a completed web site, and will give you insights into how the web works.
Install and Run XAMPP
You can use XAMPP to turn your computer into a web server. XAMPP stands for Cross-Platform (that’s the X), Apache, MariaDB, PHP, and Perl. It’s basically a LAMP Stack except that it can be used on Linux, Windows, or MacOS.
 Do It Yourself
Take a moment to download and install XAMPP on your machine. You can find it at https://www.apachefriends.org/index.html. For best results, let the software install wherever it wants to (on Windows, it will want to be in C:/ instead of more standard locations like C:/Program Files).
Once the installation is complete:
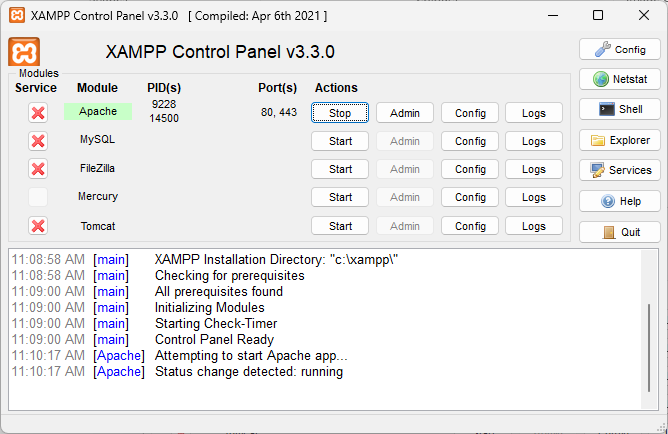
- Run XAMPP. You should see a control panel like the one in Figure 1.
- Press the “Start” button beside Apache to start the web server.
- If the first port number listed under “Port(s)” is not 80, take note of it.
- If the first port number is 80, use Chrome to navigate to http://localhost/ by typing “localhost” into the address bar and hitting Enter. If the first port number shown is not 80, use http://localhost:port/ instead, where port is the port number.
- When you hit enter after step 4, Apache should redirect your browser to http://localhost/dashboard and show you some info about your installation.

What Just Happened?

Here’s a deeper dive into what you just did…
Localhost is an alias for Internet Protocol (IP) Address 127.0.0.1. All Internet domain names (localhost, google.com, example.com, and so on) are aliases for an address such as this. For example, typing http://example.com into Chrome’s address bar sends a request to IP Address 93.184.215.14. If you’re curious, you can look up the IP addresses of domain names using a web app such as this one. The localhost address 127.0.0.1 is special – it’s a home or loopback address that always maps back to the originating machine.
So, typing http://localhost/ into the Chrome address bar causes an HTTP Request to be sent to your local machine. This request is received by the operating system and handed over to Apache. Apache interprets this as a request for an “index” file that is stored in a special folder called htdocs. On a windows computer, you’ll probably find this in C:/xampp/htdocs, or wherever you installed XAMPP.
If you go and look in the htdocs folder on your computer, you’ll see a file there called index.php and a folder called dashboard. The index.php file is a PHP program that Apache ran in response to the original request. That program caused it to send a redirect message back to Chrome. A redirect tells the browser to modify the address and try again. Chrome responded with a request for http://localhost/dashboard/. Apache interpreted this as a request for an index file in the dashboard folder inside htdocs. If you look in that folder, you’ll see an index.html file. This is the file you’re looking at on the browser.
If you would like to see the back and forth messages between Chrome and Apache, open the Network tab in Chrome Developer Tools and load http://localhost again (see Client-server Architectures for how to open the Network tab. In the list of messages, you’ll see a request for localhost, followed immediately by a request for dashboard.
 Do It Yourself
It’s time to create and host your first web page.
- Make sure the XAMPP control panel shows that Apache is running.
- On your computer’s file explorer, go back to the htdocs folder.
- Create a new folder inside htdocs called hello.
- Open notepad or your favorite text editor and create a new empty file. Save it in the hello folder and call it index.html.*
- Enter (or copy and paste) the text shown below and save again.
<!doctype html> <html> <head> <meta charset=utf-8> <title>Hello!</title> </head> <body> <p>Hello, World!</p> </body> </html> - Point your browser to http://localhost/hello to see the result. Right click and select view page source to see the source code for the page.
- Congratulations! You just created and hosted your first web page.
* In Windows, you should make sure you can see all file name extensions. Windows hides this part of its file names by default, but you’re a power user now and you need to see them. One way to do this in Windows 11 is to go to the file explorer, then go to View > Show > File Name Extensions.
Mapping Local Files to Server Files
When XAMPP is running on your machine, the address http://localhost maps to the htdocs folder on your local machine. When you visit http://localhost/hello you are visiting the .../htdocs/hello/ folder of your local machine. By default, Apache will look for an index.html or index.php file there. If it finds it, it will load and display it. If not, it will probably display a listing of all the files in the folder (though this behavior is configurable so not all servers will act in the same way). If you want to load a different file from that folder you can specify that in the URL. For example http://localhost/hello/about.html will load the about.html file from the ../htdocs/hello/ folder of your local machine, if that file exists.


Feedback/Errata