Programming on the Client Side
21 Events
 Learning Outcomes
When you have completed this chapter, you will be able to:
- Describe how JavaScript implements event-driven programming.
- Create dynamic user interfaces which respond to user events by making changes to the DOM.
- Use the window load event to achieve better separation of concerns and place your code in its own namespace.
In the previous two chapters you learned how to manipulate the DOM to produce different kinds of output from a JavaScript program, and you learned some important properties of JavaScript functions. In this chapter, you’ll learn how to trigger functions in response to events like mouse clicks and movements.
Event Listeners
JavaScript supports a number of ways to register a function as an event listener, but it is generally considered best practice to call the element’s addEventListener method. This method requires an argument of type string that names an event type, and an argument of type function that specifies which function to call when the event happens.
Here’s an example:
<body>
    <p id="clickme">Click Me!</p>

    <script>
        function respond(event) {
            alert("You clicked me!");
        }
        const node = document.getElementById("clickme");
        node.addEventListener("click", respond);
    </script>
</body>
In the above script element, a function is defined named respond. This function accepts a single argument, which is expected to be an object that contains information about the event that triggered the function call.
After declaring the function, an element is retrieved from the DOM, and its addEventListener method is called to register the respond function as a listener (callback function) for the click event. The respond function will now be called whenever that element is clicked.
 Do It Yourself
To see the above code in action, get the clickme.html file from the Full Stack Example Pack. Load the page into a browser and click the p element.
Note the use of CSS to make the p element look and behave a bit more like a button. This involves the hover pseudo-class and the cursor property, neither of which we have seen before.
#clickme {
    background-color: royalblue;
    cursor: pointer;
}
#clickme:hover {
    background-color: darkslateblue;
}
The first rule sets the cursor property for the element. This property sets the cursor’s appearance whenever it is positioned over the element. The second rule makes use of the :hover pseudo-class so that it takes effect whenever the mouse hovers over the paragraph. Because it appears lower in the style sheet, it will supersede the properties in the first rule. Together, these two rules help signal to the user that the element is clickable.
Hover effects are a good user interface choice for users with a mouse or a trackpad, though it’s important to remember that they may not work as well for mobile, touch-screen users. Nothing in your user interface should rely exclusively on hovering.
What other CSS property values could you add to the rules above to make it even clearer that this paragraph can be clicked?
Many JavaScript programmers prefer not to declare a single-use function when adding an event listener, but instead just place an anonymous callback function into the second parameter position, like this:
node.addEventListener("click", function(event) {
    alert("You clicked me!");
});
Note the brackets and semicolon at the end of the statement. Make sure you understand the role that each symbol plays in the syntax of the statement.
 Do It Yourself
See clickme2.html from the Full Stack Example Pack for an anonymous callback function as a listener.
Separation of Concerns
 In the clickme.html and clickme2.html examples, you might have noticed that the script element is not in the head element. It’s at the end of the body. On the face of it this seems wrong – the body element is supposed to be for elements that are visible on the page, while the head element is for non-visible elements. Putting script elements in the body seems to be a violation of the usual separation of concerns between the head and the body.
 Do It Yourself
What would happen if we moved the script element into the head? Try that out, either in clickme.html or clickme2.html and watch for the error message in the JavaScript console. Can you figure out what went wrong?
The problem with adding event listeners in the head is that the browser interprets the HTML file from top to bottom, building the DOM as it goes. It runs script elements immediately whenever it finds them. So if the script element is in the head, the browser will execute it before it creates any elements in the body. In the above example, the script executes before there is an element in the DOM with an id of “clickme”, so the document.getElementById("clickme") step fails and returns null, eventually causing an error when we try to execute the addEventListener method.
Waiting for the Load Event

The solution to the above problem is to link your code to the window object’s load event. The load event happens exactly once in the life cycle of the page, after the DOM has been built.
The template below can be used in a script element or .js file and will cause the browser to delay the execution of your JavaScript program until the rest of the page has finished loading.
window.addEventListener("load", function(event) {

    // your code goes here!
    // add listeners, etc.

});
Note that your code is now going to be placed inside an anonymous callback function that will be executed once the load event for the window object is triggered.
Taking advantage of JavaScript’s first class functions, you can write any code you want, including function definitions, inside another function, so this solution works really well and allows you to put your code anywhere on the page you want. Another advantage is that now all variables you use (including function names) become local to the anonymous function you assign to the load event. This is good because it creates a private namespace for your code, minimizing potential variable name conflicts with other JavaScript code or libraries you might be using. The big tradeoff is that you won’t have debugging access to your functions and variables in the console.
From this point onwards, we will adopt the convention of putting all our JavaScript code into the head element as part of the window object’s load event listener.
 Do It Yourself
See clickme3.html from the Full Stack Example Pack for an example of how to use the window load listener to put all your code inside the “head” element. In this code, the stylesheet and the JavaScript code are loaded from separate folders named css and js. This achieves an extra level of separation of concerns.
Buttons
 Using a div or a p element as a button, as in clickme2.html, is not ideal. Recall that in the separation of concerns between HTML and CSS, we should always choose the most appropriate element type for each piece of content – the element that makes the most semantic sense. If you are using a piece of text like a button, HTML has an element for that already.
You can define a button using an input element like this, where the type attribute dictates that this element is a button and the value attribute holds the button text:
<input type="button" value="Press me">Note that input is an empty element, like img or link. No closing tag is required.
To make a button respond to click events, you can give it an id and add a listener to it. You can also style a button using CSS box model, font, color, and other properties (the default styles are pretty basic). We’ll have a lot more to say about input elements in the chapter on HTML forms.
 Do It Yourself
Get buttons.html from the Full Stack Example Pack and load it into a browser. This is an example that shows two buttons. One has the default style and the other has been styled using CSS rules. Input elements are inline elements so they’ve been put inside div elements to make them appear one on top of the other.
The hover pseudo-class is necessary to change the appearance of the button when it is hovered over, and the active pseudo-class changes the style while the button is being clicked.
Here’s the relevant CSS:
#clickme {
    cursor: pointer
}
#clickme:hover {
    background-color: #4144e1;
}
#clickme:active {
    background-color: #41a4e1;
}
There is actually nothing special about a button input element other than the default styling, at least not for the kind of apps we’re writing right now, but it is much more semantically correct to choose this element than to use a p element.
Other DOM Events
The click event is just one of many kinds of events your program can respond to. Here are a few more:
- dblclick: Triggered when an element is double-clicked.
- mousedown, mouseup: Triggered when a mouse button is pressed or released over the element.
- mouseover, mouseout: Triggered when the mouse is moved into or out of the bounding box of an element.
- mousemove: Triggered every time the mouse moves (even just one pixel) while it’s over the bounding box of an element. This can generate a lot of events!
 Do It Yourself
Get clickme3.html and its associated CSS and JS files from the Full Stack Example Pack. Run it in a browser and try the following:
- Modify clickme3.js so that text is sent to the JavaScript console instead of an alert box.
- Then change the event listener so that it responds to the mouseover event.
- Now try dblclick.
- Now try mousemove, and prepare to see a lot of events triggered.
- Add a counter variable to the load function and increment it on each mousemove event, then report the event count in the console to see how often mousemove gets triggered.
Listener functions always have an event parameter. A listener is passed a special event object that represents the event that caused the function call. You can use this object to access information about the event, such as which element triggered the event event.target, which mouse button was pressed event.button, the location of the mouse on the page when the event happened (event.pageX, event.pageY), and so on.
You can also get easy access to the element you added the listener to using the this keyword.
 Do It Yourself
If you have access to your browser’s developer tools, try this in the JavaScript console for this textbook.
document.getElementById("diy").addEventListener("click", function(event) {
    console.log(event.pageX + "," + event.pageY);
});
Now when you click on this box, you will get to see the exact X and Y location of your click, in pixels relative to top left corner of the page. If you change pageX and pageY to clientX and clientY, you get the location relative to the top left corner of the browser window.
The event object contains a number of useful fields, but probably the most useful is event.target, which returns the DOM node that was the subject of the event.
 Do It Yourself
If you have access to the developer tools, try this in the JavaScript console:
document.getElementById("diy2").addEventListener("click", function(event) {
    console.log(event.target.innerHTML);
});
Now clicking this box should report the contents of element you clicked. If you click on different parts of this box, you’ll get different elements. Note that you added the event listener to the entire box, but event.target tells you which element within that box was clicked.
If you want to make sure you access the element that the listener was added to, use the keyword this instead.
 Do It Yourself
If you have access to the developer tools, try the following in the JavaScript console:
document.getElementById("diy3").addEventListener("click", function(event) {
   console.log(this.innerHTML);
});
Now clicking this box should get you the contents of the entire box, no matter where you click on it.
Drop-down and Pop-up Menus
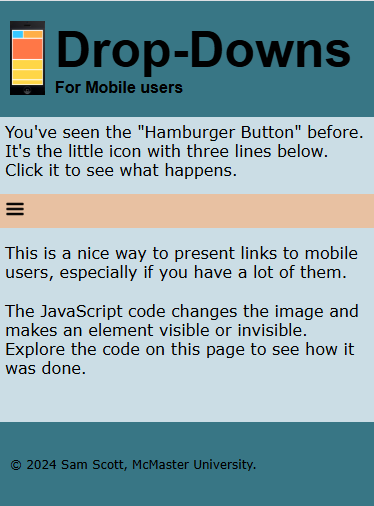
You see drop-down and pop-up menus on many web apps designed for both desktop and mobile viewing. These menus are created with a mixture of JavaScript and CSS, often involving CSS Animations as they open and close. The programming behind these menus is very simple. Typically a JavaScript function responds to a click or a mouseover event by changing the display or visibility property of a div or similar element. For example, when display is set to none, the element will be hidden and will take up no space on the page. Setting it to flex, block, or some other value makes it appear on the screen. Sometimes properties of the element that was clicked are also changed (for example, a hamburger icon may turn into an X icon when the menu is open, as in the examples below:
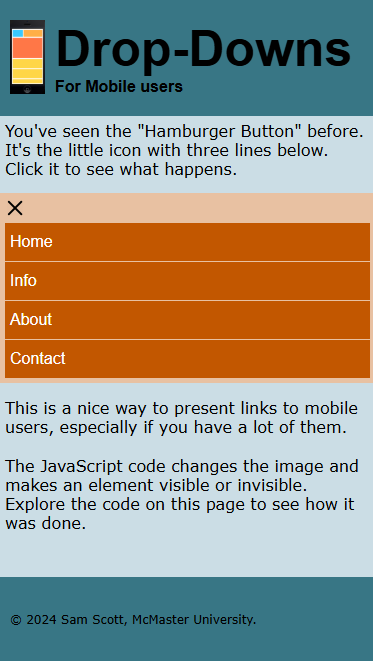
 Do It Yourself
Get the files in the hamburger folder from the Full Stack Example Pack (hamburger.html plus the files in the css, js, and images folders).
Open hamburger.html in a browser, right click and inspect the hamburger icon, then click it and watch the changes to the DOM as they happen.
If you take a look at the hamburger.js file, you’ll see that it is using the keyword this to avoid having to use getElementById.
 Check Your Understanding
 Coding Practice
- Get clickme3.html and its associated CSS and JS files from the Full Stack Example Pack. Alter it so that instead of popping up an alert when the heading is clicked, the user is asked for their name and then the message “Hello name” is displayed somewhere on the page. Use CSS to make it prominent. Each time a new name is entered, a new message should appear on the page, without erasing the old one.
- Create a web page that asks the user a true or false question and give them a button to click for each option. Display a success or fail message somewhere on the page in response to their click.
- Create a web page with two buttons on it and a big number “1” somewhere on the page. One button should say “count” and the other should say “count by 5’s”. When they press the “count” button, the counter should go up by 1. When they press “count by 5’s” it should go up by 5. Use a variable inside the load event function to keep track of the current state of the counter
- Get messaging.html from the Full Stack Example Pack. Read the instructions in the comments that appear at the top of the page source and finish the app according to these instructions.
- Create a page with a single div element with a fixed width and height and a border around it. Include a p element underneath it with an id so you can use it as output. Use the mousemove event on the div element to count the number of times the event is triggered and display the updated count in the p element.
- Get the files in the catchTheRabbit folder from the Full Stack Example Pack. Read the instructions in the comments that appear at the top of catchTheRabbit.html and finish the app according to these instructions.
- Lottery Balls revisited. In the Arrays and Objects chapter, you created an app that let the user draw lottery balls until they were finished. Convert this app so that it presents two buttons: choose ball and stop. Whenever they click choose ball it should randomly pick a ball from the array and display by adding a small div to the page. The div should be styled to look like a tile and should use the CSS property
float: leftso that they will “stack” in a flexible way. When they click “stop”, or when they get a red ball (whichever comes first) you should remove or disable the choose ball button and display their final score on the page. - Go back to the moveme.html file from the Full Stack Example Pack. In previous exercises, you used prompt dialogues to get the user to move the ball around in response to U, D, L and R. Now you should add buttons to the page for up, down, left and right and move the ball in response.
- Modify moveme.html from the Full Stack Example Pack so that the ball follows the mouse as it moves. When the mouse moves over the area of the container div element, the ball should adjust its position to center itself around the mouse location. The tricky part here is that you have to calculate where the event happened inside the container div in order to set top and left for the ball div. If you added the event listener to the container, then you can calculate the location using its “offset” properties, which hold you the top and left coordinates of the container:
let x = event.pageX - this.offsetLeft
let y = event.pageY - this.offsetTop
- The file sideMenus.html from the Full Stack Example Pack contains some very simple starter code. When you view this file you will see what the page is supposed to look like when the user clicks Menu 1. See if you can add JavaScript and make other changes so that when the page starts, the menus are not highlighted, but Menu 1 pops up when the user clicks it and hides itself when the user clicks again. Now add the other two menus to sideMenus.html. The content of these menus is up to you.
- Now try to get the menus in sideMenus.html to respond to mousing over and mousing away from the buttons and/or menus. This is actually a little trickier to get right than the first version since we need the user to be able to move into the menu element without the menu disappearing. To make things more user friendly, try adding a timer so that when the user mouses away, the menu hangs around for a second before closing. But if the user moves back into the menu area, you should cancel the timer.


Feedback/Errata