Programming on the Client Side
26 Advanced DOM Manipulation
 Learning Outcomes
When you have completed this chapter, you will be able to:
- Traverse the full DOM structure for a web page by accessing DOM node fields.
- Use the innerHTML field to create, insert, delete, and update DOM elements dynamically.
- Use DOM methods to create, insert, delete, and update DOM elements dynamically.
It’s time to get more serious about the HTML DOM.
Up until now you have navigated the DOM by using methods like getElementById or querySelectorAll to pull out specific elements. You have also made changes to the DOM by accessing a node object’s innerHTML field, or by changing attributes and CSS style properties. These techniques can get you a long way, but there will be times when you will want to navigate and manipulate the DOM in more sophisticated ways.
The Full DOM
Consider the HTML source below:
<!DOCTYPE html>
<html>
<head>
    <title>DOM Example</title>
    <meta charset="UTF-8">
</head>
<body>
    <div id="div1">This div has ID "div1"</div>
    <div>This div has no ID</div>
    <div>This div has no ID</div>
</body>
</html>
Following the analysis from the first chapter on The Document Object Model, we should expect the DOM for this document to look like Figure 1 below.
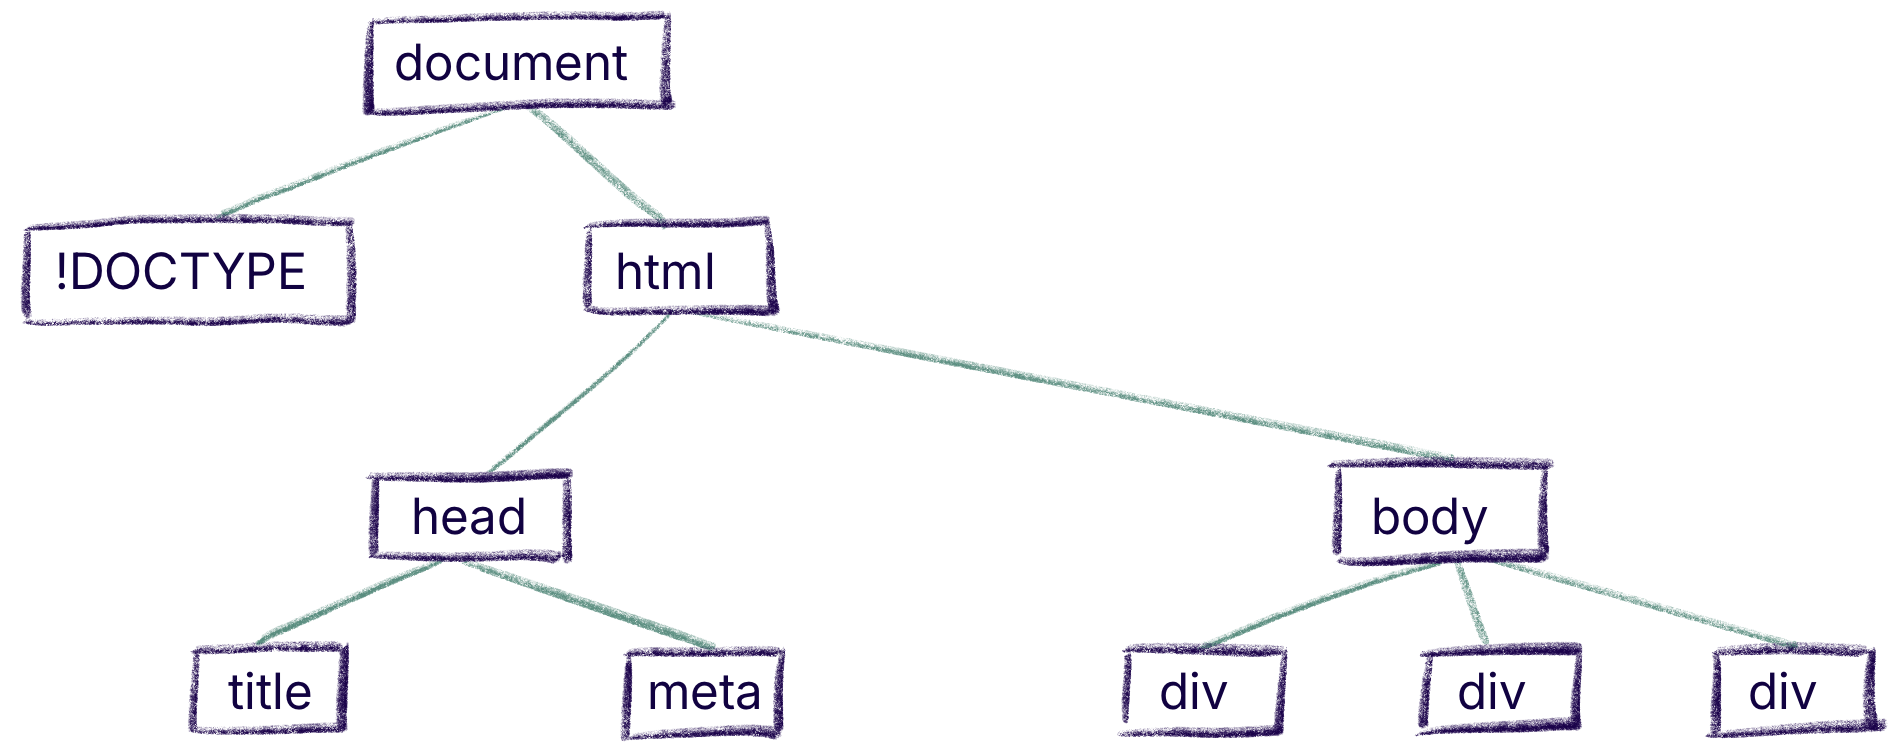
In Figure 1 above, there are 10 nodes. The root node is the document object. It has two children or child nodes. Each of the children share the same parent. The line from parent to child means that the child is contained within the parent. If there are many children, they are usually shown in order from left to right. Nodes that share a parent are siblings. Each child of the body node has two siblings. Each node contains a field for every HTML attribute as well as style and className fields.
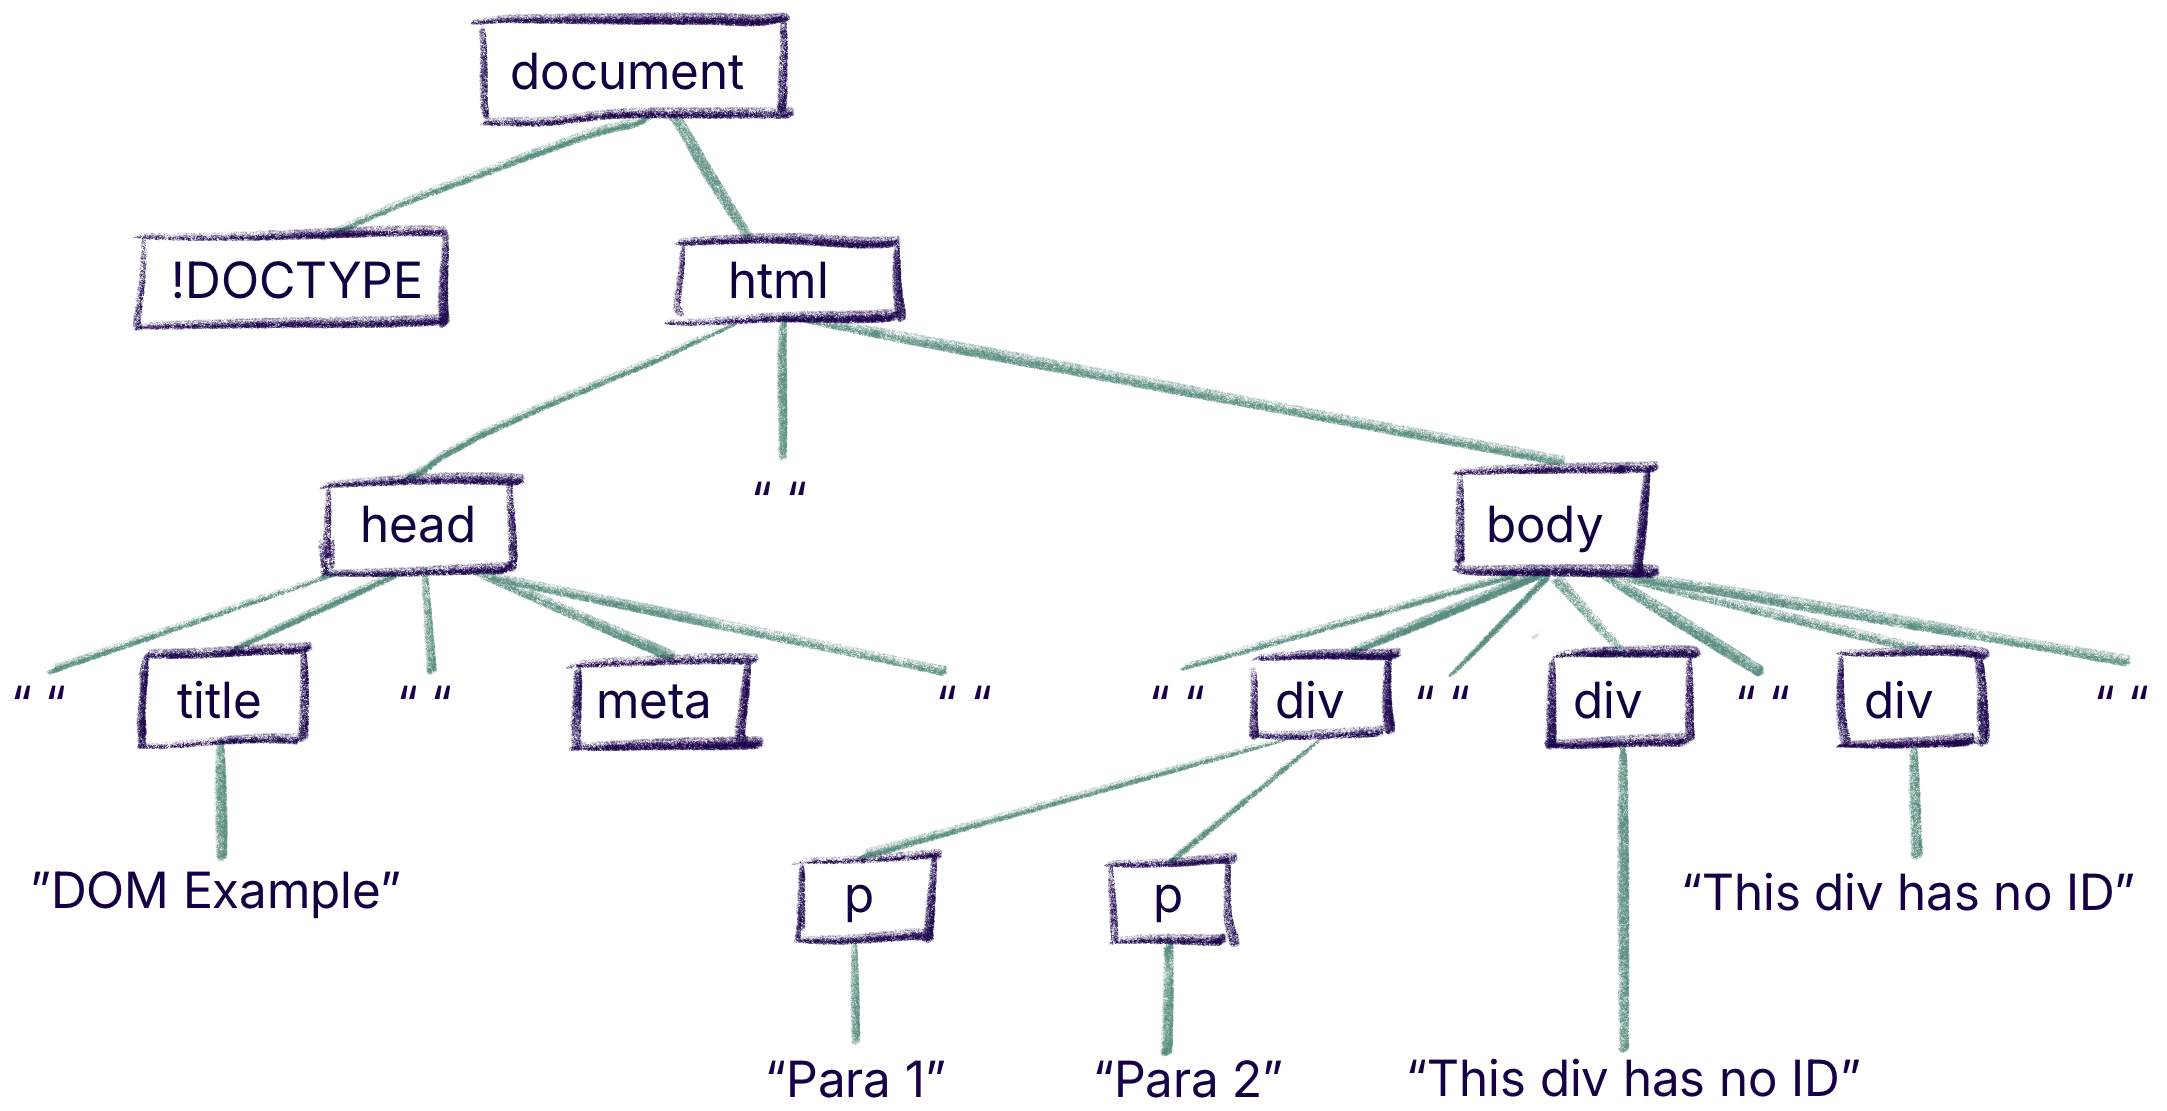
So far, so good. But this picture is an oversimplification. In fact, the browser creates a surprisingly complicated DOM from this source, as shown in Figure 2 below.
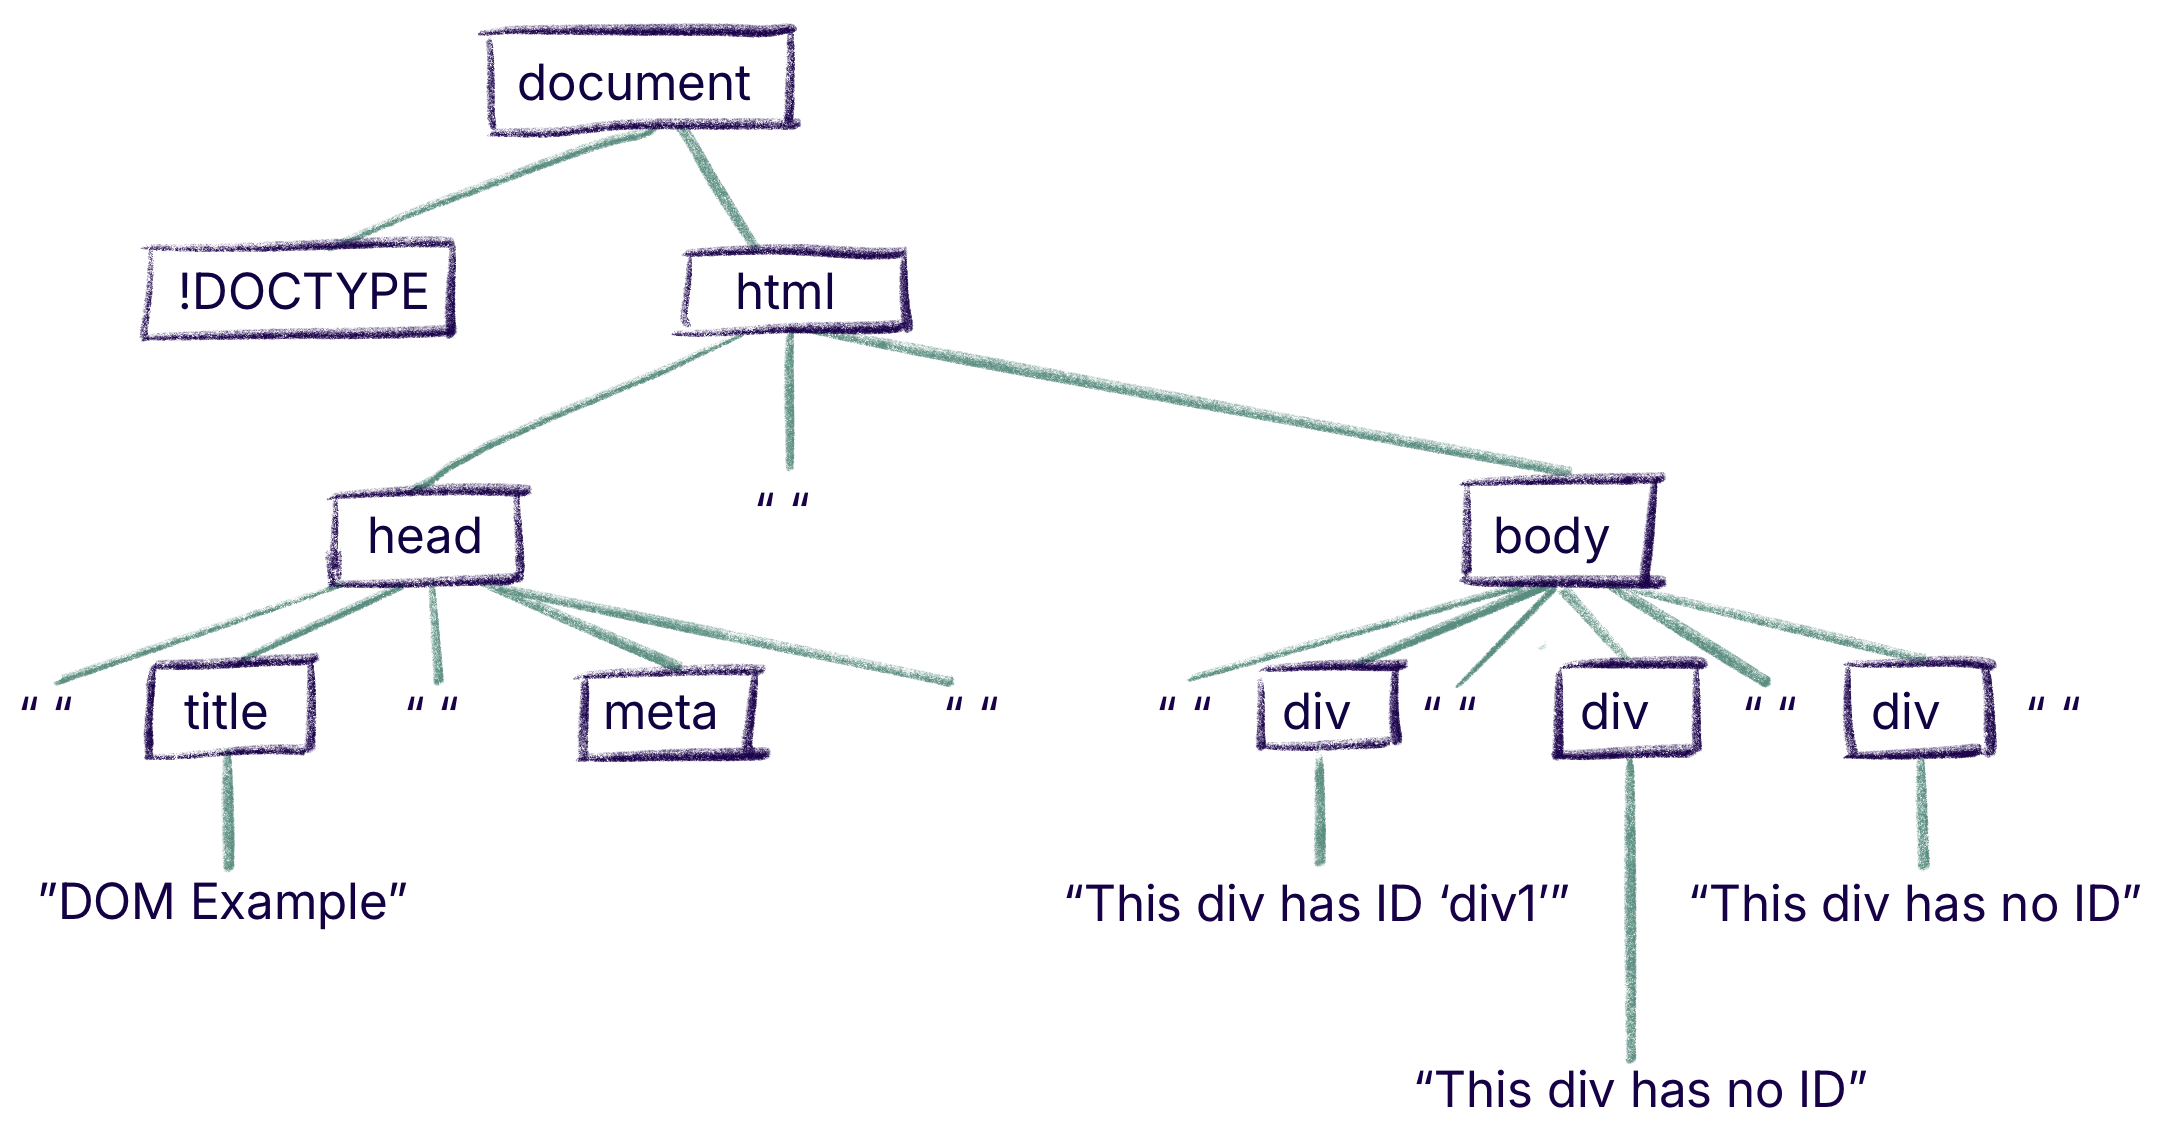
The items in quotation marks in Figure 2 are TextNodes. They are a different kind of object from a regular DOM Node. They don’t have attributes, style, className or innerHTML. They just have a field named data that contains a string representing the text. When the browser reads the document, a TextNode will be created for almost every sequence of characters in the document that is not enclosed within < and > angle brackets, including every stretch of whitespace characters at the beginning or end of a line. The only stretches of whitespace that don’t get turned into TextNodes are those that are not inside or between the head and body tags.
Traversing the DOM
The HTML DOM is a collection of Node objects that are all linked together into a tree structure with the document object at the root. In order to effectively manipulate the DOM, you will sometimes have to understand the various ways to traverse this structure, moving from node to node by following the links.
Every DOM Node contains the following fields:
- childNodes: contains an array of all its child nodes
- children: contains an array of all element child nodes (excludes text nodes, comments, etc.)
- firstChild: contains its first child
- lastChild: contains its last child
- nextSibling: contains its sibling to the right
- previousSibling: contains its sibling to the left
- parentNode: contains this node’s parent
- data: if this is a TextNode, contains its text
 Do It Yourself
Load domExample.html from the Full Stack Example Pack into a browser. It contains the source code shown in the text above. Open the JavaScript console, and try the following. Try to predict the result of each before you hit enter:
document.childNodes
document.firstChild
document.lastChild
document.childNodes[0]
document.lastChild.childNodes
Can you explain the result in each case?
Now try this and explain the result:
document.lastChild.childNodes[0].childNodes
Now for a challenge. Find as many ways as you can to get the TextNode from the second div element. Remember that the TextNode is a special child node, not an attribute or a value (i.e. don’t use innerHTML).
Using innerHTML to Modify the DOM
One quick-and-dirty way to make modifications to the DOM is to alter the innerHTML of a Node. You’ve probably already used this field to change text, but it’s actually much more powerful than that. With the innerHTML field of a node, you can quickly delete all its child nodes, replace them with new ones , or append child nodes to the end of its existing list of child nodes.
Delete All Child Nodes
If you assign an empty string to the innerHTML field of any DOM node, you will delete every node that is a child of that node.
 Do It Yourself
Load domExample.html from the Full Stack Example Pack into a browser and try this command in the JavaScript console. Predict the result before you hit enter.
document.querySelector("body").innerHTML = "";
Now check the resulting DOM in the Inspect Elements view of the developer tools or by unfolding the document object in the console.
Reload and try again with the command below, once again predicting the result before you execute the command and checking the results in the DOM afterwards.
document.lastChild.lastChild.innerHTML = "";
Finally, go to page source, and compare that to what you see in the Elements tab in the developer tools. Can you explain the difference?
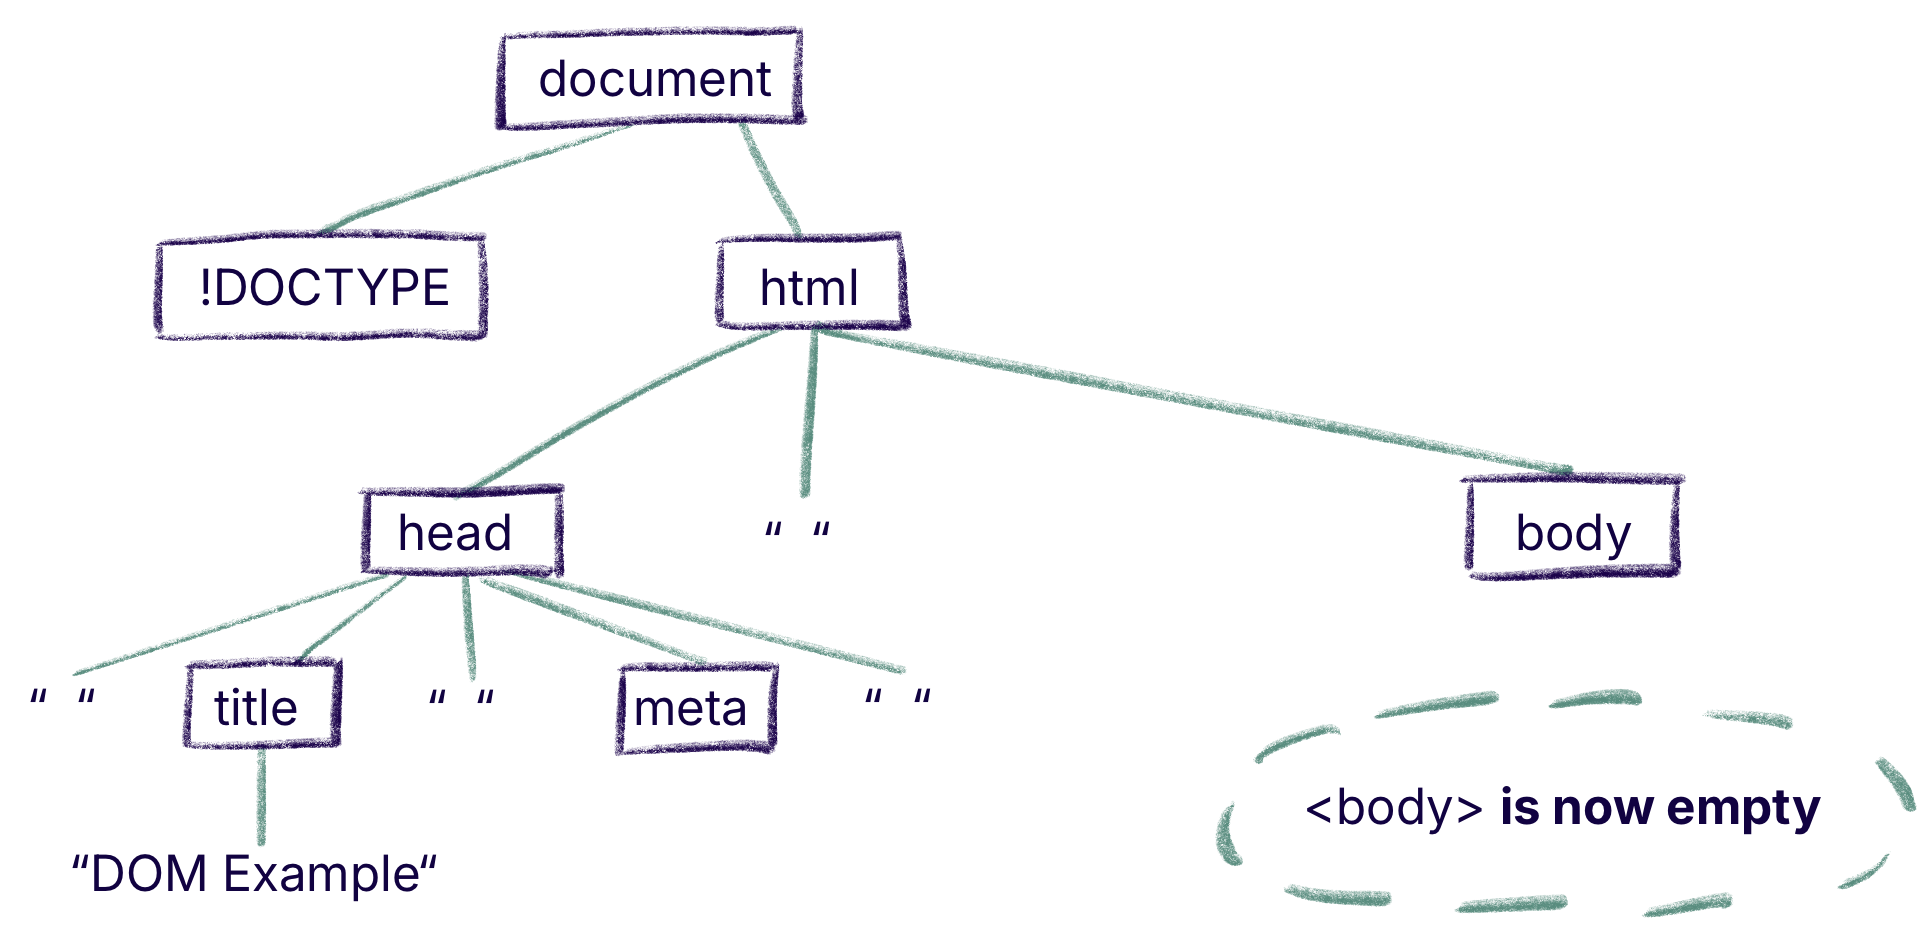
After the operation in the last Do It Yourself box, the DOM tree looks like the one in Figure 3 below.
Replace All Child Nodes With a Text Node
If you put some plain text in the string you assign to innerHTML, you will replace all the children of that node with a single TextNode (or insert a new Text Node if the element had no children).
 Do It Yourself
Load domExample.html from the Full Stack Example Pack into a browser and try this command in the JavaScript console.
document.querySelector("body").children[1].innerHTML="Hello";
What does the document tree look like now? Now make the same change, but to the entire body element. Now what does the tree look like?
Replace All Child Nodes With New Nodes
 Do It Yourself
Load domExample.html from the Full Stack Example Pack into a browser and try this command in the JavaScript console.
document.getElementById("div1").innerHTML = "<p>Para 1</p><p>Para 2</p>";
What does the DOM tree look like now?
In the example above, the TextNode child of the selected div element is deleted and replaced with two p nodes, each with their own TextNode contents. This is true DOM manipulation because you have removed one DOM element and added two new ones in its place.
The new DOM tree looks like Figure 4 below:
Append New Child Nodes
Finally, you can always append new DOM elements through string manipulation, by appending new HTML code onto an existing innerHTML field.
 Do It Yourself
Load domExample.html from the Full Stack Example Pack into a browser and try this command in the JavaScript console.
document.lastChild.lastChild.firstChild.nextSibling.innerHTML +=
    "<p>Here is a <a href='http://www.google.ca'>link</a></p>";
Note that the above is taking advantage of the fact that double and single quotes can be used interchangeably in both HTML and JavaScript.
Draw the resulting DOM tree.
Creating New Nodes From Scratch
Manipulating the innerHTML field is a powerful technique for changing the HTML DOM and is often easier than other methods. But this kind of string manipulation can get complicated, can be a source of hard to find errors, and violates our beloved separation of concerns by mixing HTML and JavaScript code.
It is more elegant and sometimes easier to create the new DOM Node objects and insert them into the tree yourself rather than trying to manipulate the innerHTML string.
To create a new DOM Node, you can use the document.createElement method, providing the tag name as a string parameter.
Here are some examples:
const d = document.createElement("div");
- creates a new div node
const e = document.createElement("a");
- creates a new a node
e.href = "http://www.google.ca";
- sets the href attribute of the new a node
e.innerHTML = "Click for Google."
- adds a TextNode to the new a node
The above code creates two new DOM Nodes and stores them in variables named d and e respectively. The div node in d is empty, but we can make the e element its child by using the appendChild method.
d.appendChild(e);
- adds e as the last child of d
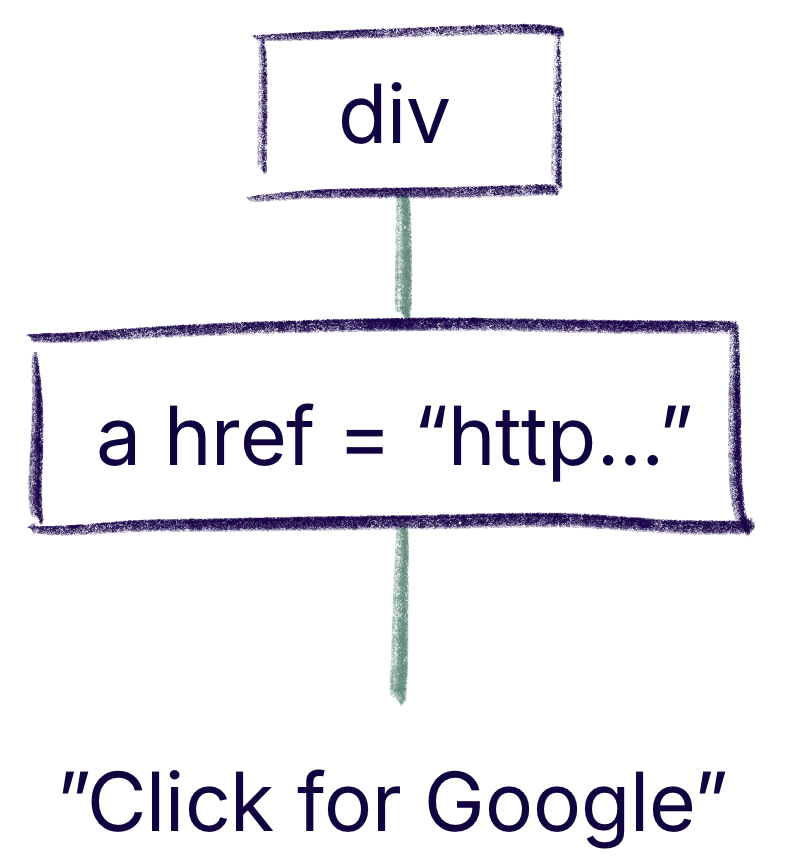
What we now have is a little piece of a DOM, depicted in Figure 5 at right. At the moment it is not included in the document object tree, but we could easily add it as the last child of the body of any document by using appendChild again, like this:
document.body.appendChild(d);
Note the use of the body field above. This is a special field in the document object that takes you straight to the body element. (There’s also a head field.)
 Do It Yourself
Load domExample.html from the Full Stack Example Pack into a browser and try the examples from the text above in the JavaScript console.
Here are the relevant commands again:
const divElem1 = document.createElement("div");
const aElem1 = document.createElement("a");
aElem1.href = "http://www.google.ca";
aElem1.innerHTML = "Click for Google.";
divElem1.appendChild(aElem1);
document.body.appendChild(divElem1);
Check that the new div is appended to the body and that the link works. Then use the same code twice more to add two identical new elements. What if you wanted to add 100 new identical elements? How could you do it?
It is also possible to insert a new child anywhere within the list of existing child nodes, using the insertBefore method. The insertBefore method requires three things: the parent Node, the new Node to insert, and the child of the parent you want to insert in front of, like this:
parent.insertBefore(newNode, child);
 Do It Yourself
Load domExample.html from the Full Stack Example Pack into a browser use the JavaScript console to create the new node divElem as before:
const divElem2 = document.createElement("div");
const aElem2 = document.createElement("a");
aElem2.href = "http://www.google.ca";
aElem2.innerHTML = "Click for Google.";
divElem2.appendChild(aElem2);
Now get the second div and the body element and store them in variables.
const parent = document.body;
const child = parent.childNodes[3];
Now insert the new node before the second div using insertBefore.
parent.insertBefore(divElem2, child);
Now follow the above example to create and insert a Node between the second and third div elements.
Removing a Single Child Node
It is also possible to remove the child of a DOM Node using the removeChild method.
document.getElementById("body").removeChild(child);
In the above, child has to be a variable containing the child to remove. The child is removed from the DOM tree, but the node in the child variable will continue to exist and could be inserted somewhere else later.
For example:
const child = document.getElementById("body").childNodes[3];
document.getElementById("body").removeChild(child);
One thing you often might want to do is delete an element that the user clicks or mouses over. If you are inside an event listener, you can remove event.target (the source of the event) or this (the Node the listener is attached to):
event.target.parentNode.removeChild(event.target);
this.parentNode.removeChild(this);
 Check Your Understanding
let e = [];
e.push(document.lastChild.childNodes[0].childNodes[1]);
e.push(document.lastChild.children[0].children[1]);
e.push(document.lastChild.childNodes[0].childNodes[1].firstChild);
e.push(document.lastChild.childNodes[0].parentNode.lastChild);
e.push(document.lastChild.children[1].childNodes[2].nextSibling.nextSibling);
 Coding Practice
- Load domExample.html from the Full Stack Example Pack into a browser. Use the document object along with childNodes, firstChild, lastChild and other fields to verify that the document does indeed have the structure shown in the diagram from the main text above.
- Go back to the helloworld.html file from the Full Stack Example Pack that we looked at in an earlier chapter. Look at the source and use it to draw the full DOM tree, including all TextNodes. Use the document object along with childNodes, firstChild, lastChild and other fields to verify that the document does indeed have the structure shown in the diagram from the main text above.
- In the a DIY box above, you were asked to find as many ways as you can to get the TextNode from the second div element in domExample.html from the Full Stack Example Pack. How many ways do you think there are in total to do this using the DOM navigation methods give above? Justify your answer.
- Get domExample2.html from the Full Stack Example Pack.
- Add some div elements, each with different id attributes, and then modify the event handler to display the id attribute of the element that was clicked.
- Now put
<input type="button" value="ID">beside each of the div elements, and add click handlers to all these buttons that display the id attribute of the div next to them in the DOM tree (hint: the div for each button should be its previousSibling, or perhaps the previousSibling to that if there is whitespace between the input element and the div).
- Get domExample.html from the Full Stack Example Pack
- Add a button. Every time the button is pressed, add a new div element to the body element, each with a TextNode “New Div X” where X is the number of the new node, counting upwards from 1.
- Add another button. This button should create a DOM fragment like the one described ealier (a div element containing an a element containing a TextNode) and append it to the end of the body each time the button is clicked.
- Add another button. This one should add a four-element checkerboard to the document every time it is clicked (you could do this with
display: flex, or you could look up how to use a table element ordisplay: grid). You can use the style field of the new nodes to specify style properties, or you can use the className fields to assign classes. - Now add a mouseover listener that deletes a div when that div is moused over.
- See if you can combine the mouseover listener with the button from the previous exercise that adds div elements. Every time you create a new div you should add the mouseover listener before inserting it. When you are is finished, you should be able to add new div elements by clicking the button, and then remove them by mousing over them.


Feedback/Errata