18 Drawing Type | Design Concept: Intro to Digital Perspective Rendering
Learning Objectives
Type your learning objectives here.
- Learn the basics of rendering with FluidRay
- Add entourage in Photoshop
The base of this tutorial was prepared by Dr. John Lewis, and edited by Dr. Katherine Perrott, Ivy Wang and Ricardo Dabydeen. Published by Urooj Khan
Introduction to Rendering with Fluidray
Rendering involves taking an image that appears flat or abstract, such as what you would create through SketchUp, and adding effects to enhance its photorealism – i.e. reflection, atmospheric and sky effects, vegetation, people, etc. There are several methods for producing landscape and architectural renderings as well as several computer-based applications – e.g. 3DS Max, Blender, Vray, Rhino, Visual Nature Studio, etc. All of these applications produce relatively similar photorealistic outputs, but they vary considerably in their complexity and ease of use. Applications such as FluidRay (https://www.fluidray.com/) have been created to work specifically with SketchUp software (Pro and Make) and are unique in that they use artificial intelligence (AI) algorithms to produce rapid architectural rendering outputs. As the FluidRay developer states on their product website – “All the tweaking of materials, lights or any other scene properties are immediately visible as real-time feedback in the viewport, making your workflow faster…”. FluidRay’s advantage as a rendering application is its capacity to work with SketchUp files, the speed with which it produces output as well as the quality of the rendered output. In effect, it can take a SketchUp model from what you see below left and produce the rendered image below right (in five to ten minutes):

1. Preparing a SketchUp File for Rendering
Before you can use a SketchUp file in any rendering application, there are some basic procedures that you will need to complete to avoid errors in the production of your render. The FluidRay_test.skp file that I have given to you to complete the following tutorial has already had the procedures in 1.1 and 1.2 made to it. In other words, you don’t need to apply the instructions in 1.1 and 1.2 to the FluidRay_test.skp to do this tutorial. However, make sure that you follow the steps described below for the SketchUp file that you have created and been working on for your Plan 210 work or you will encounter errors.
1.1 Double-siding Textures
The colour and textures that you have applied to your SketchUp model need to be double sided, which means that they are applied to both the outer and inner sides of all surfaces in your model. If you don’t do this, the outer surfaces of objects and buildings will appear white in the rendering application. To do this, follow these steps in SketchUp:
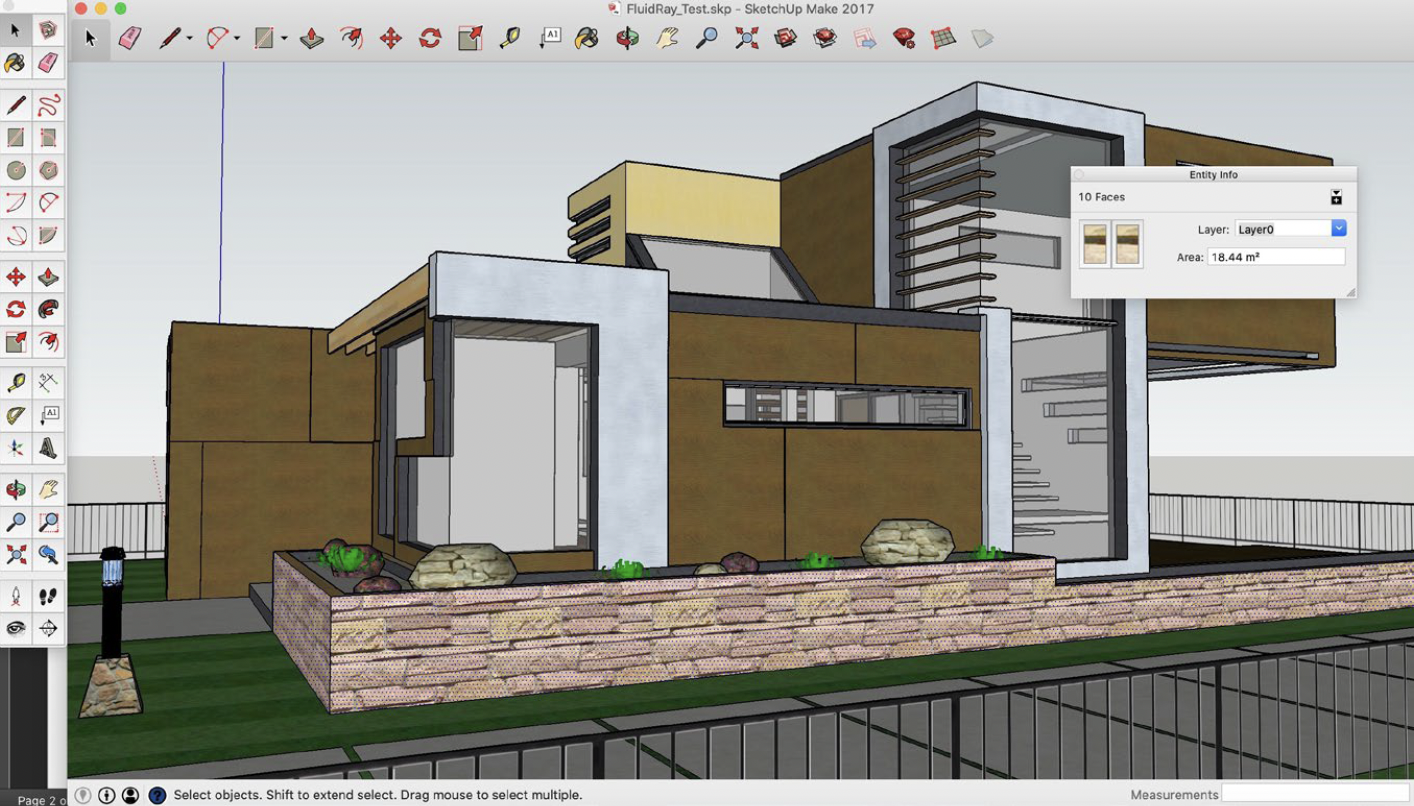
a) Using your Pointer, click on one of the surfaces of your building. In the example below (top of page 2), I have selected the building’s stone surface.
b. Because the building has several surfaces with the same texture applied to it, you need to quickly and efficiently select all of the other surfaces at the same time. From the Edit pull-down menu, select Face >> Select >> All with same Material. This will select all of the surfaces with identical textures.
c. From here, you can click the Window pull-down menu and select Entity Info from the menu. When the Entity Info window opens, you will see two boxes, one of which has the outer texture while the other is blank (the blank box is the inner surface of the building). Simply drag and drop the texture from the outer to the inner box. That will apply the texture throughout the inner building surface (see graphic above).
d. Repeat steps a through c for all the other textures you’ve applied to the outer building surface.
1.2 Components
a. Because components can create lag in SketchUp remove them from parts of your park/square that are not within the eye-level view you’ve chosen.
b. Trees can be added with Photoshop, so if your model is slow, you can remove them.
c. If your feature (arch, fountain, bell) is grouped, you may need to explode it in SketchUp first, so that you can apply/change materials in FluidRay.
d. Don’t explode imported tree components.
1.3 Setup the Camera View
The final step is to set up the camera in SketchUp to look at the model from the ideal viewing angle. The reason for doing this step is that FluidRay will pick up the last saved view in your SketchUp file and position the camera in the rendering application from the same location. Basically, it saves a bit of time and effort. Positioning the camera in SketchUp is simple – you use the Position Camera, the Orbit or the Zoom tools in order to set up your viewpoint. However, choosing the right/best viewpoint is usually based on the following considerations:
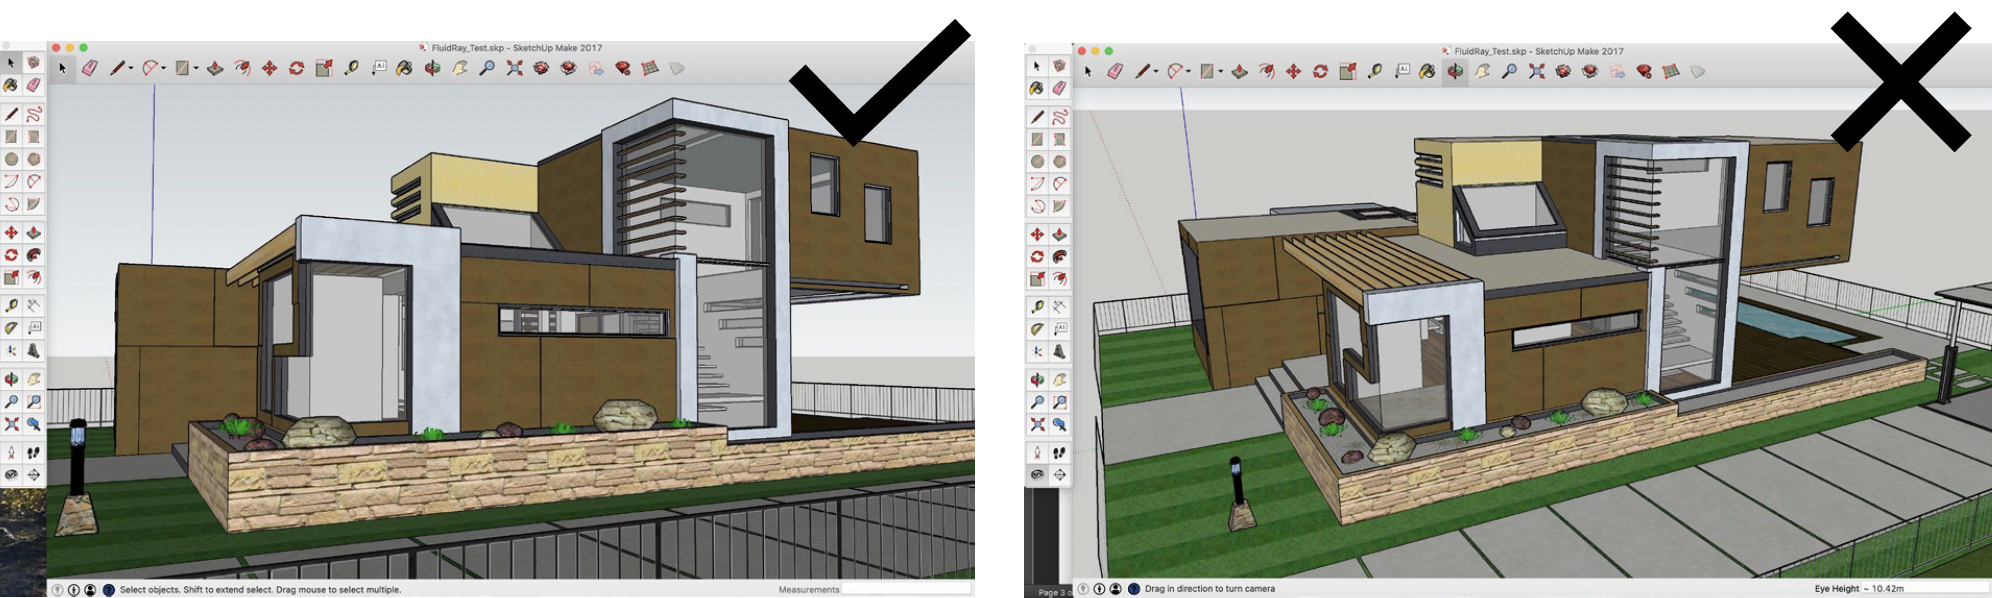
a. As in the sample image above, place the viewpoint close to/standing on the ground surface. Do not place the viewpoint above and looking down on your SketchUp model. Not only is this an unrealistic view of a building model, you will also be able to see the void space surrounding and below your SketchUp model in your render.
b. Position the viewpoint as close as possible to an element of the park/square that you want to highlight so that it nearly fills the camera view (see below). Graphically, as the focus/main subject of your render, you want the building to dominate the image that you produce. However, as with point a above, you also likely have a great deal of void space (i.e. space with no buildings or vegetation) surrounding your building model. Positioning the camera close to your building fills the image and removes any unwanted blank/void space below and to the left/right of your model.
1.4 Adding the surrounding “floorscape”
Turn on the geolocated aerial photo for the surrounding neighbourhood (in SketchUp go to tags and make the geolocated based image visible), so the roads, sidewalks, etc. around the park/square appear as a base and your park doesn’t look like it’s floating in FluidRay. Depending on the view you select, this may be more or less important depending on how much of the surrounding road/sidewalk is visible.
2. FluidRay for SketchUp: AI-based Rendering
2.1. The FluidRay Interface
When you are finished your SketchUp model and are ready to render it, download the trial version of FluidRay (Mac or PC) from the following site – https://www.fluidray.com/try-now/. If you want to use the software for a longer term than the trial (i.e. 10 days), it can be purchased for ~fifteen dollars a month. However, you shouldn’t need more than 10 days to complete the rendering for your assignment.
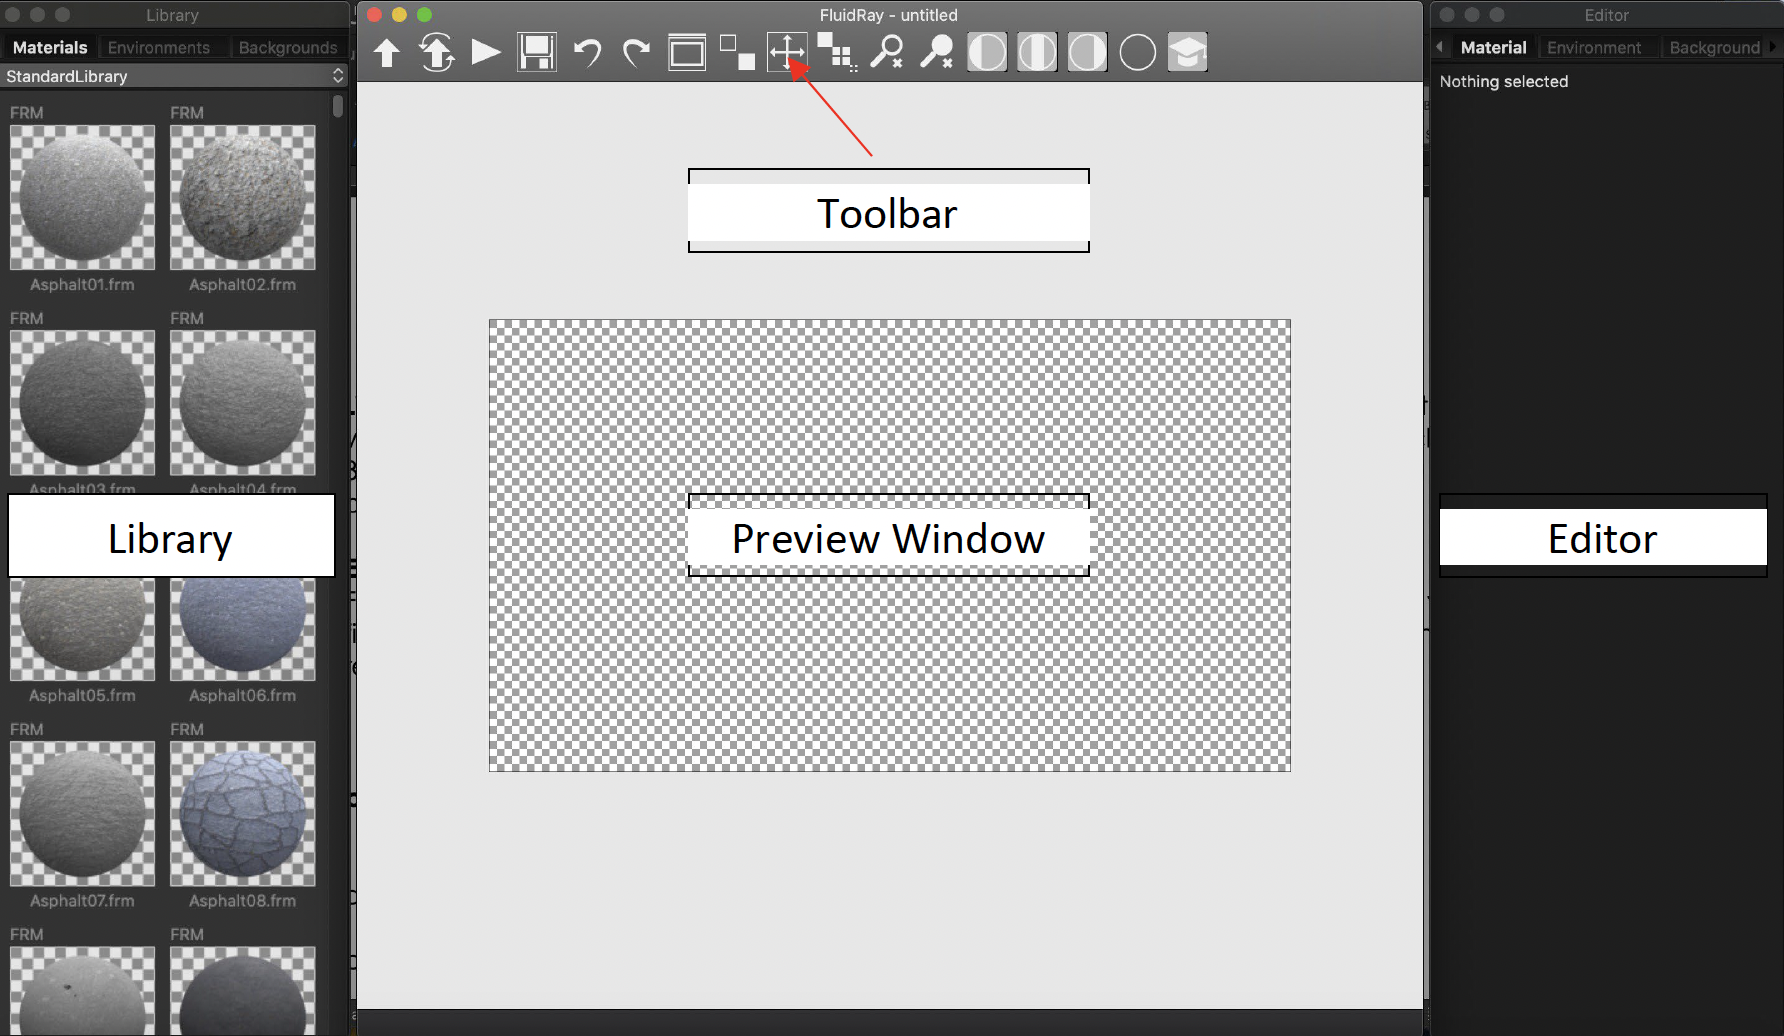
The FluidRay interface is divided into four main areas (see graphic page 5):
- Preview Window: the preview provides a real time rendering of your building model. The preview is setup so that whatever materials or effects that you apply to your project are immediately displayed in this window. All you need to do in order to create an image file that shows your final render is save your image – i.e. there is no complicated rendering setup as is the case with most other applications.
- Toolbar: the toolbar above the preview window contains the main functionality that allows you to import a SketchUp model and save a rendered image. Other features allow you to redo or undo edits that you have made to your render project, as well as change the size of the image in the preview window, change the image’s resolution or zoom the image.
- Library: the Library allows you to change any of the materials that you have added to your SketchUp model in FluidRay. It also allows you to import an ‘Environment,’ which is a 360-degree image that wraps around your model to add a backdrop setting as well creates a light source that casts sunlight and creates shadow effects.
- Editor: any of the Environment, Material or Background features that you add to a FluidRay render can be adjusted to fine tune the effects that you want to appear in your final image. For instance, you can change the sunlight intensity, adjust the colour and reflectivity of glass surfaces or add artificial light to lamp posts or bollards.
3. Importing a SketchUp File and Setting-up the Camera
To bring the FluidRay_test.skp file into FluidRay:
a. Click the Model Import button on the far-left side of the Toolbar.
b. When the Import Model window opens, locate the FluidRay_test.skp file on your computer and click Open.
The Preview Window will display the model in isometric (i.e. aerial oblique) when it opens the file. To restore it and setup the camera to your last saved view in SketchUp, do the following:
a. Select the Camera tab in the Editor.
b. Click the pull-down list at the top of the Editor and select Imported Camera. The Preview Window will reset the camera to the last saved view of your model in SketchUp.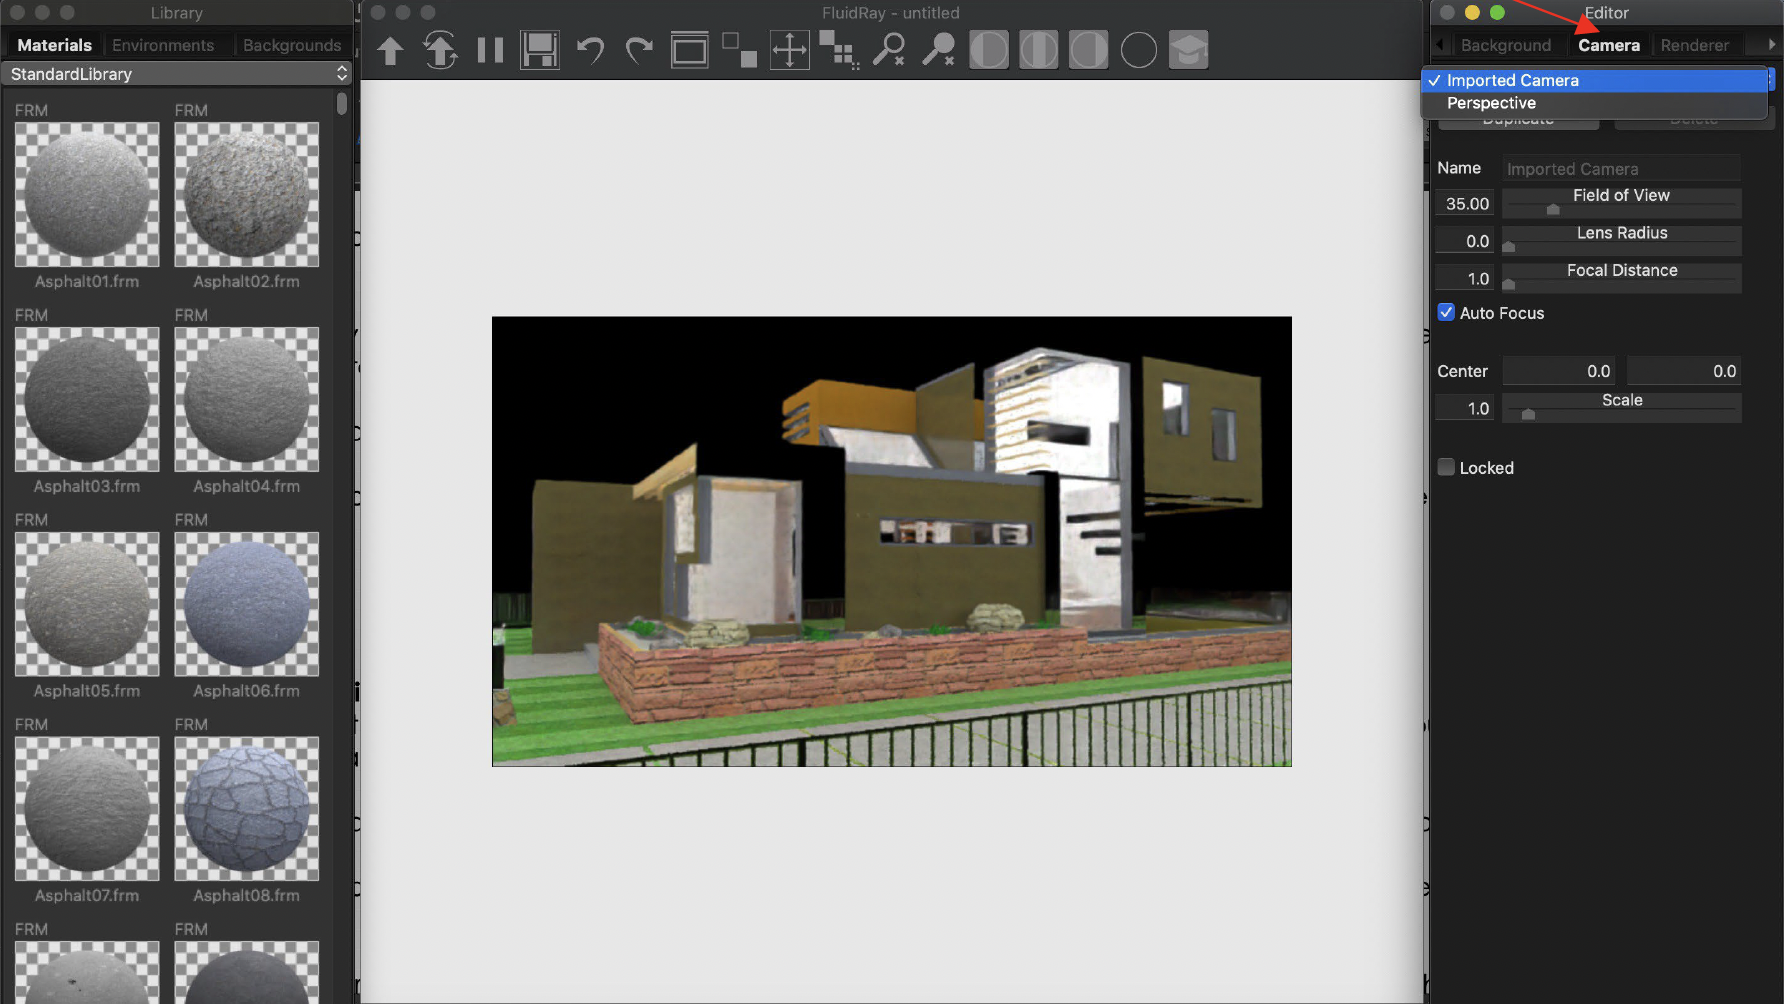
4. Adding an Environment and Natural Light
The next step involves adding an Environment which will create a background setting for your model as well as simulate natural lighting and shadows:
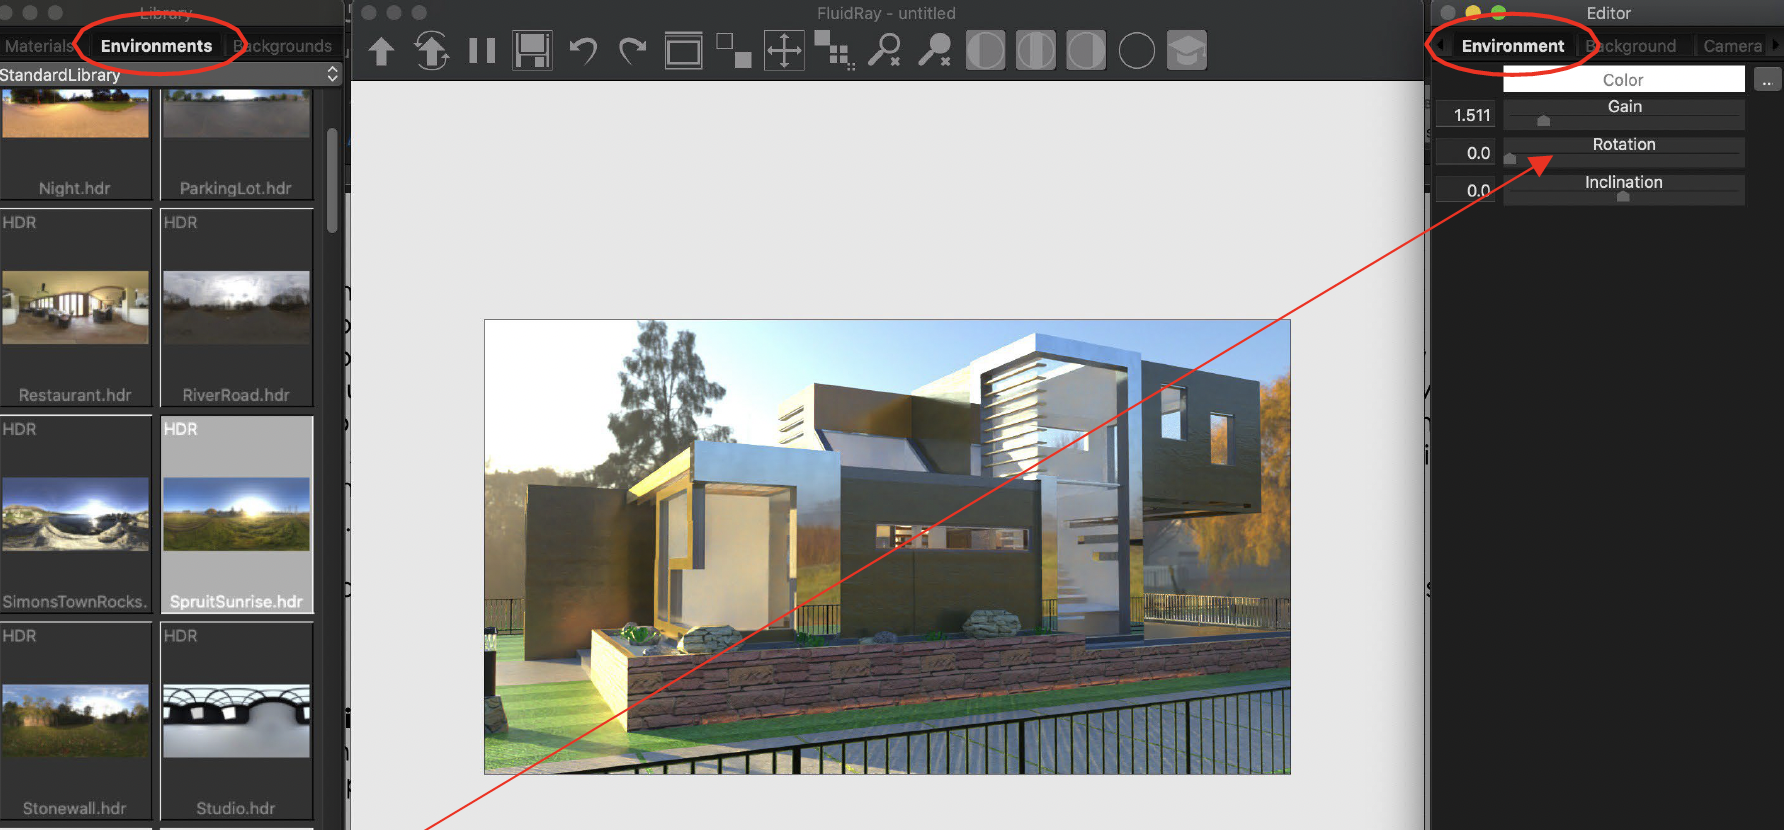
a. Click the Environments tab in the Library. A menu of preset Environments will appear (see graphic on page 7).
b. Scroll down to SpruitSunrise.hdr in the Library list. Drag and drop it over the Preview Window.
The Environment effect will appear immediately in the Preview window. You can then use the Editor to make adjustments to the Environment. In the Editor, click the Environment tab (you may need to click the arrows to the left or right of the tabs if the Environment tab is hidden).
c. Move the Rotation slider and both the background image as well as the sun will change location.
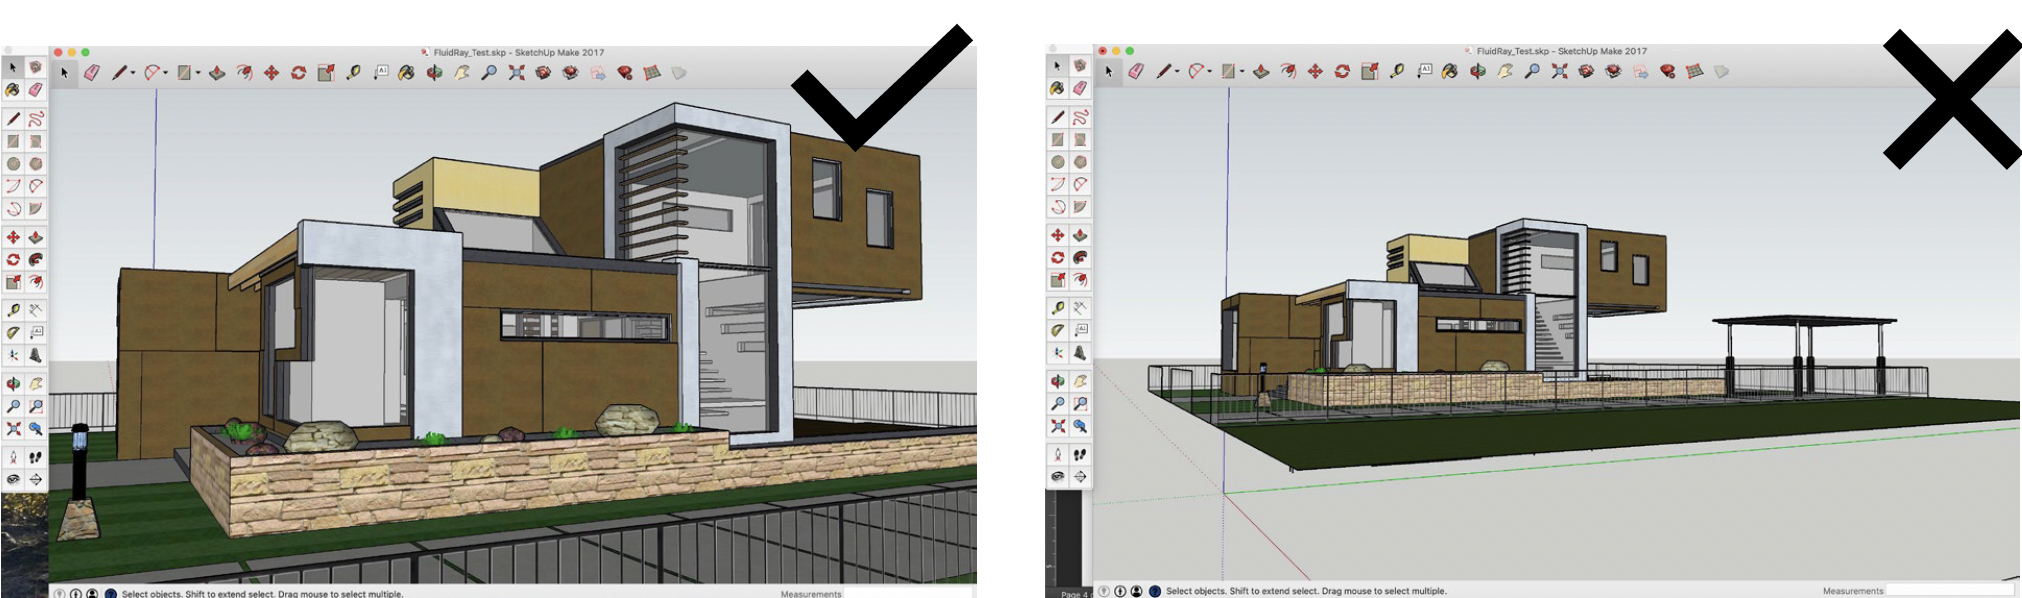
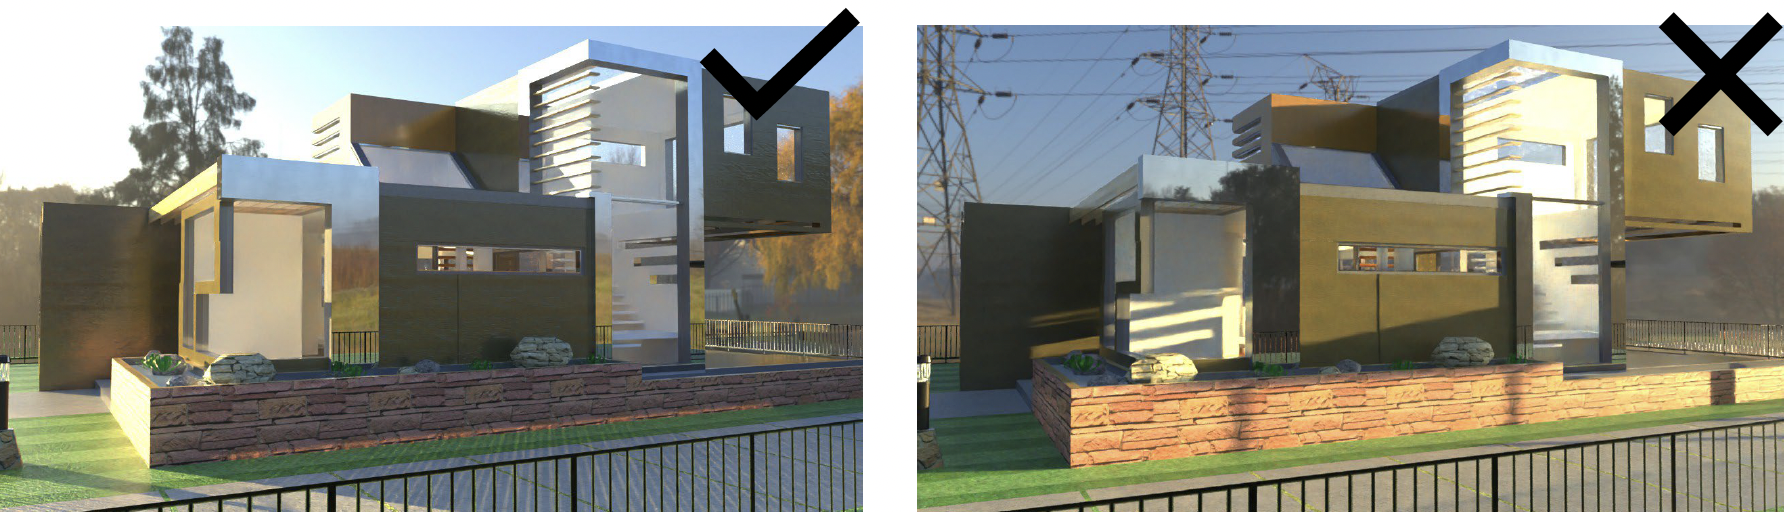
Adjust the rotation so that you are achieving two effects. First, that you have trees in the background to give your image a softer, more natural appearance. Avoid setting up your background with other buildings (or utility lines in this case in your background, below right). Second, try to set the sun so that it is either shining across your building face (as you see in the image below left) or backlighting your building (i.e. with the sun behind your building). Both of these settings will add shadows to your building and create a dramatic effect for your rendering. The basic rule of thumb is that the sun should not be set to cast light directly onto the façade of your building.
d. There is one final adjustment you may wish to make. If you find that the sunlight is too intense or faint, adjust the Gain slider under the Environment tab to increase or decrease the sun glare.
5. Adding Artificial Light
You can add artificial light to any light sources that you have placed into your model in SketchUp – e.g. wall sconces, lamp posts, illuminated bollards. To do this:
a. Click the Material tab in the Editor (see graphic page 8).
b. Click the material that will cast light in the Preview Window. In this case, I have added a bollard to the left of the building with a lamp at the top. Click the glass portion of the bollard at the top to select is as you see in the image below.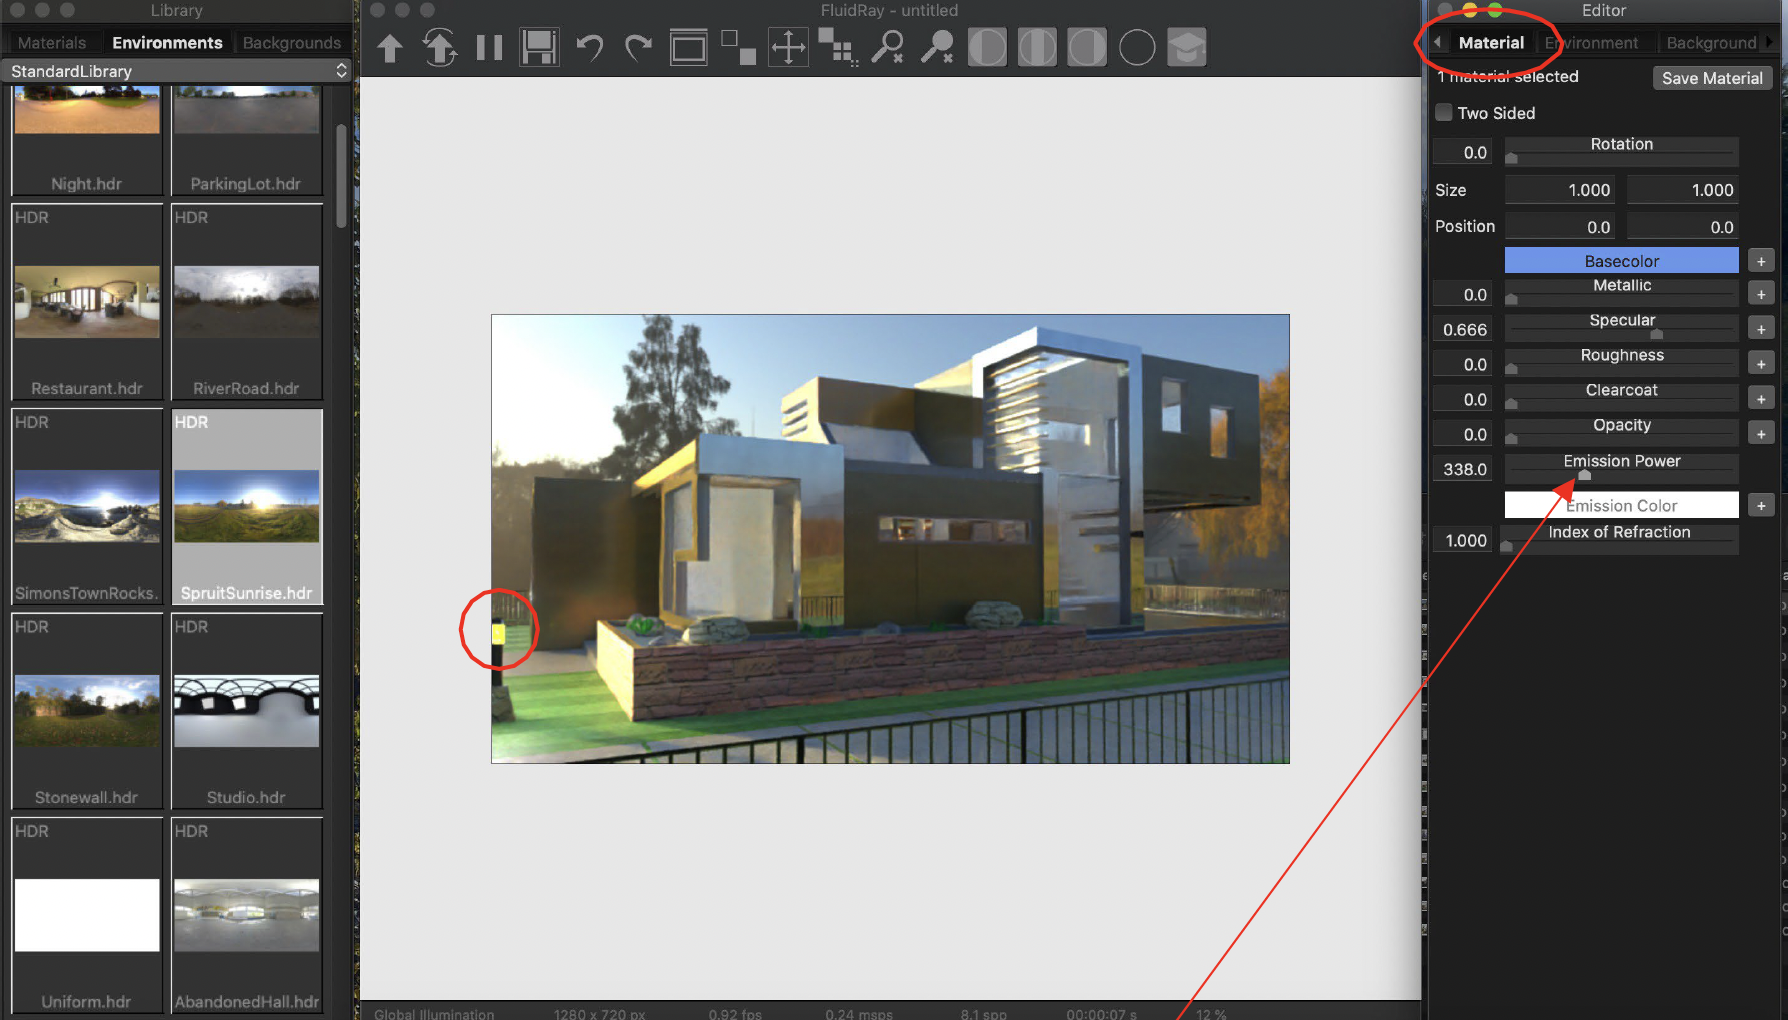
c. In the Editor window, move the Emission Power slider and you will immediately see light coming from the top of the bollard and shining on the surfaces surrounding it.
6. Saving/Exporting a Render
To save your rendered image:
a. Click the Save Image icon in the Toolbar. The default file format for the rendered image is jpeg. Create a file name and select a location to save the final image. Click Save.
Open the saved jpeg file and that is your final rendered image (below). Use the instructions in below regarding PHOTOSHOP to add any additional effects to your render, include entourage elements (i.e. people, birds, vehicles) or foreground vegetation to enhance the image.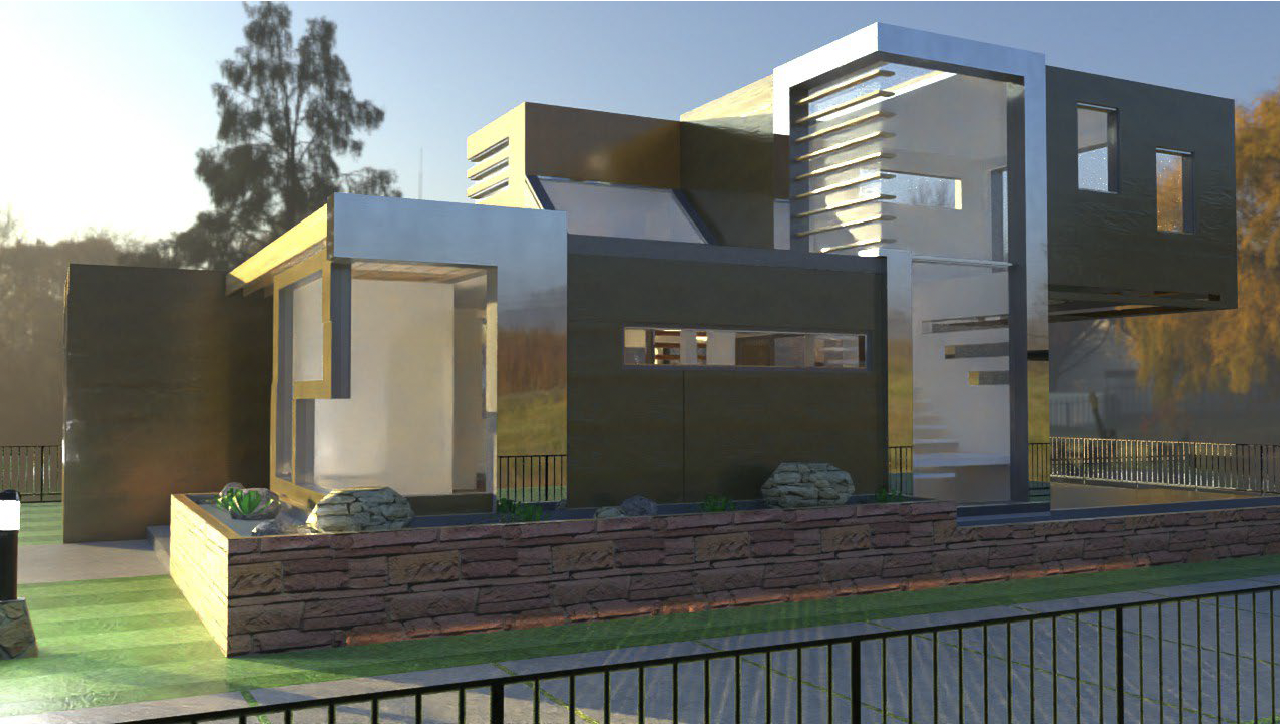
Finishing Touches in Adobe Photoshop
1. Add Entourage/Vegetation Images
Open Photoshop on your computer. Retrieve an image file that you have rendered using third party software such as FluidRay:
a. Click File >> Open from the Photoshop pull-down menu.
b. When the file open window appears, navigate to the file that you rendered in the preceding instructions and click Open.
c. When the file opens, because you saved it as a 640 x 480 image, you will need to enlarge it. Type 200% into the image size field on the bottom left-hand corner of the interface.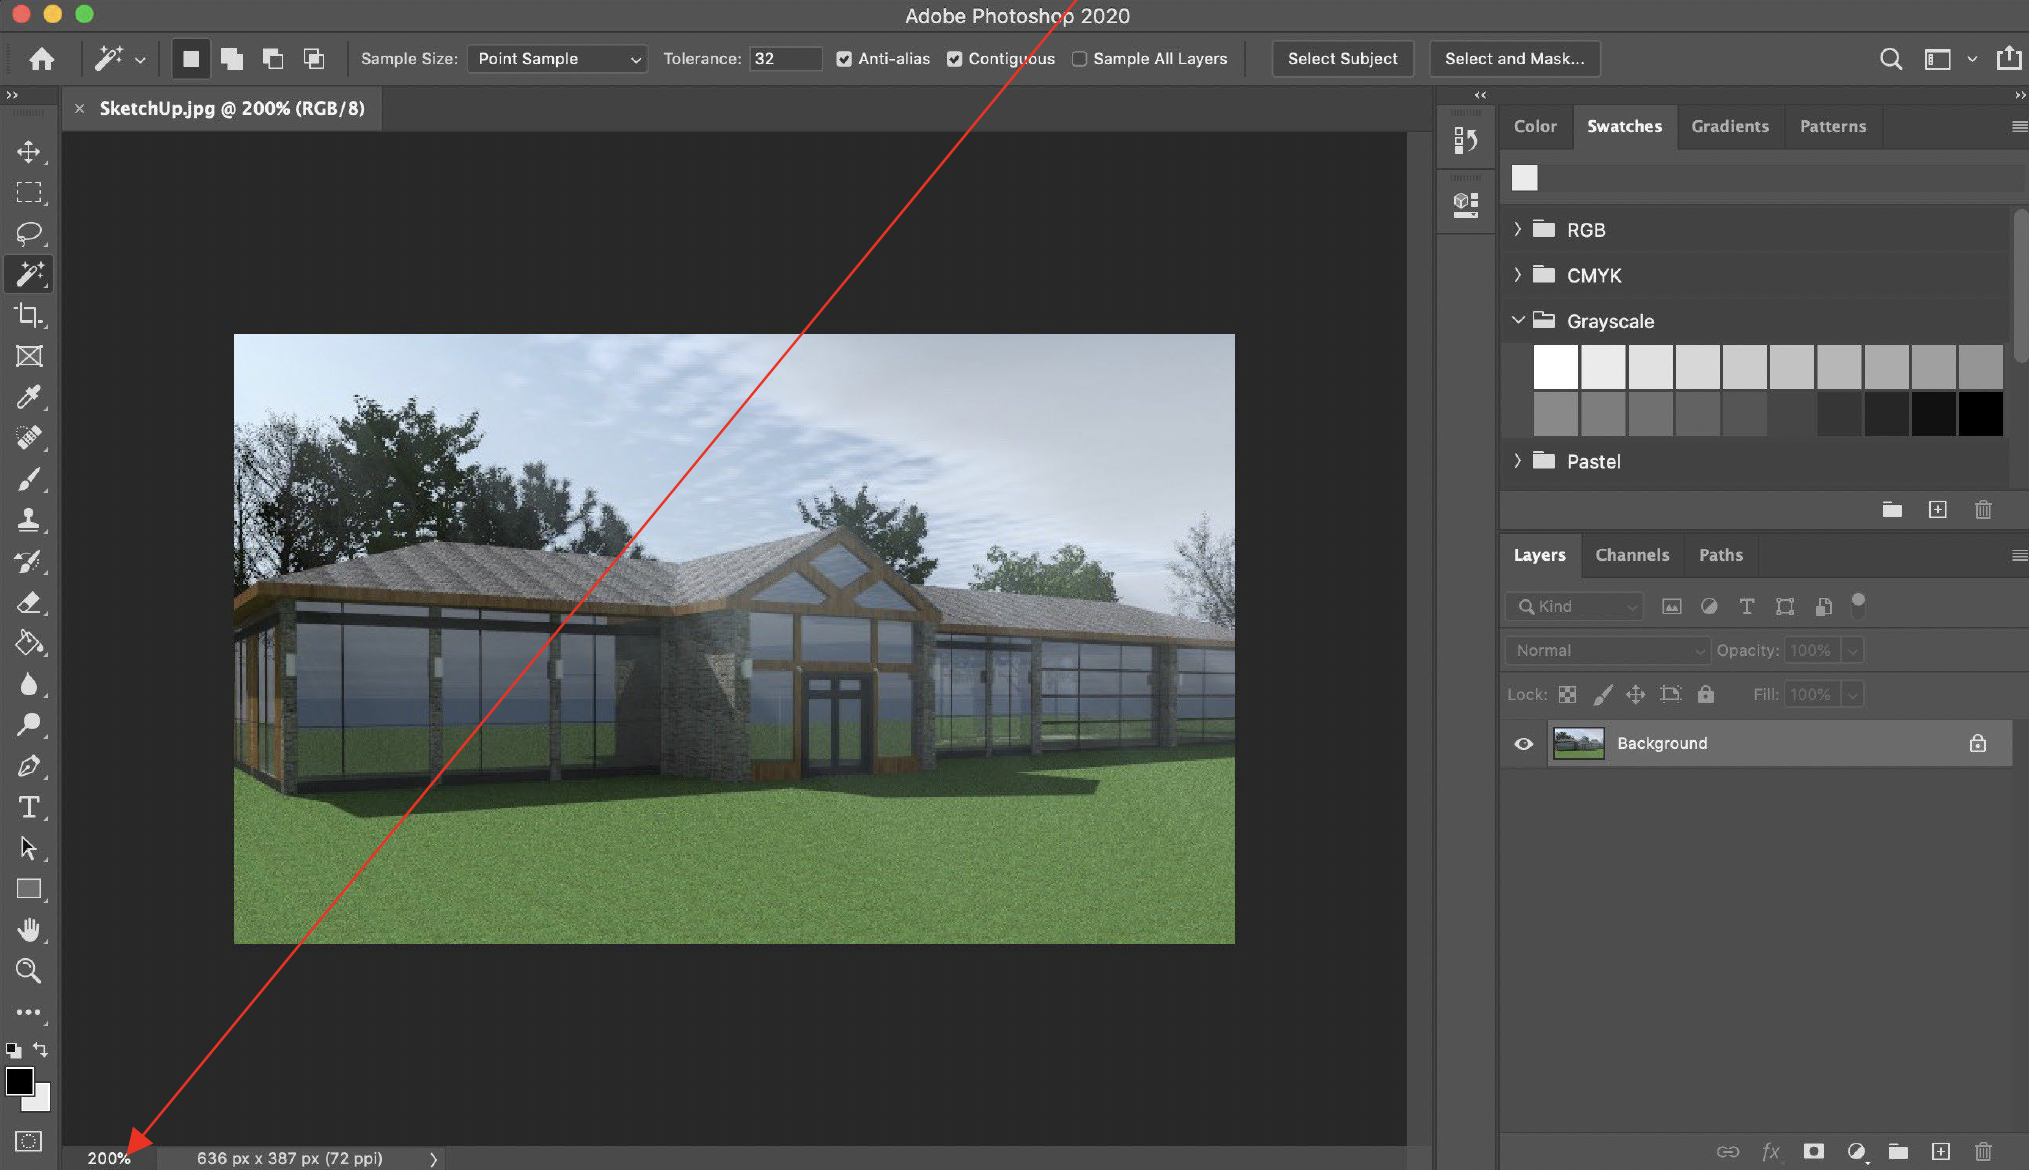
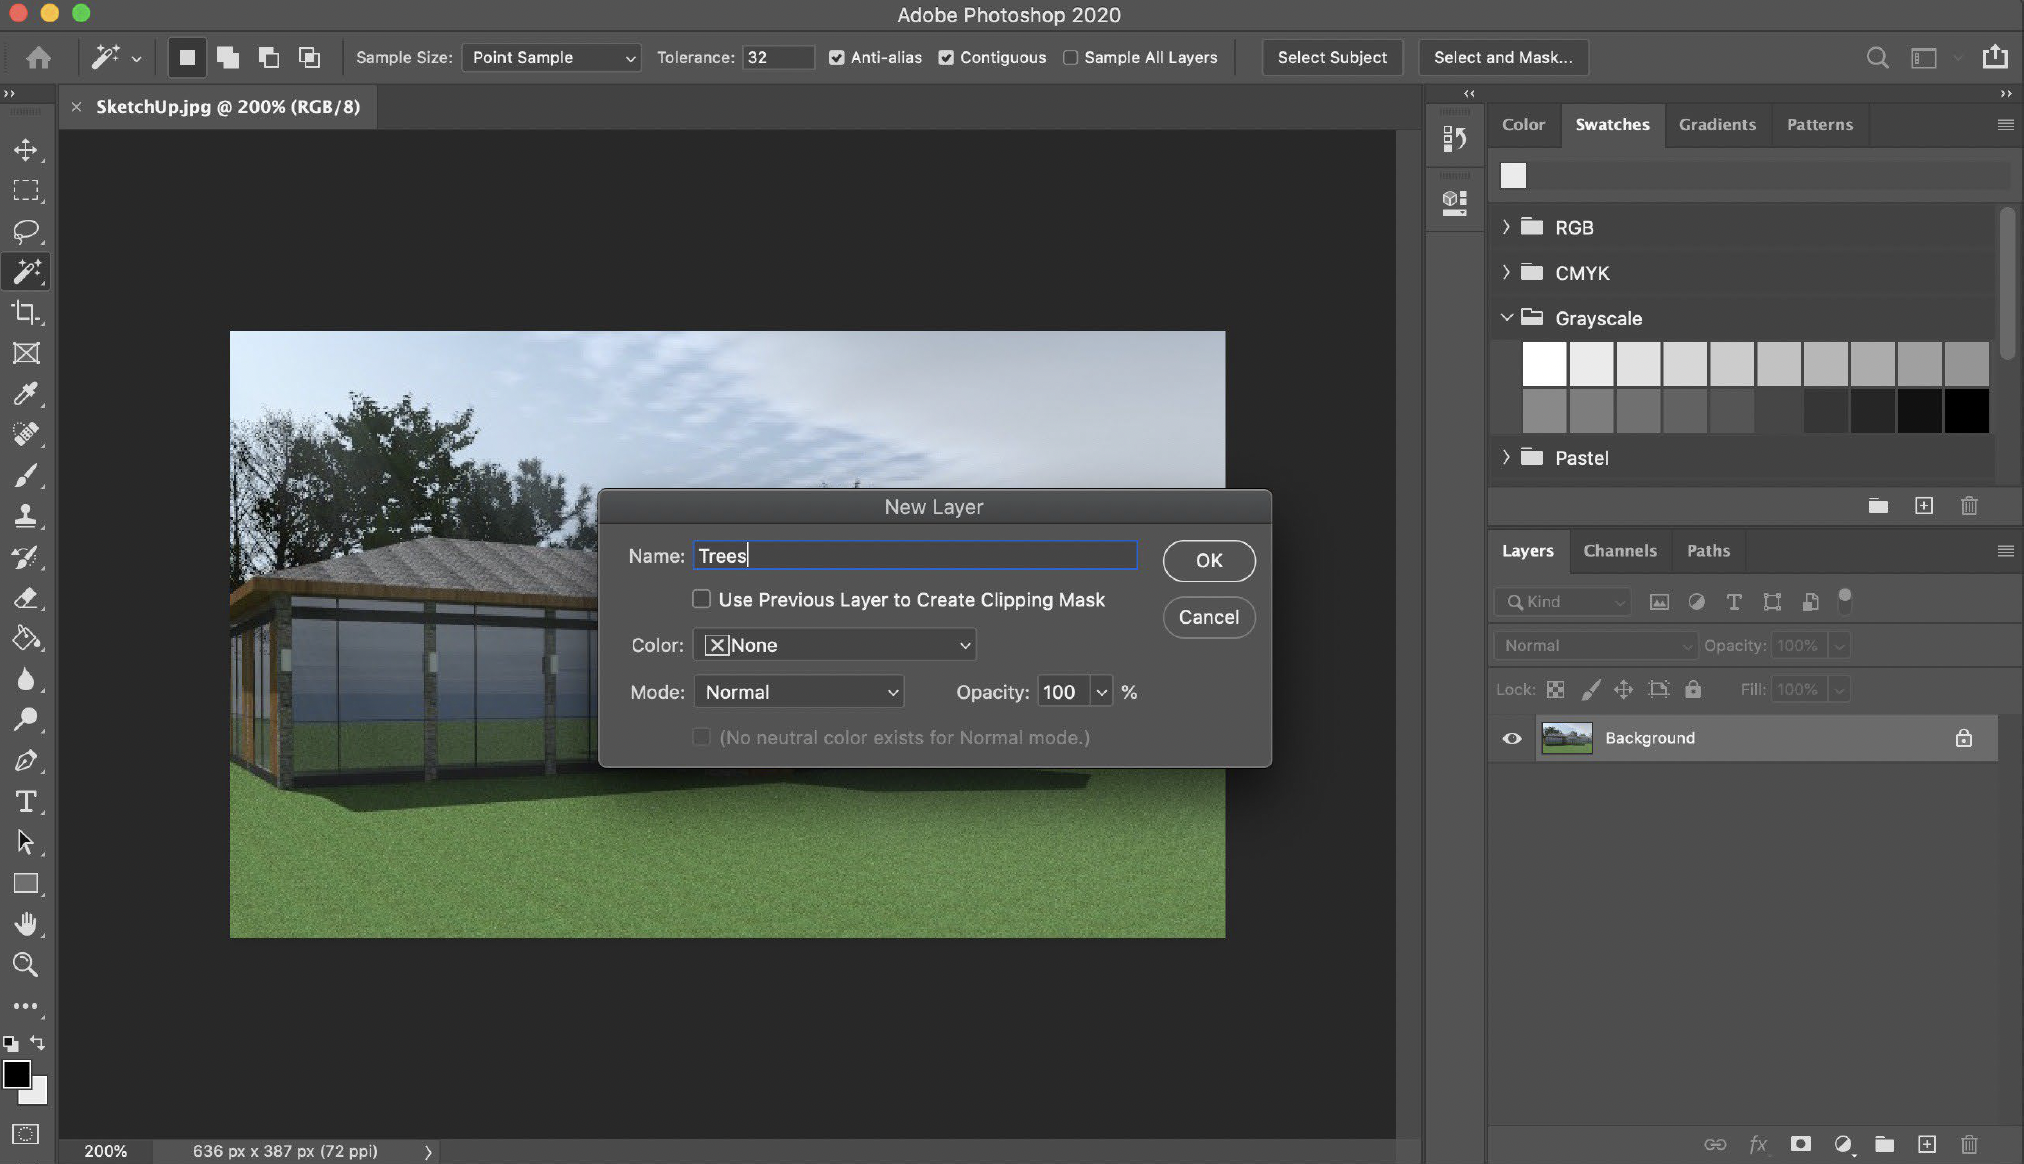
c. When the New Layer window opens, type Trees into the Layer Name field and click Ok.
d. Adding new layers to group similar entourage together can help to keep your file organized. (I.e., vegetation layer; ornamentation layer; human entourage layer)
e.
2. Add Transparency
Adding entourage is a simple matter of dragging and dropping image files that have been provided to you onto the background image in Photoshop. On Learn, there is a series of *.png files of people, trees and vehicles (in a folder named ‘Photoshop Entourage’) that can be overlaid onto your Photoshop background. Download these files and save them to a folder on your computer.
For this portion of the tutorial, you will add one of the tree images to the Photoshop background image…
a. Open your Finder (Mac) or your File Explorer (Windows) and navigate to the png files you’ve downloaded.
b. With the Trees layer selected in your Layers, drag and drop one of the tree image files onto the Background.
Use the blue bounding box around the image to resize and reposition the image if needed.
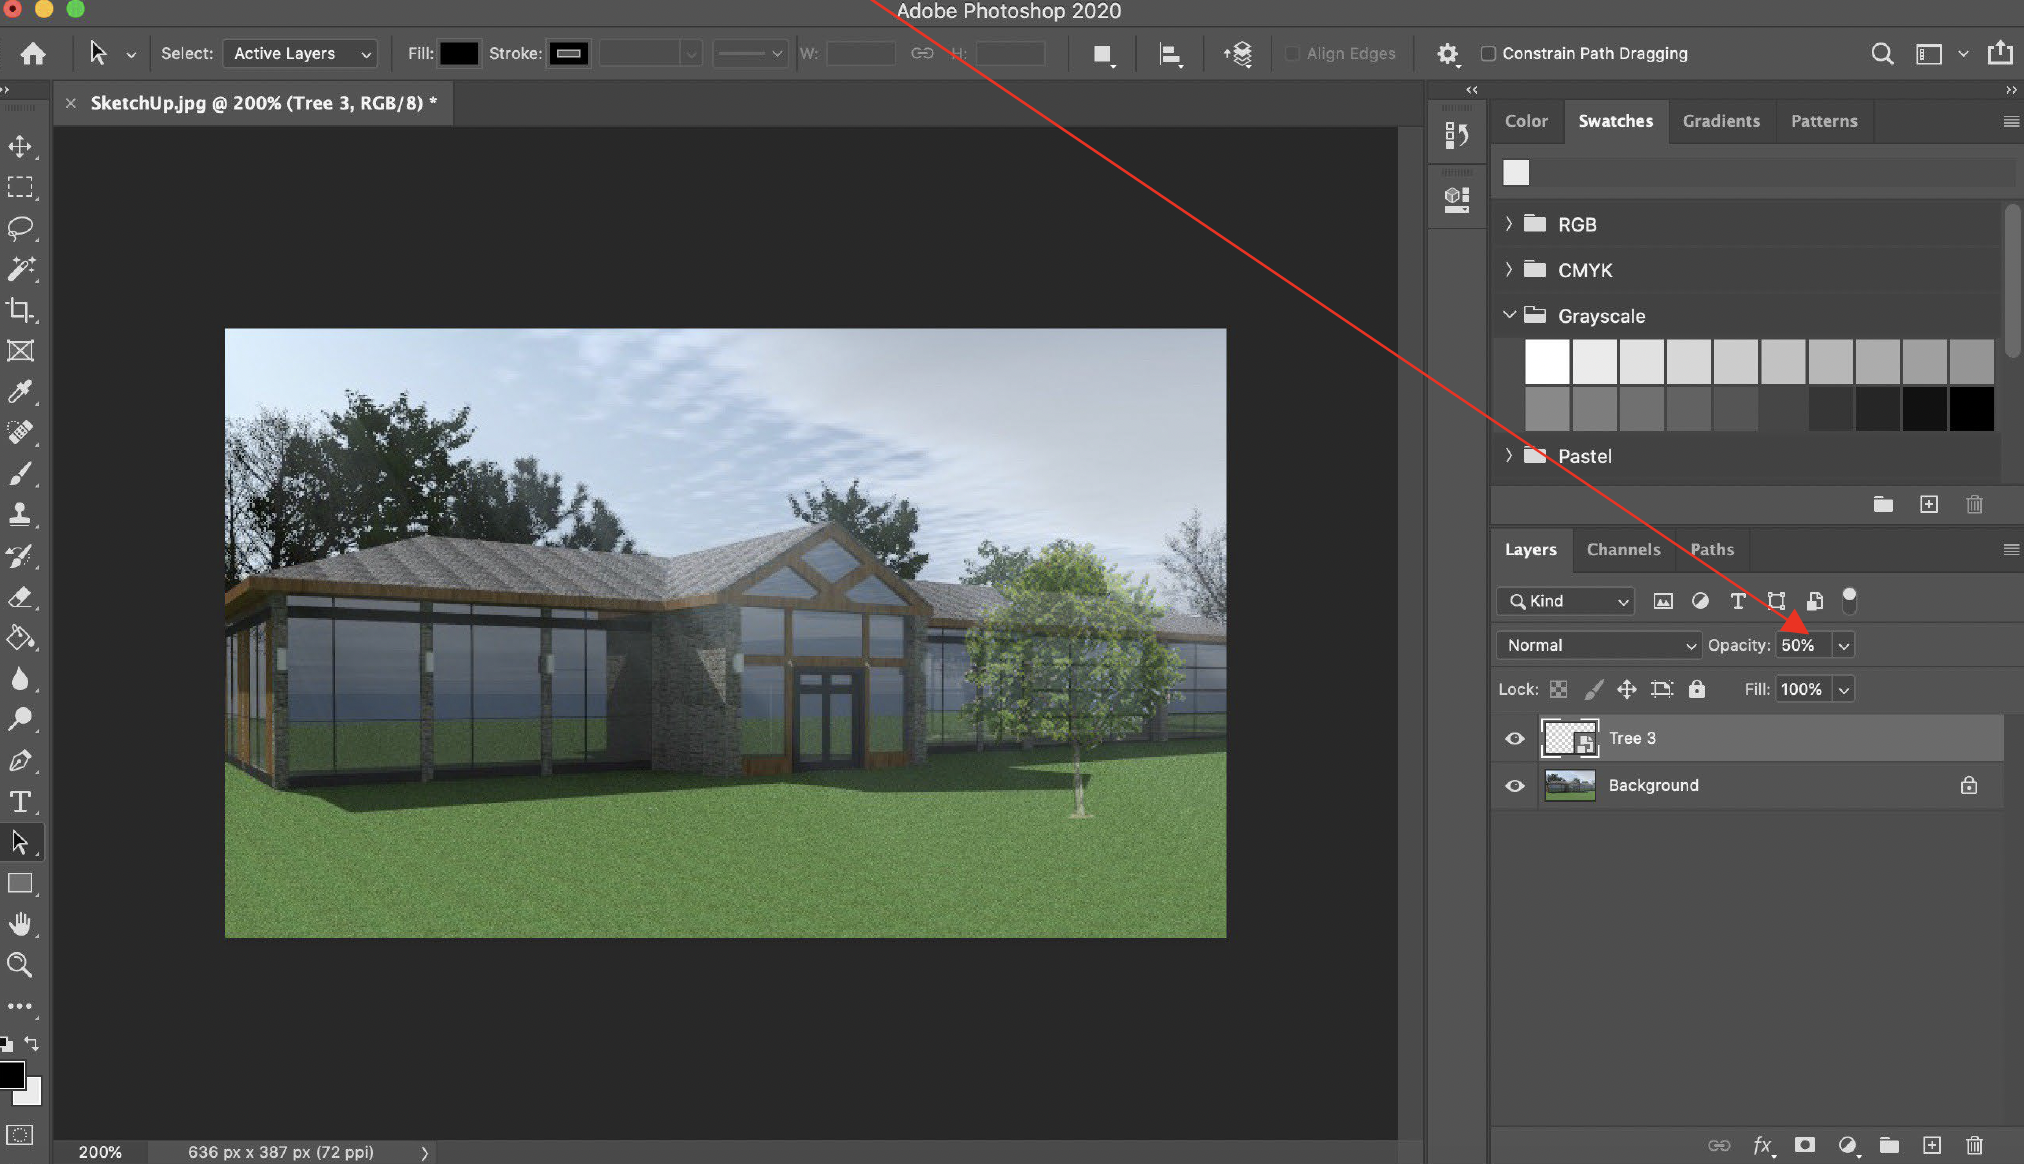
The same process can be used to add other entourage objects – people and vehicles – and apply opacity effects to enhance the appearance of the rendering. To save the file as a flat jpeg image that can be embedded into a poster panel, click File >> Export >> Export As, select JPG under File Settings and then click Export.
Extra Resources on Photoshop
Photoshop basics explained: https://documents.manchester.ac.uk/display.aspx?DocID=53083
Photoshop urban design-specific tips: https://documents.manchester.ac.uk/display.aspx?DocID=53082
Video: https://www.seed.manchester.ac.uk/mudlab/resources/video-tutorials/
