15 Concept Design and Analysis: Shadow Study
rdabydeen
Keywords: Shadow Study; Shadow Profiles; Time Zone
Apps: SketchUp, TwinMotion
A critical component to consider when designing a site with buildings of various heights is understanding the shadows they cast. These shadows change during specific times of the day and as the months progress which can impact neighbouring properties. Therefore, conducting a shadow study can help show the three-dimensional nature of these buildings in connection to their surroundings by showing the shadows they cast on adjacent properties or buildings. This study is helpful in showing how shadows of buildings may impact urban environments at the pedestrian level, whether people are walking down the street or resting in their homes.
TECHNIQUE – Creating Sun and Shadow Study Using SketchUp
Before creating your own shadow study, it is important to choose appropriate time zones and months that show the most apparent shadow impacts. Below are standard time zones that are often used when conducting shadow studies for developments or sites.
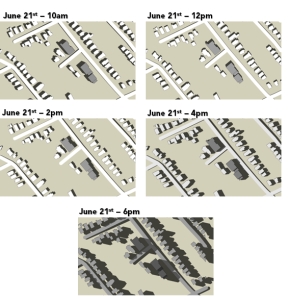
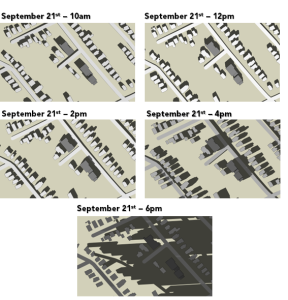
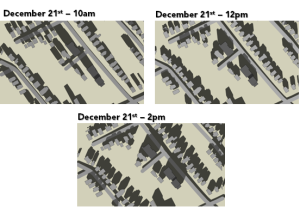
Shadow Profiles using Standard Time Zones to Show Shadow Impacts on Adjacent Property/Buildings and Surroundings
June 21 (Solstice – Sun at Highest Angle, Longest Daylight, Shortest Shadows)
September 21 (Equinox – Represents Seasonal Averages)
December 21 (Solstice – Sun At Lowest Point and Angle, Shortest Daylight, Longest Shadows)
Above is a sample shadow study. Many cities may have different requirements of what months and times to include in your shadow study. Make sure to check the provisions or criteria for shadow studies as some municipalities require all or some of the above time zones when making your shadow profiles.
Check out the shadow study criteria below for the City of Waterloo on page 52: Urban Design Manual: Part 4 Site Plan Review Guidelines.

STEP 1 – Open Site Model In SketchUp
Now that you have a clear idea of what time zones to use for your shadow study, you will need a 3D model of your site which can be made in SketchUp or other software. For this tutorial, open your 3D model in SketchUp to begin as seen on screen. The desktop app or online version will both work for this tutorial.
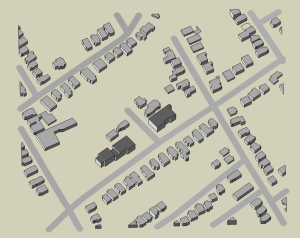
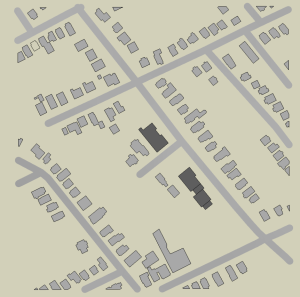
We will be using this template site. You will notice that the buildings in the model are not casting shadows. In this tutorial, you will learn to adjust the time of day and month in SketchUp to create shadows which can be used for your shadow study.
STEP 2 – Set Camera View to Top View and Parallel Projection
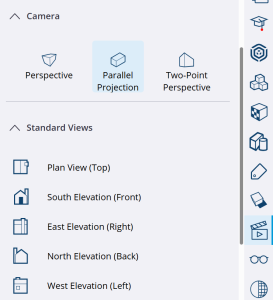
Next, navigate to the right toolbar and find the “Scenes” tab as seen on the right. Under the “Camera” drop-down menu, select “Parallel Projection.” Then under “Standard Views,” select “Plan View (Top).” Your camera should be looking at your site from a bird’s eye view. As seen in the image below, the perspective view of the site will be turned off and the view will look flatter than normal. If the view looks similar to the example, you are on the right track.
STEP 3 – Creating Shadows
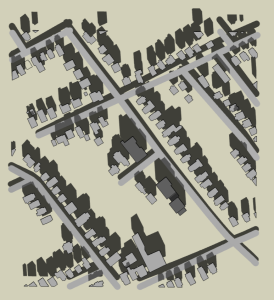
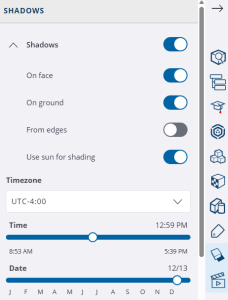
In order to create shadows, navigate to the “Shadows” tab on the right tool bar where a menu of options will appear. Click the toggle to turn on shadows. In the “Shadows” drop down menu, ensure that “On face” and “On ground” are toggled on, including “Use sun for shading.” You should be able to see each building casting its own shadow from a bird’s eye view. The Shadow menu will be useful to set certain time zones during specific months as we will do next.
STEP 4 – Setting Time Zones, Time, and Dates
Before adjusting the time and date in the menu above, it is important to choose the correct time zone based on your location in the world. If the location is not geo-located automatically, simply search online what Coordinated Universal Time (UTC) matches your site’s time zone. For this tutorial, the template site is located in Ontario which falls under the Eastern Daylight Time (EDT). In this case, EDT is 4 hours behind UTC so we would choose UTC-4:00. Use this similar process to determine what UTC is right for your site.
Once you have confirmed your time zone is correct, you can adjust the time and date by dragging the sliders. On the desktop app, you can type the desired time and date into the text box on the right of the sliders or you can also interact with the arrows to slightly adjust the month or days as needed.
STEP 5 – Adjusting Shadow Appearance
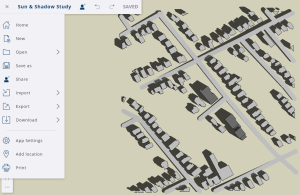 After setting your time zone, time, and date, sometimes you may notice the shadows casted over buildings are too dark which may conceal these structures and your site’s surroundings. In SketchUp, these are two sliders that modify appearance of the shadows which adjust the lightness and darkness of the shadow.
Feel free to play around with these sliders to get the desired effect. A general rule of thumb is that the shadows should look realistic and should suit the site you are showing. Check out the interactive below showing the effect adjusting the lightness and darkness of the buildings’ shadows.
STEP 6 – Saving Shadow Profiles As Scenes
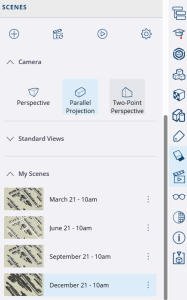 As highlighted earlier, the dates and times in your shadow study should align with the shadow study criteria for your municipality. If we consider the criteria from the City of Waterloo, creating all these shadow profiles of each date with its associated times may be hard to track. In this case, you can save these shadow profiles as different scenes which will allow you to refer back to shadow profiles you created before.
For this tutorial, we will create shadow profiles for each date at 10am using the City of Waterloo’s shadow study criteria. Check out the slider to see the transition between the different dates at the same time.
STEP 7 – Exporting Shadow Profiles As Equal Sized Images
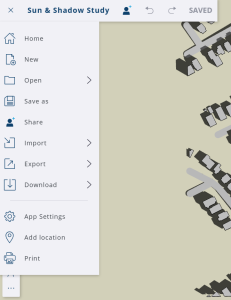 Now that you have created all your shadow profiles, you can save these images by navigating to the three lines on the top left of your screen which will bring down a drop-down menu where you will find the “Download” menu. There, click “PNG” to export the screen as an image.
The key to a shadow study is ensuring the proportion of the images are the same for each shadow profile in order to achieve the effect shown in the sample shadow study above. To do so, adjust the “px” for the length and width of the images and ensure they are consistent when exporting.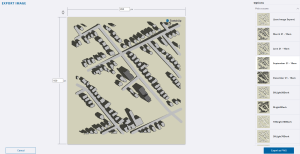
Tip: When exporting an image, you can also choose the scene you want to save by clicking on the “Pick a scene” drop down menu. This will show all the scenes you created earlier, making it easy to save the shadow profiles quickly and at the correct proportion. Remember, consistent imagery is key when arranging your shadow study in software such as Canva or Adobe Illustrator or InDesign for presentations, reports, or booklets.
Congratulations! You have created a shadow study and learned to edit the appearance of shadows to best suit your site. This way, people viewing your shadow study will be able to understand and visualize how shadows will appear in real-life settings. Feel free to check out additional resources below of other City standards for shadow studies.
- City of Waterloo – Urban Design Manual: Part 4 Site Plan Review Guidelines
- City of Kitchener – Urban Design Manual
- City of Mississauga – Urban Design Terms of Reference
- City of Niagara Falls – Terms of Reference
- City of Burlington – Guidelines and Terms of Reference

