21 Drawing Type | Design Concept: Exploded Axonometric
khalilh1
Exploded Axonometric
Exploded axonometric drawings are a powerful visual representation technique that can reveal hidden or obscured elements in your design projects. These drawings are excellent for isolating specific components and showcasing your project in a unique and compelling way. In this tutorial, we’ll guide you through the process of transforming your 3D model from SketchUp into a stunning exploded axonometric drawing. While this technique can also be done by hand, creating a digital version can act as a reference for your hand drawing. Let’s dive into the step-by-step process to bring your creative vision to life.
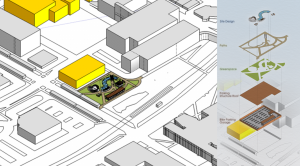
[Image: This tutorial will show you how to take your 3D model (left) and turn it into a beautiful axonometric drawing (right)]
Sketchup Setup
1.
Your first step in SketchUp is to group each layer you want to isolate into its own group, tag, or layer (depending on your version of SketchUp) (referred to as tag going forward). This can take quite a while and can be difficult to make sure you include every geometry.
2.
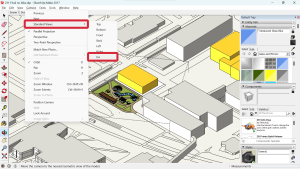
Once every layer you want to include in your drawing is in its own tag, it’s time to set up your camera view. Set your view to parallel projection in the camera toolbar.
[Image: Set your camera mode to parallel projection in SketchUp.]
Next, adjust the camera angle to your desired view, select Standard Views, and then ISO.
 [Adjust your camera view in SketchUp.]
Your view should now be a top-down isometric view. Once you are satisfied with your camera view, save it as a scene in the scene tray (you may have to enable it from the window toolbar first).
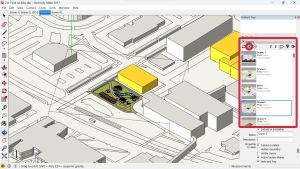
[Image: Save your scene in the scene tray in SketchUp.]
3.
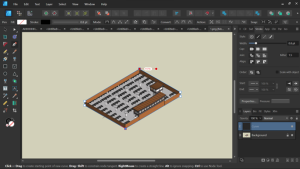
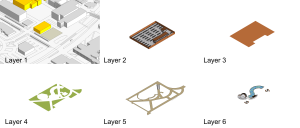
Now that you have saved a scene, and isolated your layers, it’s time to export each tag as an image. You’ll want to export each tag individually, including the background. Hide all tags except for the one you are exporting.
[Image: Hide all tags except the one you want to isolate.]
Make sure you have your saved scene selected, and then export the image as a 2d graphic.

[Image: Export tool in SketchUp.]
Repeat this step for each tag you want to isolate as its own PNG, including the background.
Preparing your images
4.
Using the graphic design software of your choice, cut out the background of each of your exported images.
Photoshop or Gimp:
Using the magic wand tool, select the background of your image.

[Image: Magic wand tool in Photoshop.]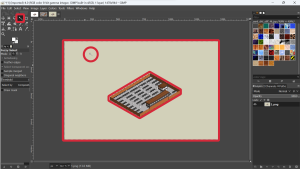
[Image: Magic wand tool in Gimp. The tool has the same functionality in Photoshop.]
Next, invert the selection in the selection toolbar, and cut the image.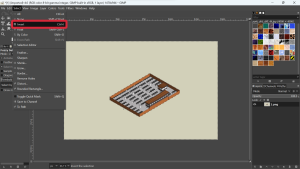
[Image: Invert selection tool in Gimp. The tool has the same functionality in Photoshop.]
Finally, paste the cut image onto a transparent background, and export your image.
[Image: Pasted image onto a transparent background in Gimp. Pasting has the same functionality as Photoshop.]
Illustrator, Inkscape, or Affinity Designer:
To remove the background of your image in a vector editing software like Illustrator, simply trace your image with the pen tool, and mask your image layer into your drawn object. If the background is transparent, you’re ready to export.
[Images: (top) Tracing objects in layer image. (Bottom) Creating layer mask to remove background.]
Alternative tools:
You can also use online tools to remove the background from your image. The paid version of Canva supports this feature, but there are other free alternatives a short Google search away.
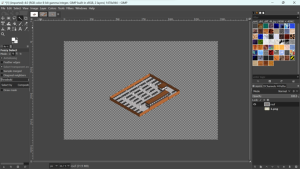
Repeat this step for each of your isolated layers until you have removed all of their backgrounds. This step is not necessary for your background.
[Image: All image layers with backgrounds removed, except for the background layer.]
Putting it all together
5.
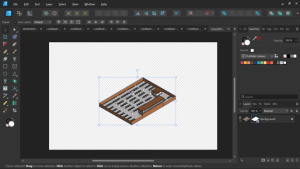
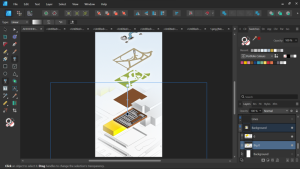
It’s time to put all your images together to make your exploded axonometric drawing. This can be done in a variety of software but is probably easiest in vector editing software such as Illustrator, Inkscape, or Affinity Designer. Create a document with a tall aspect ratio, and insert all of your exported images on top of one another. Next space them apart evenly to create the illusion that they are stacked.

[Image: All image layers imported into the graphic design software of your choice, and spaced apart evenly.]
6.
Next adjust the transparency of your background image so it blends into the other images better.
In Affinity Designer, the transparency tool makes making these transparency gradients very easy.
[Image: Transparency gradient effect seen on the background of the image in Affinity Designer]
In Illustrator, creating a transparency gradient is quite involved. Here is a step by step guide on how to achieve the effect.
[Video: Credit to Design Made Simple on YouTube.]
The effect can also be achieved in Inkscape as seen in the video below.
[Video: Credit to Logos By Nick on YouTube.]
7.
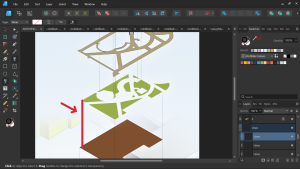
Next, using the pen tool, draw straight vertical lines connecting each of your layers visually. Starting lines at corners tends to create the best looking results but don’t be afraid to selectively choose where to draw these lines to create your desired effect.
[Image: Pen tool used to draw lines connecting each image layer.]
Your lines should be light, and potentially dotted or translucent so as to not draw too much attention from the elements of your site design.
Finishing Touches
8.
Finally, add labels and any other desired effects, such as a paper effect or a sky background.
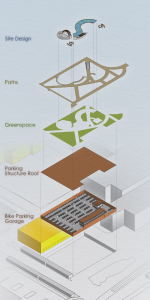
[Image: Finished exploded axonometric drawing created using the steps in this tutorial.]
