4 Technique: Sketching with Pencils
Tools
We may all be familiar with the classic HB pencil and paper, but there are actually dozens of different tools and materials choices that can play a crucial role in the outcome of your artwork. Understanding your options can help to achieve your desired results. Here’s a breakdown of the tools and materials commonly used in drawing:
Pencils:
Graphite pencils come in various degrees of hardness, which influence how dark or light the graphite appears. The hardness scale ranges from H (hard) to B (soft). Hard pencils create lighter lines, while soft pencils produce darker lines.
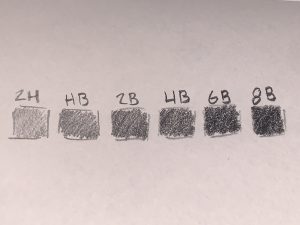
[Image: Pencil hardness gradient.]
Other types of pencils, like carbon, grease (China markers), mechanical, and charcoal pencils, are also available. This tutorial primarily focuses on standard wooden graphite pencils, but many techniques can be applied to other pencil types as well.
Paper:
The choice of paper significantly impacts your drawing experience. Papers can vary in texture, from rough to smooth, and they come in various colors. For most of the techniques in this tutorial, standard printing paper, newsprint, or smooth sketching paper are ideal. Keep in mind that rough and textured papers, such as watercolor or pastel paper, may not yield the same results with these techniques.
Erasers:
Different erasers serve various purposes and materials. Common erasers for drawing include rubber, vinyl, gum, and kneadable erasers. While rubber and vinyl erasers work as expected, kneadable erasers are soft and malleable, allowing you to shape them according to your needs. They are perfect for detailed erasing. Gum erasers are harder than your typical rubber or vinyl erasers and crumble easily. This makes them ideal for erasing smudges and marks from all sorts of materials like charcoal, graphite, and pastel.
Drawing materials needed:
- Graphite pencil
- Paper/drawing surface
- Ruler
- Eraser
- Tissue/blending stick
- A reference image or scene. (For the purposes of this tutorial, we will be using various household objects arrangements to demonstrate various techniques)
Underdrawing
The underdrawing is the first and lightest layer of your artwork. Although it is optional, creating an underdrawing can be helpful for planning your drawing’s composition and ensuring everything is in proportion. Your underdrawing doesn’t need to be perfect; you’ll refine it later. The only crucial rule for an underdrawing is to use minimal pressure with your pencil, so the lines are light and will be concealed in the final drawing. Using a hard pencil like H or F can help maintain light lines. Alternatively, artists often use chalk or charcoal for underdrawings in paintings and drawings. Try different kinds of material for different artworks to see what suits your needs best.
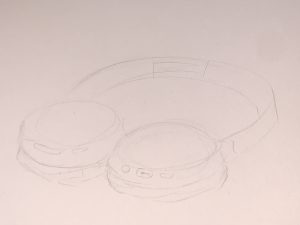
[Image: Light and rough underdrawing of a pair of headphones; an underdrawing like this should take no more than a few minutes to sketch.]
Hatching & cross-hatching
Hatching and cross-hatching are shading techniques where you add depth and value by drawing many straight lines. Here’s how they work:
Hatching and cross-hatching are shading techniques where you add depth and value by drawing many straight lines. Here’s how they work:
Hatching:
In hatching, you create shade and value by drawing parallel lines that do not intersect. To make an area appear darker, you can:
- Draw the lines closer together.
- Use a softer pencil.
- Apply more pressure to the pencil.
Cross-Hatching:
Cross-hatching, on the other hand, involves two or more sets of parallel lines that cross each other. You can achieve different shades by using the techniques above in addition to:
- Adjusting the angle at which your lines intersect. Typically, you aim for angles around 90 degrees, the sharper the angle, the darker your shading will appear.
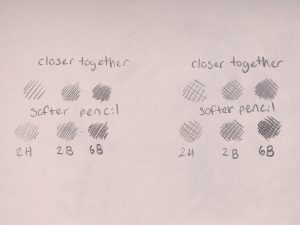
[Image: Hatching and cross-hatching gradients using different techniques.]
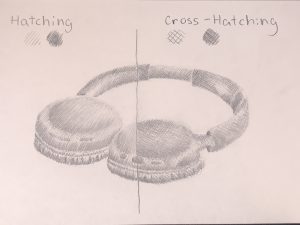
[Image: Drawing of headphones showcasing a combination of hatching and cross-hatching shading.]
Stippling
Stippling is a shading technique that relies on dots to create depth and value in your artwork. To master stippling, keep these key points in mind:
- Density for Darkness: If you want to make an area appear darker, place more dots closer together. The denser the dots, the deeper the shading.
- Sparse Dots for Lightness: For lighter areas, keep the dots sparse and evenly spaced. This creates a sense of lightness and gradual transition.
- Patience is Key: Stippling can be time-consuming and requires patience. Be sure this technique aligns with your artistic vision before diving in.
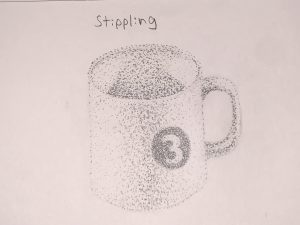
[Image: Drawing of headphones showcasing stippling shading.]
Blending
Blending in drawing is to seamlessly merge values to achieve a smooth gradient, rather than relying on individual marks. This technique can be accomplished in various ways, and it’s a valuable skill for any artist. Here’s how to blend effectively:
Shading Seamlessly:
- Use the side of your pencil tip to apply gradual and consistent pressure.
- This creates a soft transition between dark and light areas, resulting in a smooth blend of values.
Smudging:
- Smudging involves merging pencil marks together to create a blended effect.
- While you might have unintentionally smudged a drawing with your hand, this method lacks precision.
- A cleaner and more controlled approach is to use a tissue or a cotton swab for smudging.
- Tissue and cotton swabs are readily accessible and easy choices for smudging.
- Paper blending sticks, specially designed for art, offer finer control and have a longer lifespan compared to tissues or cotton swabs.
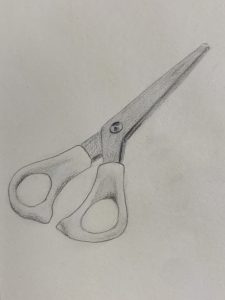
[Image: Drawing of a pair of scissors drawn using blending techniques with a pencil and a tissue.]
Materials like charcoal and pastel are exceptionally well-suited for blending however, be mindful that they may wear down your blending tools faster than graphite. Incorporating blending techniques into your artwork allows you to achieve graceful and seamless transitions, adding depth and realism to your drawings. Experiment with different blending methods and tools to discover the ones that best suit your artistic style and vision.
Scribbling
Scribbling is a technique often overlooked for shading in drawings. Similar to hatching, you achieve darker values by bringing lines closer together and applying more pressure. The beauty of scribbling lies in its freedom – there are no rules for the direction or shape of your lines.
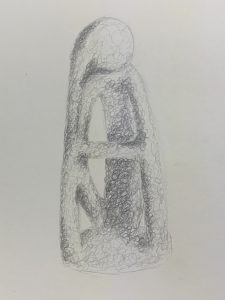
[Image: Drawing of a statue shaded using scribble technique.]
Experiment with scribbling to add spontaneity and depth to your drawings.
Drawing with an eraser
Erasers are typically thought of as tools for erasing mistakes, but they can also serve as creative instruments for drawing in reverse. Here’s how to leverage erasers to add a unique dimension to your artwork:
Highlights and Outlines:
- Use the fine corner of an eraser or an eraser pencil to add highlights or glowing outlines around elements in your drawing.
- This can create a striking contrast and bring specific areas to life.
Eraser-Only Art:
- Take your creativity a step further by drawing entirely with an eraser on paper previously colored in with a pencil.
- A kneadable eraser is an excellent choice for this technique due to its versatility.
Embrace the unexpected and experiment with erasers to uncover your unique style and techniques. Drawing with erasers opens up a world of creative possibilities, allowing you to add depth and uniqueness to your artwork.
Practice exercises
The most effective way to improve your drawing skills, or any skill for that matter, is through consistent practice. Here’s are some steps to help you refine your drawing techniques:
- Choose Your Subject: Start by selecting an inanimate object from your surroundings. Opt for something with a simple shape and opacity, like an apple or a mug, for an easier beginning.
- Variety of Techniques: Replicate the same object using a range of techniques introduced in this tutorial – hatching, cross-hatching, stippling, blending, scribbling, and, if you’re feeling bold, even use an eraser.
- Complex Challenges: Challenge yourself with more complex subjects like reflective and transparent materials (e.g., glass) or intricate shapes (e.g., human faces or hanging fabric).
- Explore Different Styles: Remember that your drawings don’t need to be strictly realistic. Experiment with various styles such as realistic, cartoon, abstract, and even create a style that’s uniquely yours.
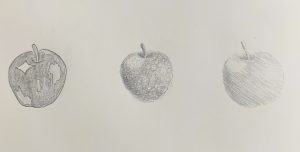
[Image: Three drawings of an apple drawn using various techniques and styles.]
By repeatedly practicing and experimenting with different techniques and styles, you’ll not only enhance your drawing skills but also discover your artistic identity. So, grab your sketchbook and embark on a creative journey to become the artist you aspire to be.
