Filming Techniques and Equipment
As you are preparing to film your virtual gaming simulation, reflect on the equipment and human resources required to support your vision. Consider the following questions:
- Which team members will be involved? For example, project team members, external members.
- What equipment do you need? For example, camera, voice recorder, audio equipment, lighting, blind-out curtains, clothing.
When filming your virtual gaming simulation, preparation is key! Before filming the simulation, you want to ensure that you have all the required equipment and know how to use it. You can purchase the equipment, which is beneficial if your goal is to incorporate virtual gaming simulations throughout your curriculum. The purchased equipment can be used for future virtual simulations and by multiple team members. Another option is to rent equipment. You can rent filming equipment from your school library, some local public libraries, or music stores (e.g., Long & McQuade).
For the virtual gaming simulation, film each decision point question and options as a single shot. We recommend not filming all the takes in the same video as this technique can complicate reviewing and editing. Each of these individual shots will be uploaded to the branching tool, for example H5P, to build the overall scene for the virtual simulation scenario.
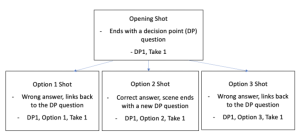
Depending on the complexity of each shot, you may need to film multiple takes of the one shot. It is recommended to film a minimum of 2–3 takes per scene to ensure you have captured the takes without errors, as well as have different options to choose from for the final take. It is also good practice to film multiple angles of the same shot in case you want to merge two takes together. The smaller scenes maybe 2–3 takes, whereas the longer scenes may require 10–20 takes. Rehearsing filming the scenes prior to the filming day will help prepare you and the team and decrease the number of takes per shot. Label each take starting from Take 1, then Take 2, and so on similar to the image below:
Cameras Techniques
If you are filming with a handheld or mounted filming device, it is recommended to purchase or rent a product that has built-in stability to avoid shakiness of the person holding the device (e.g., GoPro).
When filming the virtual simulation, you want to think about cinematography and how you want to program the setting for the camera in each scene. You may need to modify the lens/perspective of the camera to best suit the scene’s filming goal and environment.
For example, you will use certain settings for close-up procedures (e.g., reading a monitor) or you may need a wide-angle perspective if you want to capture the full environment (e.g., communicating to the client and family).
Nathan Grebe’s YouTube video Cinematography Lesson One: Angles illustrates various examples of different angles when filming. For example, wide, medium, close-up, high, low, over the shoulder, pan, dolly, tilt, and many more.
To learn more about each angle in detail read the open education resource Exploring Movie Construction and Production by John Reich and learn more about What Is Cinematography?
Filming with a Professional Film Crew
When using a professional filming crew, multiple camera angles can be filmed at the same time, and changes in perceptions can be made while filming. The filming crew will manage the filming, camera shots, lighting, audio, and editing. When working with a professional film crew, your role will be to watch the external screen and direct the scene as needed.
As the director, you will tell the actors how to act in each of the scenes by describing the signs and symptoms of the client’s diagnoses, directing them how to embody the character of the client, and explaining the physical movement to portray the realism of a clinical situation. You will also help with managing the set. You will need to set up the props, ensure the equipment is functioning, and ensure all required props are on set.
Your institution may have a filming department that can help you during the filming stage. Centennial College has a School of Communications, Media, Arts and Design, which has various film programs: Script to Screen – Advanced Television and Film, Broadcasting – Film, Television, Digital Media and Radio, and Film and Television – Business.
Filming without a Professional Film Crew
When filming without a professional filming crew, it is recommended to have a minimum of two team members: one member to film the scene and another member to watch the scene on an external device such as a tablet, monitor, or phone. Streaming the filming camera to an external device for another team member to watch will help to catch errors that may occur.
Some examples of errors can include:
- The sound is visible in the scene shot.
- Seeing the nurse’s head in the scene shot when filming from first person.
- The camera is out of focus or turned off due to the battery.
The team member watching the external device can inform the team and stop filming to correct the error before re-filming. The second device will also allow you to playback the videos onsite as necessary to determine if you captured the shot you wanted and to check if the audio was clear, or if you need to re-film the scene.
Educator Tip
If you are filming your first virtual gaming simulation, it is important to choose the right camera to use. If the simulation is about a scenario that is one-on-one or has limited movement, you can use a DSLR or mirrorless camera for filming. However, if the scene has a lot of movement into different positions, a GoPro may be a better option. It is important to take time to learn about the different cameras and get comfortable using the camera before making a decision.
Once you choose a camera for filming, go out and practice filming with it prior to the rehearsal so you will be ready. Go out and have some fun filming your favorite things, practicing different angles, and listening to the audio. Being comfortable with the camera will help your confidence during filming.
Insights from the Student Team
When filming virtual gaming simulations, you can film the scenes in sequence. For example, at the end of a decision point question, you can film the two incorrect answers and then the correct answer. It is important to remember to take a picture of the end of one scene because the next three scenes (i.e., the options for the two incorrect and one correct answer) need to start the same as the end of the decision point question scene to ensure flow and consistency.
One role you can take as a student lead is to monitor each scene for consistency and flow. For example, make sure the props are in the same places for each scene, ensure the actors are in the same position from the end of one scene to the beginning of the next, monitor for errors in wording or skill technique. Other important factors to look out for are removing clocks from the walls or hiding brand name labels.
