6 Assistive Technology – Try It For Yourself
Some of the assistive technology that students use with learning materials is easily available through Microsoft Office. While students with disabilities may use assistive technology to mitigate a challenge the learning environment presents, using these tools can also increase productivity, motivation, and engagement for all students – and faculty too! The three most commonly used assistive technologies are speech-to-text, text-to-speech, and captioning.
Speech-to-text
Speech-to-text can most easily be described as talking while your computer does the typing. Microsoft Word Online has this feature as Dictate. To give this a try:
1. Open MS Word Online or Microsoft 365 and start a new blank document.
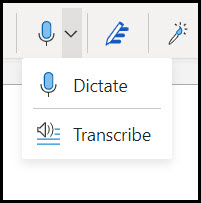
2. Look for the Dictate icon on the ribbon and select Dictate. Transcription is a different process that can be used to record a meeting or create a transcript from an audio recording.
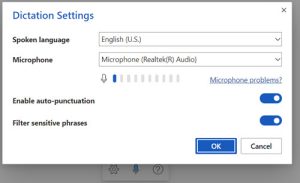
3. A menu will appear at the bottom of your screen. Select the Settings icon that looks like a gear. Set your language and microphone and turn on auto-punctuation.
4. Click on the Blue Microphone icon to turn on dictation and begin to speak.
Dictation Tips:
- Speak clearly – it can help to try to speak like an announcer.
- Speak in phrases – the computer does not understand you but determines what you say by comparing the sounds sets to common patterns of speech.
- Think about what you want to say and continue until you finish your thought. Do not worry about errors, focus on getting your ideas out. You can make corrections later.
- You can use simple commands such as “undo,” “new line,” and “new paragraph.
Dictate is available in other products including Outlook and PowerPoint, check out Dictate in Microsoft 365 for instructions.
Text-to-Speech
Text-to-speech software takes the text in a document and converts it to speech, basically reading the text out loud. The voice is a computer-generated one but, with advances in technology, these voices are much less mechanical than in the past. One powerful tool in Microsoft 365 is Immersive Reader. It can be used to support students with visual and learning disabilities as well as International students who benefit from hearing and seeing the text to improve their listening and speaking skills. It can be used in other creative ways such as part of a personal proofreading strategy for written assignment as hearing your paper read out loud can help you identify mistakes or as another way to review a slide deck as Immersive Reader also works with PowerPoint. Here is how you can try Immersive Reader in MS Word Online:
1. Open MS Word Online or use Microsoft 365 to open any word document.
2. Select View from the Word Ribbon at the top of your window and then select Reading View.

3. Select Immersive Reader from Reading View Ribbon.
 4. In Immersive Reader you can adjust:
A. Text Preferences
B. Grammar Options
C. Reading Preferences
D. Voice Settings
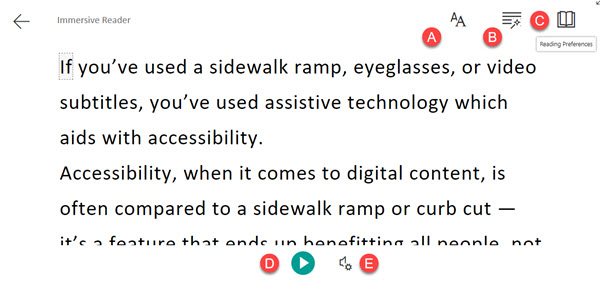
5. Select the Play icon (E. on the image above) to begin listening to your reading.
Captioning
While Dictate and Immersive Reader works best using Microsoft 365 or Online versions of Word, using MS Teams downloaded version (not the browser version) now offers two new tools to increase accessibility – captioning and transcription.
Captioning
You can turn on captioning in any MS Teams meeting.
1. Join the meeting.
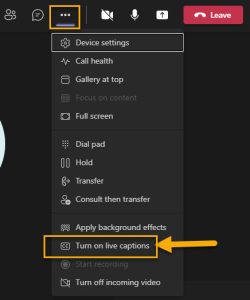
2. Select the three ellipses on the menu bar at the top of your window and scroll to Turn On Live Captions. The captions should appear at the bottom of your window.
3. Select the three ellipses to the right of the captions to open settings and change the spoken language if needed
For further instructions, including how to use Live Caption on your mobile device, check out Use Live Captions in a Teams Meeting.
Transcription
If you are interested in Transcription in an MS Teams meeting, an overview is available through Microsoft. Please note, transcription works best in a meeting set up through the calendar as the transcription file will be available to download from the calendar entry after the meeting has ended. The transcription will appear beside the meeting window as it is being generated.
