Chapter 4 – Visual Processing and Distance Measurement Techniques
4.1 – Face Detection
Overview
In today’s lesson, we’ll be looking at how we can teach Zumi to detect faces and stop signs. Can you think of some real world examples, where facial recognition technology is used?
The Haar Cscade Algorithm
Before looking at a face, let’s look at an example that has fewer features. You have no problem identifying the sign as a stop sign, but how do you know it’s a stop sign? What difficulties will a computer have in trying to do the same task?

The easiest way to identify that this is a stop sign is by identifying particular features, such as color and shape. We can train computers to recognize a stop sign by collecting multiple pictures of stop signs, called positive images, as well as images that do not have stop signs, called negative images. The model that is produced is known as a Haar cascade.
Q: Is this process similar to how humans learn? How did you learn too differentiate and identify a stop sign?
Haar features
A Haar cascade is based on the idea that certain features, called Haar features, can represent objects.
Recall that an image is a set of pixels, and each pixel in the color image is normally represented by a set of three numbers. Now let’s convert that stop sign image to grayscale.
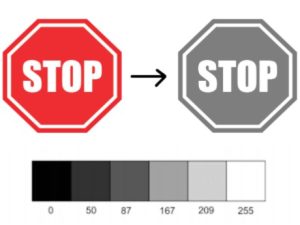
Note: In a grayscale image, you only need one number to represent each pixel instead of three. The lowest value is 0, representing black, and the highest value is 255, representing white. Any value in between is a shade of grey
Let’s try applying the Haar cascade concept to understand Haar features in relation to indentifying faces. Faces have multiple features, including eyes, noses, and mouths. If you feed the computer multiple grayscale images of faces, it will start to find a pattern in the average pixel values. Down the bridge of the nose, it is more likely to find a column of lighter pixels surrounded by darker pixels on the sides. The computer might also find that the area with our eyes and eyebrows generally has darker pixels than our cheeks.

Activity
Using the knowledge learned in this lesson, lets try creating a program that is able to recognize faces. Some initial code and pseudocode is provided below to help you get started!
from zumi.util.camera import Camera
from zumi.zumi import Zumi
from zumi.util.screen import Screen
from zumi.util.vision import Vision
import    time

zumi =    Zumi()
camera    = Camera()
screen    = Screen()
vision    = Vision()

start camera
take an image
close the camera
convert the image to gray
try and find a face in the image
show the image
Things to Remember:
- To convert an image to greyscale, the following line of code can be used:
image = vision.convert to gray(image) - To detect faces, the following line of code can be used:
vision.find face(image) - To show the image on the screen, the following line of code can be used:
vision.show_image()
HINT: Use the following line of code to look for faces:
vision.find_face(image, scale_factor = 1.05, min_neighbors=8, min_size= (40,40))
Here’s a couple of advanced parameters have been provided that make it possible to identify faces.
- minSize: Setting a minimum size will only return faces that it finds bigger than (x,y) area.
- maxSize: Setting a maximum size will only return faces that it finds smaller than (x,y) area.
- minNeighbors: Each feature is a rectangle of pixels. Neighbors are any features that have similarities. If you increase this number, it will detect fewer faces because the conditions for meeting the requirements of a face require more similar features.
- scaleFactor: Images are often reduced in size to make training easier. This is a computationally heavy process, so the default is reducing the image by 5% at each scale.
Try playing around with different values for these parameters. What do you notice?