Plasma Physics
Procedure
WARNING!!!
This experiment uses high voltages and a vacuum chamber that is, in theory, breakable. Please use the utmost caution. If you aren’t sure about what to do, please ask your lab tech or TA
DO NOT use a voltage above 1000 V. All cables and connections are only rated to 1 kV. Using much more voltage will cause arcing inside the cable connections, which will likely damage the HV power supply, cable connection, and potentially anyone close by.
DO NOT turn off the vacuum pump without completely opening the isolation valve and gas inlet valve. If the pump is turned off while under vacuum, the oil that lubricates the moving parts of the pump will be sucked up into the plasma chamber. The experiment will not function again until it has been thoroughly cleaned out, which will take the better part of a week.
4.1 Qualitative Plasma Analysis
4.1.1 Vacuum System
- We first need to be sure that your vacuum system is leak tight. Make sure the gas inlet valve and the isolation valve are closed.
- Turn on the vacuum pump, then slowly open the isolation valve. Watch the pressure go down (hopefully very quickly).
- Pump for a couple of minutes, close the isolation valve, then check the vacuum gauge. The pressure should creep up slowly as the water molecules stuck to the inside of the vacuum chamber slowly off-gas. If the pressure is increasing steadily for a minute or longer, then you may have a vacuum leak. Flag down a TA or lab tech.
- Re-open the isolation valve. The vacuum gauge is hopefully showing a number close to zero. Close enough that we are just going to call it zero. You can use the small screwdriver to adjust the zero on the pressure display so that the display actually show zero, or just note the value and take all of your measurements relative to that. We’re always going to be measuring relative pressure, so the absolute value of the zero pressure isn’t very relevant.
4.1.2 Plasma Generation and Properties
- Turn the HV power supply to between 800 and 900 V. DO NOT GO OVER 1000 V!!!
- The plasma will not turn on because the chamber pressure is too low. Close the isolation valve. The pressure will slowly increase, and you should see the plasma turn on within a minute or so. You can open the gas inlet valve ever-so-slightly if you want to speed this up. Too much gas will increase the pressure past the point where a plasma can form.
- The plasma will change as the pressure slowly increases. Take notes of how the plasma is changing as a function of pressure. Taking pictures is probably a good idea.
- Fun Fact: The gap between striations in the positive column is a function of pressure and a direct result of quantum mechanics.
4.2 Setting Up for Quantitative Measurements
- Close the isolation valve to separate the pump from the vacuum chamber. Open the gas inlet valve to bring the chamber to atmospheric pressure.
- Carefully remove the end plate from the left-side of the apparatus and put it down without bending the copper wire and steel disk.
- Remove the long Pyrex tube from the left of the apparatus and re-attach the end plate to the Pyrex cross using one of the O-rings. The bolts should be finger-tight – do not use a wrench. The electrode spacing should be something like 3 cm now.
- The Langmuir probe should already be in the apparatus, mounted off of the bottom aluminum plate. Make the Langmuir probe circuit as shown in Figure 7.
- Turn on the scope and start out in XY mode (through the ‘Display’ menu). When you turn on the function generator, you should see the XY point move back and forth in the x-direction. You can change the ‘persist’ option if you want the curve to stay on the screen.
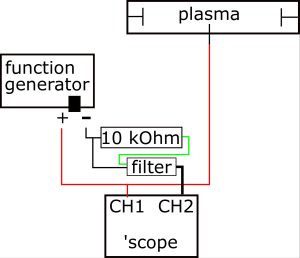
Figure 7: Wiring diagram for plasma measurements with the Langmuir probe.
4.3 Measuring the Langmuir Curve
In order to measure the plasma temperature, potential, and density, we need to probe the plasma constituents, in this case, electrons.
- Generate the plasma in the same way as you did in the previous sections. Use as low a high-voltage (400-500 V) and as low a pressure as you can get away with. Then the plasma behaviour we want to see should be accessible within the range of our function generator.
- As you adjust the probe voltage, you should see a change in the probe current; hopefully an exponential change that looks similar to Figure 2. These steps often require the user to make adjustments on the scope and see how the data looks, then maybe change the pressure in the vacuum chamber, and go back and see what the scope data looks like. Keep in mind that the pressure is always creeping upward, so the curve won’t stay the same for long.
- If you are getting a nice curve, switch to YT mode on the oscilloscope. Use the trigger menu to set the scope to trigger on the increasing edge of channel 1, near the bottom of the ramp. The the scope will start collecting data once you hit the trigger threshold. Make sure the trigger type is ‘Normal’. Save the data from each channel to a USB stick using the ‘Save/Recall’ menu. Make sure the save type is ‘Waveform’.
- Take the Langmuir probe data at various pressures, hopefully at least 5 values of pressure. Then you will be able to comment on the difference in plasma parameters.
- Please try to analyze the Langmuir curve before you leave, at least to make sure it is exponential, and that the main features from the example curve are present.
4.4 Different Gases
- These measurements can be done with the plasma made from atmospheric gas (i.e. Nitrogen), or with Argon or Helium, which we also have access to. Repeat your previous measurements with at least one more gas.
- Evacuate the plasma chamber and pump on it for about 2 minutes to get most of the outgassing out of the way.
- Connect the portable gas-holding device (i.e. inner tube) to the gas inlet valve. Add gas of your choice until the chamber is about 0.5-1.0 Torr. You need a relatively high pressure so that the continued outgassing (which is air and water) is only a small fraction of the gas in the chamber. Evacuate the chamber again and refill it. Evacuate it AGAIN and refill it. Now your chamber should contain mostly just the gas you mean to be studying.
- Us the same parameters as the previous measurements in air to make sure that the plasma is as similar as possible.
- Generate the Langmuir curve like you did for your previous gas.
4.5 Shutting down
- Turn off the Langmuir probe voltage. Turn off the high voltage by turning the knob down to zero volts, then shutting off the supply. Look at the multimeter to be sure the high voltage is actually zero.
- Make sure that the gas inlet valve is closed, and the isolation valve is open. Remove the inner tube from the gas inlet. Quickly open the gas inlet valve and almost-simultaneously turn off the power bar that powers the pump. (or just grab the TA or lab tech to shut things down if you’re not up for it)
- Celebrate by analyzing data.