Collisions I Exercise 1: Set-up
Collisions I
Exercise 1: Set-Up
Mazur claims that when two identical carts collide on a frictionless surface, the velocity-time graph will look like this…
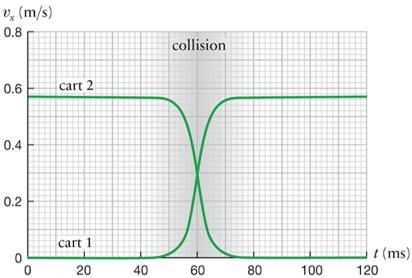
Using Capstone, you will try to re-create the experiment and the result. Before doing do, you will need to consider the following:
a) Open the Capstone file called “Collisions1” from the desktop folder. The sensors (now we have two) are set up for you in the Capstone software, but you will have to correct for the fact that the motion sensors have different reference frames. Let a cart roll along the track and look at the velocity as measured by the two sensors. You’ll see the problem… If the software does not plot 2 velocities (two different sets of data) on the same graph perform the following step.
To plot both velocities on the same graph, click the y-axis label, select Ch 1 velocity then click it again and go to ‘Add similar measurement’ and choose Ch 2 velocity.
Decide which direction you want to be positive and then use the Capstone calculator  (left Tool bar, bottom of the list) to modify the definition of one of the velocities:
i. Once inside the calculator, define the velocity “vc” (for velocity “corrected”). When defining the function, make sure to use the variable name (you can find them by clicking the rainbow triangle ![]() – e.g. Velocity Ch P2).
– e.g. Velocity Ch P2).
ii. Under calculator properties, tell Capstone that “vc” is a velocity by giving it units of m/s.
iii. Remember to “accept” the function before leaving the calculator. “vc” should now appear in your data summary (rainbow triangle ![]() button) under the calculator tab. Replace the offending velocity data with the corrected velocity on the velocity-time graphs.
button) under the calculator tab. Replace the offending velocity data with the corrected velocity on the velocity-time graphs.
b) You can “simulate” the absence of friction by tilting the track. Give one of your carts a solid push (in whatever direction you’ve set as positive) and let it roll. Adjust the slope of the track until it travels at a (more or less) constant velocity.