Exercise 2: Setting up the experiment
For this experiment you will need:
- clear box with vertical edges, about the size of your hand
- protractor
- paperclips or any other small object that stands up on its own (thumb tacks, Lego pieces, etc.), which will be referred to as markers
- water
- sheet of paper (standard letter size i.e. 8.5” x 11”)
- (optional) tape to keep paper still
Setting up the Experiment
The setup involved in this experiment is more involved than the previous labs. You may find it useful to follow along with this video:
Note: If you would like to view this video in full screen, you can click on the McMaster logo found in the bottom right corner (this opens the video in a new tab).
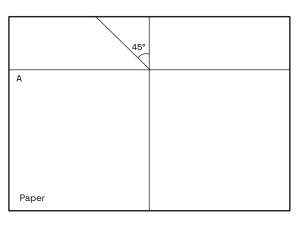
Place a piece of paper on a flat surface and if you are able, tape it down to keep it in place. With a pencil, divide your paper into four sections, making sure the lines meet at 90 degree angles. The vertical line should be centred on the page, while the horizontal line should be closer to the top edge of the page.
Use your protractor to draw an additional line at 45 degrees, extending from the centre of your sheet into the top left quarter. These markings define your line of sight and will serve as the angle of incidence. At this point, your sheet should look similarly to this photo:
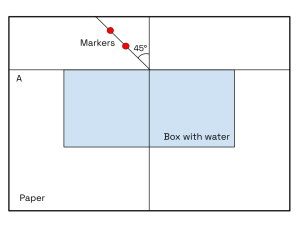
Place your clear box on the paper with its top side along the horizontal line. Trace an outline of your box and stick your markers on the straight line angled at 45 degrees (if you used paperclips, you can bend them into upside-down T-shapes). Do whatever you find easiest, the main thing is that you can easily look along the vertical segment to make a line-of-sight as shown in the figure below.
 Now your sheet should look like this:
Initial Observations
Now that your experiment is set up, let’s make some initial observations.
First, look through the clear box along the line of sight that you denoted with your two markers. Here, the markers are on the opposite side of the box from where you are viewing (i.e. you need to look through the box to see the markers on the other side). Make sure that the two markers are perfectly in line as you look through the clear box – this will ensure your line of sight is at exactly 45 degrees to the plane of the box. At this point, air is filling both the inside and outside of the box, so there should be little to no optical distortion.
Exercise 2.1 (2 marks)
Now, fill your box half-way with water so that the bottom half of the markers appear under the water, and the top of the markers are above the water. Repeat your observation. As you look through the box at the markers on the other side, what do you see? The markers should look ‘cut and shifted’. This is the effect you will be exploring in the Exercise 3.
Before you continue!
Before continuing, be sure you have completed (2.1), which will be graded and submitted through Crowdmark.
