Overview of Dentitions – Dental Charting (Part B)
Recording the Dental Examination
The oral findings of a patient are recorded either electronically using one of the many software systems or on a paper chart. The patient’s chart includes:
- Charting symbols
- Abbreviations
- Color coding can be used in the recording process to indicate various conditions and existing restorations.
Tooth Diagrams
Dental charts are available in various diagram styles, but anatomic and geometric designs are the most frequently used dental charting systems. In the anatomic diagram, the illustrations resemble the actual crown and root of the tooth. On the geometric diagram, each tooth is represented by a circle. The circle is divided into five sections that represent each tooth’s surface. Electronic charting has provided a standardized system whereby all clinical staff members will chart the same way.
Colour Coding
Whether using paper charts or electronic charts, colour coding is a visual notation to differentiate between treatment that has already been completed and treatment that still needs to be completed. Black or blue symbols represent dental work that has been completed, and red symbols indicate treatment that needs to be completed at future dental appointments. Once work has been completed, you will mark over the red with a black or blue notation to indicate that the work has been completed. Some dentists mark silver amalgam restorations in black or blue and composite restorations in red. It is important to follow the convention in the office where you work.
Charting
When charting symbols are placed on the tooth diagram of the dental record to represent the various treatments and the types of dental material used to restore the tooth or teeth, it is important to learn the charting symbols for treatment to be completed as well as for treatment already provided.
In the following content you will learn the eleven charting circuits:
- Missing and misplaced teeth
- Occlusion
- Abnormal surfaces of teeth
- Mobility
- Percussion
- Abnormalities of the gingival periodontal membrane
- Decayed, replaced, fractured teeth
- Contact points
- Vitality tests
- Radiographs
- Laboratory tests
Circuit 1: Missing and Misplaced Teeth
The following findings need to be charted:
- Unerupted
- Missing (congenitally or extracted)
- Incomplete/over eruption
- Drifting
- Tipping
- Rotated
See explanations and examples of each in the slides below.
Circuit 2: Occlusion
Learn more about occlusions in the slides below.
Circuit 3: Abnormal Surfaces of the Teeth
The following are findings for abnormal surfaces of teeth:
- Attrition
- Abrasion
- Erosion
- Enamel hypoplasia
- Enamel hypocalcification
- Resorption (notation in the chart)
- Discolouration (notation in the chart)
- Decalcification vs. hypocalcification: both present as white defects and are similar. Differentiation can be determined by patients’ reported history.
- Hypocalcification may be caused by fevers during tooth development
- Decalcification may be caused by diets high in acid (citric), sucking on candies, or excessive vomiting
See explanations and examples of each in the slides below.
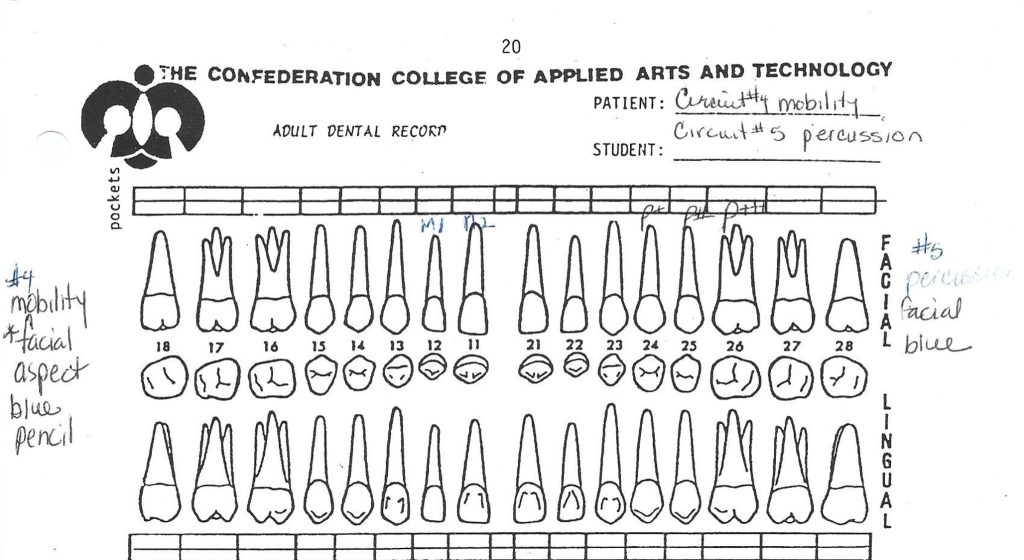
Circuit 4: Mobility of Teeth
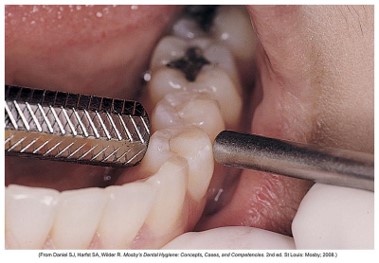
Clinical mobility of teeth provides a method of determining the presence or absence of supporting bone for the roots of the teeth. To determine, the clinician would use the blunt end of two instruments and press on a tooth’s buccal and lingual surfaces to determine if the tooth’s mobility is as shown in the image. The cause may be due to periodontal pockets or traumatic occlusion.
It is referred to as a numerical index scale of 1 to 3, with the number being related to millimeters of horizontal tooth movement with the socket. Mobility is recorded as M1, M2 or M3:
- M1: slight mobility, movement up to 1 mm
- M2: moderate mobility, movement up to 2 mm
- M3: severe mobility, movement of 3 mm or more, possible vertical movement also
Circuit 5: Percussion of Teeth
A percussion test is done by tapping on a tooth’s incisal or occlusal surface with the blunt end of an instrument. The clinician will listen for sounds and observe the patient’s response to the procedure. This is a valuable test for evaluating inflammation of the periodontal membrane and secondary tooth pulpitis.
It is recorded as:
- P+: slight tenderness
- P++: moderate tenderness
- P+++: severe tenderness
Below is a copy of a paper chart showing Circuits 4 & 5 symbols. Symbols are placed close to the apex of the affected tooth.
Circuit 6: Abnormalities of the Gingiva and Periodontal Membrane
Learn more about gingiva and periodontal membrane abnormalities in the slides below.
Circuit 7: Decayed, Restored, and Fractured Teeth
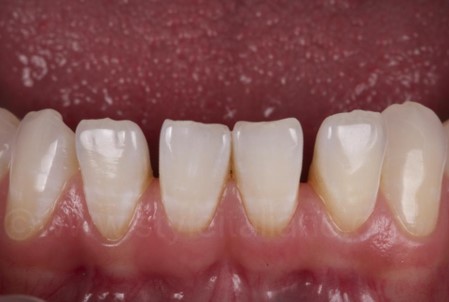
Circuit 8: Contact Areas
The improper contact relation between teeth may result in food impaction, caries, and deterioration of the gingival tissue. Unwaxed dental floss is used to determine the contact relationship of all teeth. Ideally, the floss should pass through the contact area with some resistance.
The image below shows open contacts between teeth 31 – 32 and 41 – 42.
Circuit 9: Vitality tests
Tests using temperature and/or electric pulp testing can be used to determine the status of the pulp.
For a temperature test, it is recorded as:
- Positive to heat +H or cold +C
- Negative to heat –H or cold –C
With an electric pulp tester, record the number on the instrument at which the patient reacts.
Circuit 10: Radiographs
Radiographs are a part of a comprehensive dental examination and enable a dentist to see conditions that are not visible in the oral cavity. Radiographic findings such as decayed surfaces, endodontically treated teeth, and other findings must be charted.
Uses of radiographs:
- Detect dental caries in the early stages.
- Identify bone loss in the early stages.
- Locate abnormalities in surrounding hard and soft tissues.
- Evaluate growth and development.
- Provide information during dental procedures such as endodontics.
- Document a patient’s condition at a specific time.
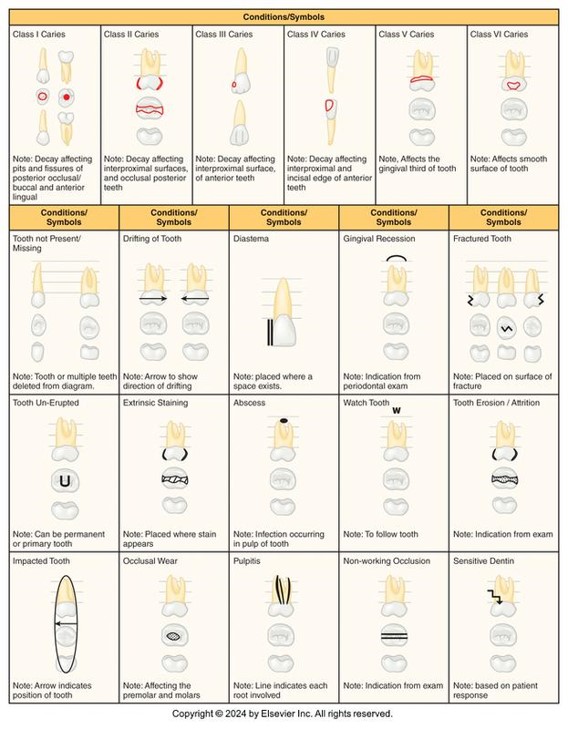
Below are examples of alternate charting symbols.
 |
 |
You have completed Module 7B. Please return to Blackboard for the next steps.
Media Attributions
- Images from: Modern Dental Assisting, 13th and 14th Edition
