4 Chapter 4
Part 1 – Merge Documents
Merge documents allow you to create a single letter and then use a data source to send that letter to multiple people without having to retype their information manually. I want you to start by opening a new blank document and writing a standard letter to be sent out to several patients. The letter contains information regarding an hours change to the clinic you work at. If you are unsure how to create a proper letter click here for a tutorial.
- Create a Merge document
- Once your letter is written click on the Mailings tab
- Choose the Start Mail Merge icon and click Letters
- Choose Select Recipients and Type a New List
- Fill out the demographic information that comes up for 5 people
- Click OK and you should be presented with a save screen that looks similar to this:
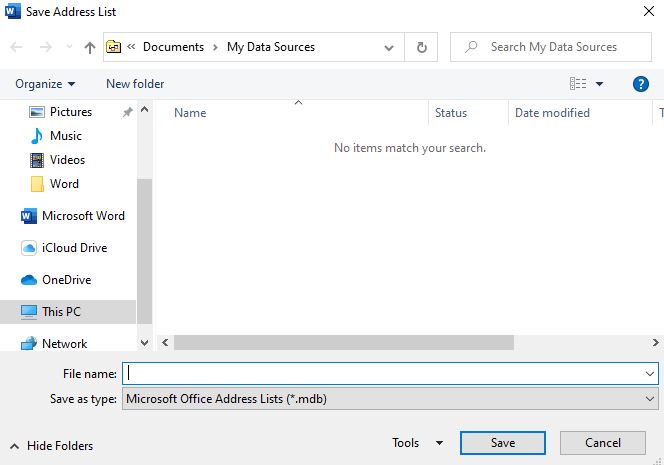
- Type “Addresses” in the File Name and click Save
- Now go back to where you initially wrote the address of the person receiving the letter
- Delete the name you wrote down and
- Find the Write and Insert Fields grouping
- Find the Insert Merge Field Icon:

- You will see a dropdown list of all the demographic fields you filled out. Click First_Name then hit the space bar then go back and click Last_Name
- Insert the rest of the fields for the address
- Find the Preview Results icon:
 and notice that all of the fields now show the first entry in your address list
 - When you are satisfied that everything is correct click the Finish and Merge and you’ll be presented with three options:
Edit Individual Documents – this option creates a new document with all the letters on individual pages in case you want / need to personalize them
Print Documents – this option sends the merge document straight to the printer to print them off as-is
Send email messages – this option allows you to send the letter as an email, if you have the emails of the people in the list. Note: you cannot attach documents to an email using the merge feature.
Part 2 – Forms
Forms allow you to create fillable documents for someone to fill in on a computer console, or print and fill in if applicable.
- Create, format, and modify tables
- Open a new blank document
- Navigate to the Insert tab and find the
 icon – this will allow you to insert a table into your document
 - You can use the tiles to create a table – try creating one with 2 columns and 3 rows
- You are immediately taken to the Table Design tab. Here you can specify the design of the table – whether it has header rows or a total role, you can pick a design for your table from the Table Styles grouping, and you can change the border style in the Borders grouping. Pick a style for your table.
- In the first column type the following:
Row 1: “Name:”
Row 2 “Birthdate:”
Row 3 “”Gender Identity” - You can leave the second column blank for now
- Use form controls
- We will use the same document as above
- First we need to turn on the Developer tab
- Click on File and then find Options at the bottom of the File tab
- Choose Customize Ribbon
- On the right hand side there is a list of the tabs, find the Developer tab and put a checkmark beside it
- Click OK
- You will notice that we have a new tab – the Developer tab
- Make sure you are in the second column, first row of the table and navigate to the Developer tab
- Find the Controls grouping and you will see the following icons:

These are Form Controls – they allow you to put in fillable elements like text boxes and dropdown lists for people to fill out a form electronically. The form controls are:
Rich Text Control – this control allows the user to enter text and format it (bold, font colour, etc…)
Plain Text Control – this control allows the user to enter text without formatting options
Picture Content Control – this control allows the user to insert an image into the form
Building Block Gallery Content Control – this control allows the user to build equations in the form
Check Box Content Control – this control allows the user to check off boxes
Combo Box Content Control – this control provides a list of options the user can choose from
Dropdown List Content Control – this control is similar to the Combo Box, but is a drop down list
Date Picker Content Control – this control allows the user to pick a date
Repeating Section Content Control – this control surrounds other controls so you can repeat the same controls elsewhere in the document
Legacy Tools – the legacy tools are from Word 97-2003 and are not as full featured as the new content controls listed above - In Column 2 Row 1 place a Plain Text Content Control –

- In Column 2 Row 2 place a Date Picker Content Control –

- In Column 2 Row 3 place a Dropdown List Content Control –

- Select the control and click Properties in the Controls grouping
- In the bottom left corner of the dialog you will see Add –

Click Add and then type Male and click OK
Click Add again and then type Female and click OK
Also add Trans*, Other, and Prefer not to say - Click OK to close the properties dialog box
- You now have a very small form someone can fill out! But – its not yet ready to fill out – if you click on any of the controls you will see that they are unusable right now.
- In the Protect Grouping of the Developer Tab, click Restrict Editing
- Put a checkmark next to option 2 “Allow only this type of editing in the document”
- In the dropdown list choose Filling in Forms
- Click Yes Start Enforcing Protection
- A pop-up will ask you to put in a password, for our purposes use 1234 and click OK
- You will now be able to interact with the Form Controls and fill them out!, but not be able to interact with other parts of the document.
- Create a Template
- We will use the same document as above
- Choose File tab, Save As, This PC, and choose the desktop to save it
- Name the file simply Form
- From the dropdown list of document types choose Word Template (*.dotx)
- Close Word
- On the desktop double click the template – it now opens up a Document 1 .docx file for you to fill out – you’ve created your very own template file!
- When you go to File, Save As, it will want to save as a regular document
- You can double click on the template file whenever you want to fill out the form
- Edit a Template
- Right click on the template on the desktop
- Choose Open
- This will open the template for you to edit should you want to make edits to the template
All screenshots and icons from Microsoft Word, used with permission from Microsoft.
