Table Formatting
Tables provide a clear and accessible format for displaying relationships between information and ideas. It should be noted that the use of tables for layout alone should be avoided, but when there is a logical relationship between the elements in the table, then their use is preferred over infographics or other image-based formats that are not as accessible to screen reading technology.
Pressbooks allows you to create and display information in tabular form, and to choose table styles that display your information in an attractive way in your webbook, ebook, and PDF exports
Important: Ensure Tables Display Properly in PDF Exports
Here are a few best practices to follow so that the tables you create display correctly in PDF exports:
- Always use relative sizing: Avoid hardcoding width or height values in pixels or other static units and instead use percentages.
- Adjust table font size: For tables with more than four or five columns, you may have to shrink the font size in order to prevent the table from overflowing off the right side of the page in PDF exports. This can be accomplished by assigning your table a class (example:
<table class='wideTable' width='100%' >) and then in the custom PDF styles assign a new font size to the table cells (example:.wideTable td, .wideTable th { font-size: 85%; }) - Avoid manually resizing the table, columns, or rows in the visual editor: Adjusting the size of the table or its elements using the mouse in the visual editor will insert hardcoded pixel values for the width and height of the table and all of its elements. If you accidentally click on one of the table's borders and thereby cause the hardcoding of its dimensions, you can highlight the whole table and then edit the table properties and cell properties using the table dialog from the Visual Editor toolbar, substituting percentages for static values.
Add or Delete Tables Using the Visual Editor
To insert a table in your book, click the table icon in the visual editor toolbar and select your desired row and column layout.
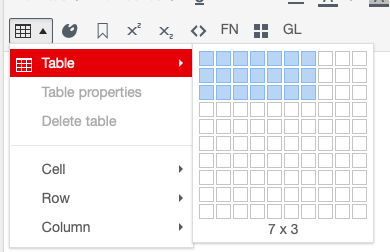
Once you've selected the number of cells, the table tool will close and your table will appear. At this point you can now enter your content or style the table.

To delete a table:
- Click anywhere inside the table
- Click the Table menu in the visual editor
- Click Delete table
Edit Table Structure
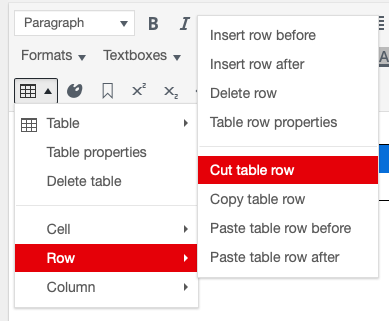 Once you've inserted a table in your book, you can use the Table tool to edit cell, row and column properties; merge and split cells; add and remove rows and columns; and cut, copy, and paste rows and columns. To modify the structure of a table:
- Click into or select the cells, rows, or columns you wish to modify
- Open the table tool
- Hover over Cell, Row, or Column depending on your needs
- Select the action you want to occur
The Table tool allows you to edit several of your table's properties. Table properties allow you to apply one of several predefined styles (classes), adjust the width and height of your table, adjust the cell padding and cell spacing, increase or decrease border weights, and add table captions.
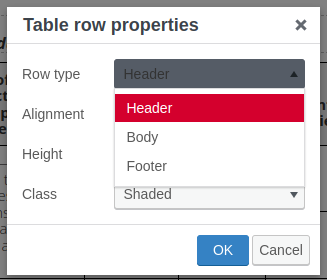 If, for example, you'd like to specify that a given row should be rendered as the table header, click 'Row -> Table row properties' and select 'Header' as the row type.
https://www.youtube.com/watch?v=QQxueSi9re8
Make Table Accessible
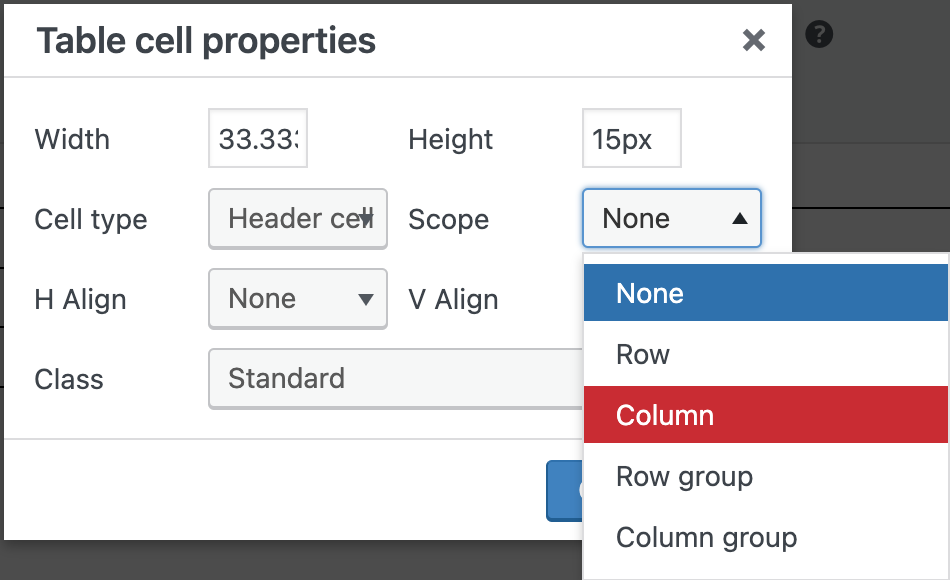
Using table headers for both rows and columns, along with the scope attribute, will enhance the accessibility of tables in your book. Clear and appropriately labeled headers provide context and structure to the table, allowing screen readers to accurately interpret the relationships between headers and data cells.
To designate table cells as header cells:
-
- Click into or select the cells you wish to designate as header cells
- Open the table tool
- Hover over Cell
- Select Table cell properties
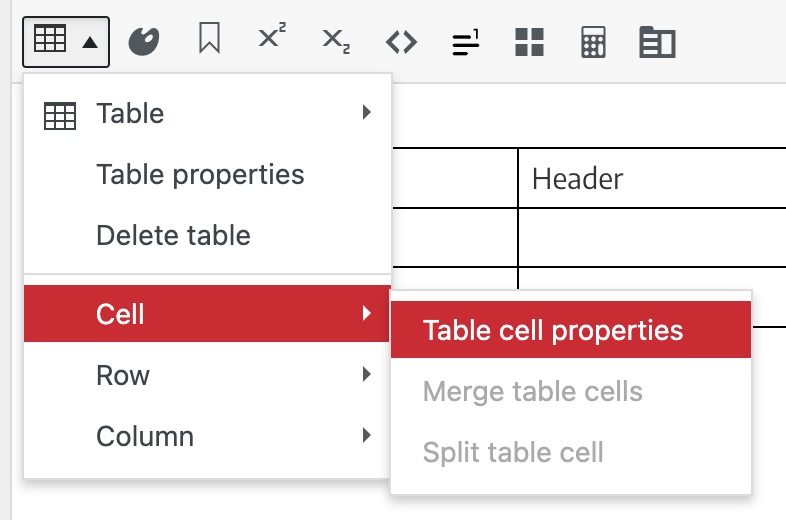
- From the dropdown list for Cell type choose Header cell
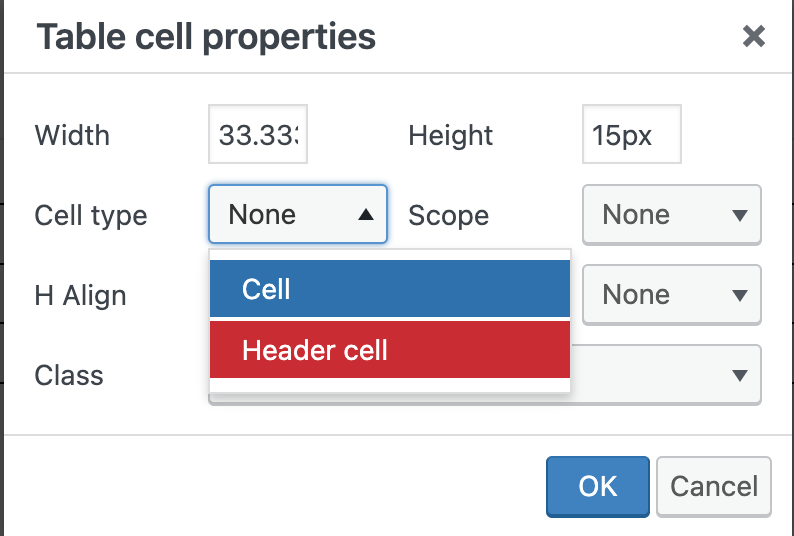
- From the dropdown list for Scope choose Row or Column
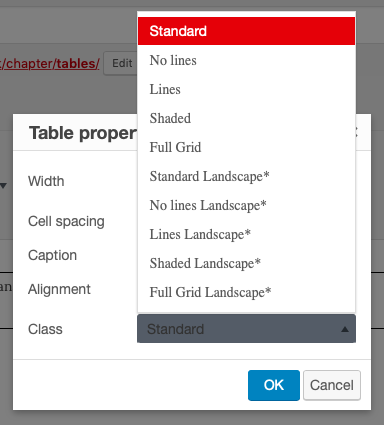
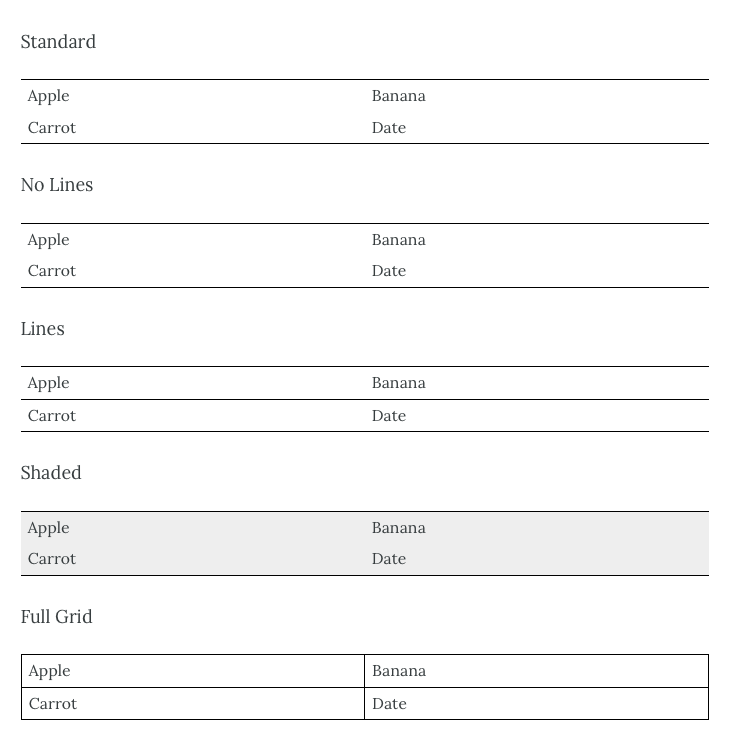
Change Table Appearance
You can change the appearance of your table by clicking Table Properties and choosing an option from the Class dropdown menu. Each of the following classes defines a preset look for the table:
- Standard
- No lines
- Lines
- Shaded
- Full Grid
- Standard Landscape*
- No lines Landscape*
- Lines Landscape*
- Shaded Landscape*
- Full Grid Landscape*
All tables default to the Standard class.
Adjust Table Width and Height
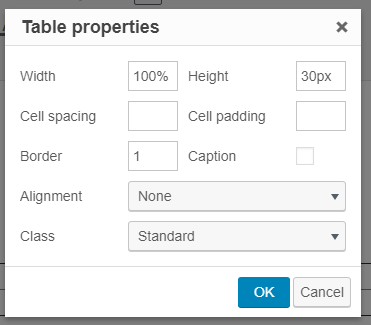 The width of your table can be set as a percentage or pixel value. Tables with percentage widths will be responsive to the size of their container, while tables with pixel widths will be will be fixed. By default, the width of your table will be set at 100%. This means that the table will take up the entire width of its parent element (typically, the page) and end at the left and right margins. You can increase or decrease your table’s width by changing the percentage or pixel value.
Table height can only be expressed in pixels. If you attempt to set a height value that is too small for the number of rows in that table, your value will be replaced by a safe default. If you increase the table height, the height will be distributed equally to all rows, unless row heights have been specified separately.
Change Border Weight
You can increase or decrease the weight of your border by changing the quantity next to Border in the Table Properties window. The default weight for the border is “1.” The higher the number, the thicker the width of your table's external border will be.
Add a Table Caption
The table caption option can be enabled by checking the box next to Caption on the Table Properties window. When enabled, you’ll see a blank space above your table in the visual editor. Click in this space to type your table caption. 
Table captions will display below your table in your Pressbooks webbook and above the table in ebook and PDF export files.
Create Interactive Tables
The TablePress plugin allows you build dynamic, interactive tables which can be sorted, filtered, and searched in the webbook. These tables are exported as static tables in ebook and PDF exports.
NOTE: TablePress tables should only be used where there is a real need for the user to sort or filter the data being presented, as these tables are not stylistically consistent with the standard tables and require special handling for them to appear as desired in PDF exports.
In order to create these tables, the TablePress plugin must be installed on your network and activated in your book. If your network allows book admins to activate installed plugins in their books, you can do so by clicking Plugins from the left sidebar menu, and activating TablePress from the plugins list. If you do not see plugins menu or the TablePress plugin, contact your network manager.
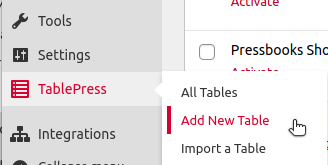
Once TablePress has been activated, you should see a TablePress link in your left sidebar menu. To create a table with TablePress:
-
- Click TablePress -> Add New Table from the book dashboard menu
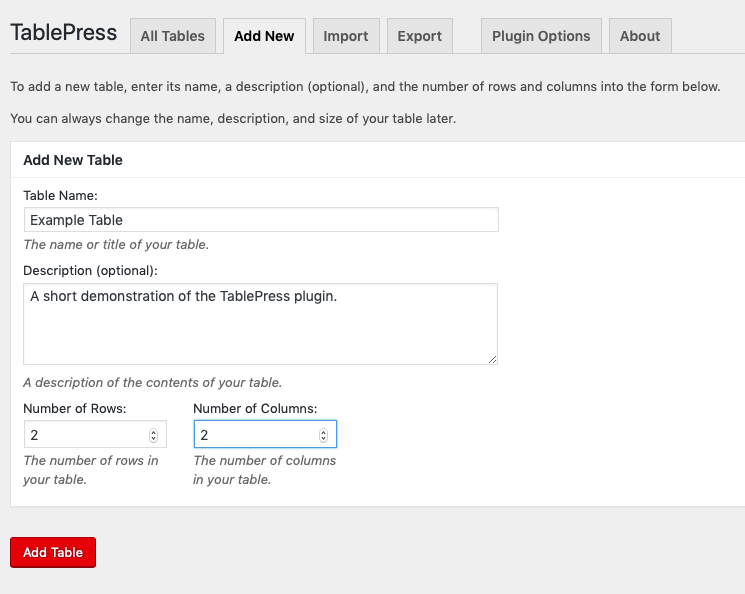
- Enter your table name and an optional description of the table, then select the number of rows and columns you'd like your table to have
- Click TablePress -> Add New Table from the book dashboard menu
- Click Add Table
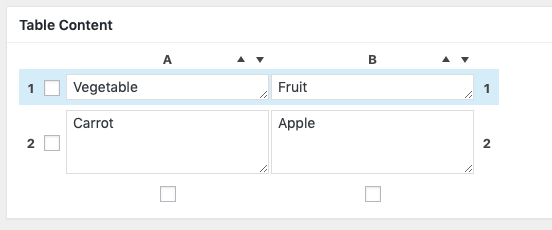
- Find the newly created table in the Table Content panel, and enter your desired data into the cells.
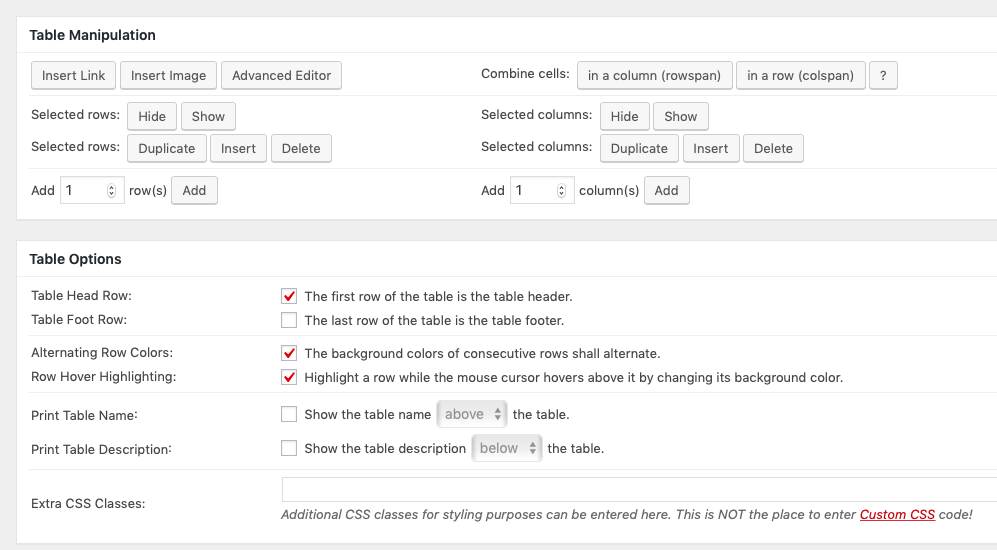
- Configure your table as desired using th Table Manipulation, Table Options, and Features panels.
- By default, the table will display without gridlines. If you wish for there to be gridlines (in PDF and EPUB exports, as well as online), add the "grid" class to the Extra CSS Classes field.
- When your table has been completed to your satisfaction, click Save Changes
TablePress also allows you to import CSV, HTML, JSON, XLS, or XLSX files and convert their tabular data into TablePress tables and export tables you've created to your device as CSV, HTML, or JSON files.
Add TablePress Tables to a Chapter
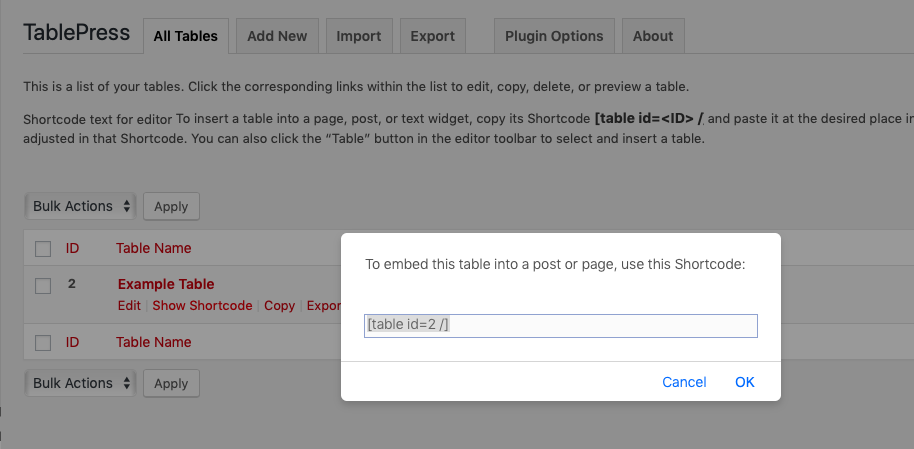
All TablePress tables will be given a shortcode upon creation. These shortcodes follow a predictable pattern: [table “ltIDgt” not found /] where <ID> is the number of a particular table (IDs are assigned to tables in the order of their creation within your book). To insert a TablePress table into a chapter:
- Click All Tables and find the table you'd like to place in the chapter
- Hover over the title of your table, then click Show Shortcode
- Copy the shortcode and click OK
- Paste this shortcode into the visual editor where you want the table to appear
- Save the chapter
The table won't display in your visual editor; you'll just see the shortcode. However, the table will appear in your webbook when you view the chapter.
Adapted from "Create Tables" in Pressbooks User Guide by Pressbooks, which is licensed under a Creative Commons Attribution 4.0 International License except where otherwise noted.
