9.1 Building a Storyboard
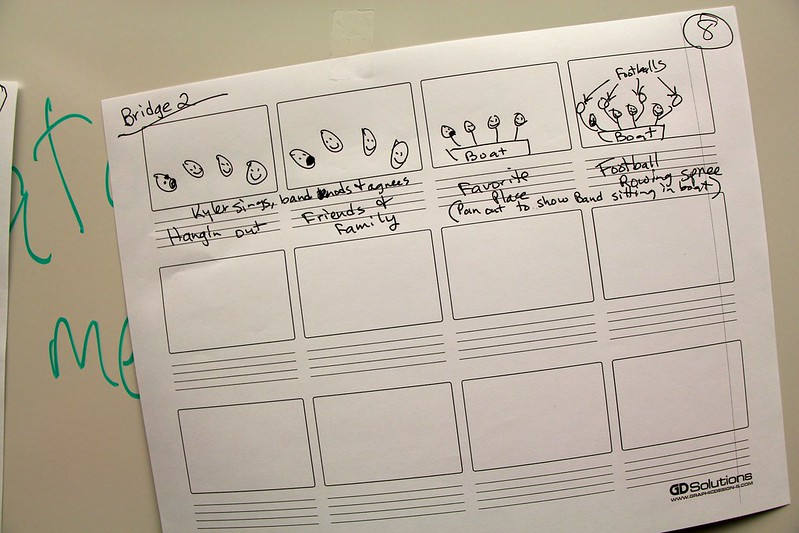
Storyboarding is a project planning technique which uses a combination of text and images to lay out your ideas. Storyboards can be used to help you plan an essay, a presentation or a digital media project.
A storyboard is a graphic organizer, in the form of illustrations or images, displayed in sequence for the purpose of pre-visualizing a multimedia product. The storyboarding process, in the form it is known today, was actually developed at Walt Disney Productions during the early 1930s, after several years of similar processes being in use at Walt Disney and other animation studios.

Benefits to Creating a Storyboard
Storyboards can:
- Help you plan and communicate the main idea of your project.
- Keep your work clear and focused.
- Be used for many tasks in different contexts. For example, they can help you plan an essay, a presentation or a digital media project.
- Be created in a variety of ways, and there is no single, ‘right’ way to create one. Every storyboard will look different depending on the project.
Essential Elements of a Storyboard
Storyboards are typically made up of these five elements:
- Set of shapes made up of made up of text and images, which are often squares, rectangles or circles. These shapes can be placed vertically, horizontally or in meaningful clusters and are often referred to as ‘panels.’
- Shapes are placed in a logical sequence. For example, boxes should be read across the page the same way we would read a book-starting in the top left, returning at the end of each line.
- Boxes are filled with pictures, symbols and text. This should include the graphics, text, information about the atmosphere and tone, angle of the camera, and a place for feedback.
- Any length, from two to two thousand shapes. The length of your storyboard will depend on the length of your work.
- Simple or complex as you need them to be. You can use stick figures and short text, or more detailed drawings and longer sentences.
 Tip: Use Sketchnoting Techniques
You can apply some of the elements and techniques you learned when reading about Visual Language and Sketchnotes to storyboarding. Consider using basic shapes, icons and symbols as you plan out your storyboard.
The panels in your storyboard should tell a clear and coherent story, providing enough detail for others (including potential users) to provide feedback. The storyboard includes representations of each screen in your product, including information about what happens when users mouse over, click on, or otherwise interact with each interactive element in the product. The storyboard should answer questions like: How do users interact with this element? What happens when they do? Which screen are they taken to after they click?
Consider
Before starting your storyboard, you have a few decisions to make:
- Are you going to create your storyboard by hand?
- Are you going to create your storyboard using a digital tool?
- Are you going to use a storyboard template that’s already been created?
- Are you going to create your own storyboard template?
Basic Steps for Storyboard Creation
Step 1: Write a Script
Draft it, review it, mark it up however you feel will be most beneficial, such as adding directives and actions. See “Writing a Script” for more detail on how to approach this part of the process.
Step 2: Make a shot list
A shot list can easily be made by going back to the script and identifying the areas within the script that you envision new clips, frames, or scenes
Scene 1 ________________
Scene 2 ________________
Scene 3 ________________
Step 3: Sketch it out
Based on your script, you should now have a good idea of how many frames you will need. Start creating. Add shapes, arrows, pictures, graphics, gifs, and text to illustrate your intention for each scene. The purpose is to convey your idea, however you can best communicate the intention.
Google slides can easily be used to create storyboards.
You don’t have to be an amazing artist to storyboard – stick figures work just fine.

Your storyboard is for your interpretation, use images that make sense to you. If your storyboard is to be used to share your vision, make a legend for your symbols you use or add descriptions to your symbols

Step 4: Add Your Context
Remember to add your script to each slide, in the notes
Add a line for actions, directives, purpose
Example:
Script: “Lorem ipsum dolor sit amet, consectetur adipiscing elit, sed do eiusmod tempor incididunt ut labore et dolore”
Directives: hold frame for 3 sec., zoom into top left, fade out to next scene
Purpose (optional): This scene is to convey…
Conclusion
Concluding these steps, you will now have an initial draft of the video content you will be producing. This storyboard will assist in communicating with others and collaborating. It will be easier to understand the material the flow, layout, and intension of the video. Providing this prior to initiating media editing and creation can save a lot of time. It will greatly assist in ensuring the content of the video you are creating meets the expectations of all stakeholders.
Attribution & References
Except where otherwise noted, this page is adapted from
- Create a Storyboard for your Digital Project by University of Guelph, McLaughlin Library, CC BY-NC-SA 4.0
- 39. Storyboarding In Open Source for Digital Communications & Learning Objects by David Kwasny & Matthew Humphries, CC BY-NC-SA 4.0 and / Reused the introductory material from first source to compliment the basic steps to creating a story board.
- Creating a Storyboard by Lumen Learning, attribution from original source: Storyboard. Located at: http://en.wikipedia.org/wiki/Storyboard. Project: Wikipedia. License: CC BY: Attribution
Reference from original source
Burgess, C. (2018). How to make a storyboard for video. https://photography.tutsplus.com/tutorials/how-to-make-a-storyboard-for-video–cms-26374

