Techniques
Below are some techniques and principles that will be needed throughout the term.
Balances
There are three types of masses you may need:
- An accurate mass. This type of mass occurs if you need exactly 2.00 g. More, or less, could affect the outcome of the experiment.
- A precise mass. You need ~2.00 g—more or less will not influence the outcome, but you need to know exactly what mass was used.
- A rough mass. You need approximately 2 g; hitting that mark, or knowing exactly what you have, is not vital. Knowing which mass, you need could save you time and effort.
To properly use a balance
- Zero the balance and place an empty weigh boat in it. Record the mass.
- Add your desired mass of chemical sample. Record the new combined mass.
- Empty your sample from your weigh boat into your reaction vessel.
- Place the empty weigh boat on the balance and record the mass. The amount of sample used is what was transferred, not what you weighed as there is often sample remaining that didn’t transfer.
Example: Your weigh boat weighs 2.3984 g, and with your sample it weighs 4.4207 g. 4.4207 – 2.3984 g = 2.0223 g. Now after you transfer as much sample as possible into your reaction vessel, you reweigh your weigh boat. This time the mass of the weigh boat is 2.4011 g. To find the mass of sample that remained on the weigh boat, take the new mass and subtract the original mass of the weigh boat. 2.4011 – 2.3984 g = 0.0027 g of sample remaining behind. Now take the original mass of the sample and subtract the residue. 2.0223 – 0.0027 g = 2.0196 g of chemical sample was transferred into your reaction vessel.
Volumetric Glassware
In general, before using volumetric glassware it should be cleaned and rinsed. If the solutions to be used are water based, the most effective way to clean glassware is simply by rinsing it with water. The final rinse of volumetric glassware should be done with a small amount of solution that will be used. This ensures concentrations will not change if residual solution (and not water) is left over.

Figure 7 – Examples of Volumetric Glassware
A volumetric flask is a piece of glassware that is used in analytical chemistry for making solutions of accurate concentrations. The flask has a single ring graduation mark around the neck. When you are filling your flask with a solution, you want to fill it so that the bottom of the meniscus is on this mark. Use a pipet to get it to exactly this line; going over will change the desired concentration and the solution should be remade.
A volumetric pipet is an analytical piece of glassware used to transfer accurate amounts of liquid. Like the volumetric flask, it has a single ring graduation mark near the top. Fill it up to this line so that the bottom of the meniscus is sitting on the graduation mark. Ensure that there are no air bubbles present, as this will cause inaccuracies in your measurements.
A volumetric pipet will deliver exactly the amount defined (e.g., 10.00 mL), and any liquid left over in the tip is extra and should not be emptied into your flask. To bring liquid into the pipet, you will need a bulb. Two kinds exist: a three-way bulb and single bulb. In a three-way bulb, the bulb is placed on the pipet (just slightly; it should come off easily). The main chamber is evacuated, forming a vacuum which is then used to bring the desired liquid into the pipet. Once at the mark, the liquid can be dispensed by releasing the vacuum in the bulb. In a single bulb, the liquid is drawn into the pipet by sucking with the bulb. The liquid must be past the mark, but not into the bulb. The bulb is then quickly removed and a finger is placed over the pipet. Slowly modulating your finger will now release the liquid.
A burette is a vertical piece of glassware with graduated markings on its full length. It ends with a stopcock on the bottom. A burette is used to deliver known amounts of a liquid when accuracy and precision are necessary, such as in a titration experiment. Always rinse the burette with the solution you will be filling it with, before use, to avoid cross-contamination. A burette can be read to two decimal places, with the second being estimated.
Decanting
To decant means to separate a liquid from a solid by pouring off the liquid and leaving the solid in the original container (see Figure 8). Remember to decant into a clean beaker; if by accident a part of the solid goes into the beaker, you will have to repeat the procedure. Always decant very carefully.
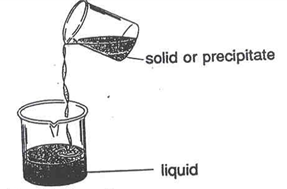
Figure 8 – Decanting a Liquid
Handling Concentrated Acids
When using concentrated acids, you will find the acids that you need in small bottles in your fume hood. Do not remove these bottles from the fume hood. Use gloves when handling these bottles. Use the plastic pipettes to transfer the required amount of acid directly to the beaker. If some acid is spilled, use the acid spill kit and notify your TA.
Spectrophotometric Measurements
Many chemical compounds absorb light at a certain wavelength and the concentration of a substance can be measured by its ability to absorb light. An absorption spectrophotometer is an instrument that measures the decrease in light intensity upon passing through a solution caused by absorption from the solution. The wavelength chosen usually corresponds to where the sample absorbs most strongly.
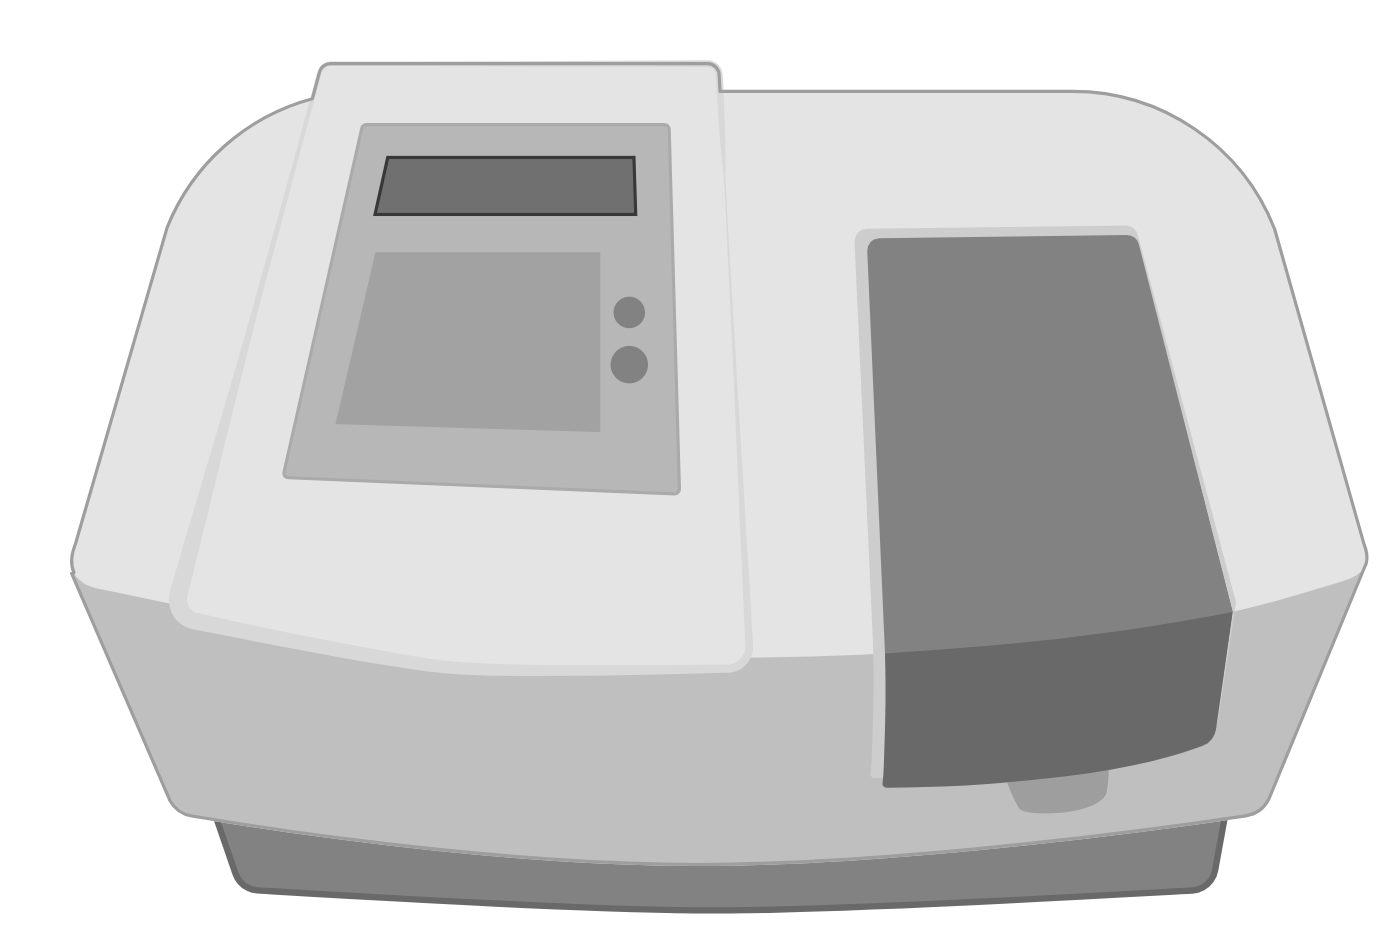
Figure 9 – Spectrophotometer
Each spectrophotometer consists of a source of light of certain intensity (Imax). The light passes through the solution to be measured and the detector determines the intensity (I) of the transmitted light. Absorbance, A, is defined as:
Absorbance is also directly proportional to concentration, hence A ∝ [Conc] , which can be equated through a proportionality constant k, meaning A = k [Conc], The value of k changes depending on the chemical being monitored and often needs to be determined by preparing solutions of known concentration and measuring the absorbance.
Calibration of the Spectrophotometer
- Turn the instrument on (there is an on/off switch at the back) and allow 30 minutes to warm it up. Usually, the technician does this part before the lab starts.
- Press A to select the absorbance mode. Press nm or nm to select the wavelength. Adjust the wavelength control to the wavelength specified in your lab manual.
- Insert a test tube filled with water into the cell compartment. The outside of the test tube should be dry and wiped with a Kimwipe before inserting it into the sample compartment.
- Close the sample compartment. Press 0 ABS. Now the spectrophotometer is properly set up and will give correct readings. You may start your measurements.
The solution to be measured should be filled up to ¾ of the volume of the test tube. The outside of the test tube should be dried and cleaned before the measurements are taken. In most experiments you will record absorbance readings. It is good to check the standardization of the spectrophotometer after a series of measurements.
Insertion of Glass Tubing Through Rubber Tubing
The improper insertion of glass rods into rubber stoppers is the number one cause of serious accidents in our first-year laboratories. Serious cuts requiring stitches can result if you do not follow the procedure described below whenever inserting glass through rubber (see Figure 10). First, always wet the glass and the rubber tubing before attempting any such insertion. Second, always wrap your hands in a towel when putting a glass tube into a hole in a stopper. Twist the glass into the tubing; do not push it in.
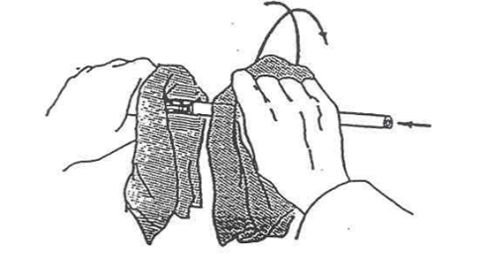
Figure 10 – Insertion of glass tubing through rubber tubing/stopper Note that fingers are kept near the insertion point.
Smelling Substances
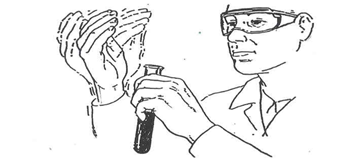
Figure 11 – Smelling substances by wafting
Generally, smelling chemicals is not an effective and safe procedure to identify compounds. Occasionally, notably during organic labs, students are asked to smell substances. When required to smell compounds, never hold a test tube or other container close to your nose and inhale. Rather, fill your lungs with air before smelling the substance. Then smell the substance by carefully waving its vapour towards your face.
Recrystallization
Recrystallizations are carried out by dissolving an impure compound in a minimum volume of a suitable solvent near the boiling point of the solvent. Filtering the hot solution (if necessary) will remove any insoluble impurities. Upon slow cooling of the filtrate, crystallization should begin. The crystals are then collected by vacuum filtration and dried. It is important that the substance being purified is at or near saturation in the hot solution so that on cooling the solution will become supersaturated and the desired substance will crystallize from the cooling solution. If too much solvent is used to dissolve the substance, little or no crystallization will occur on cooling.
The selection of a suitable solvent is of great importance for efficient recrystallization. A good recrystallization solvent should have the following four essential characteristics:
- The major component should be fairly soluble in the solvent when it is hot but relatively insoluble when the solvent is cold.
- The impurities should either be insoluble in the hot solution, and hence removable by filtration or moderately soluble in the cold solvent and therefore remain dissolved in the mother liquor after the major component has crystallized.
- The solvent should not have a boiling point too high to permit its easy evaporation when drying the crystals.
- It should not react chemically with the substance being purified.
It sometimes happens that a single solvent is not satisfactory for the efficient recrystallization of a compound. Under these circumstances it may be possible to recrystallize the compound from a mixture of two miscible solvents, one of which is too good a solvent to use by itself and therefore would retain too much of the substance in a cold solution, and the other which is too poor a solvent and would not dissolve a sufficient amount of the substance when hot. Common solvent pairs are methanolwater, ethanolwater, benzeneligroin and etheracetone.
Melting Point
Almost every organic solid possesses a sharp, definite melting point which is a characteristic property of that substance. A very pure substance has a very sharp melting point, i.e., a very narrow temperature range for melting; this is a commonly accepted criterion for the purity of a solid compound.
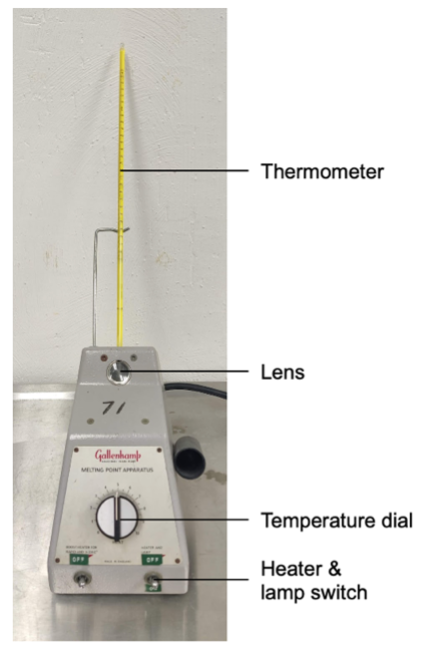
Figure 12 – Melting point apparatus
While a pure compound should have a sharp melting point, in practice a melting point range is often observed due to equipment, procedural and purity factors. This temperature range must always be reported. The lower end of the melting range is taken as the temperature at which the first liquid can be seen, and the top of the range is the temperature at which the last of the solid melts. A pure compound can be expected to melt over a range of 0.5-1°C. If the range, however, is no greater than two degrees the substance is usually regarded as pure enough for most purposes.
If the melting point range is greater than two degrees, further purification is usually necessary. An impure substance is easily recognized; compared to the pure substance, an impure substance will melt either at a lower temperature or over a greater temperature range.
In determining a melting point range for a compound, it is important that the rate of heating of the sample be slow, typically 1 – 2°C per minute. To save time in determining the melting point of an unknown substance it is often easiest to prepare two melting point samples. The first sample is heated fairly rapidly (at a rate of 5-10°C per minute) to give an approximate melting point. The melting point apparatus is then cooled to about 10°C below the apparent melting temperature, the second sample inserted and the temperature raised slowly at 12°C per minute for an accurate determination of the melting point.
Filtration
Filtration by suction is more rapid than gravity filtration and uses a Buchner or Hirsch funnel, filter flask and a vacuum source (see figure). A Buchner funnel is a porcelain funnel with holes in its flat bottom. A piece of filter paper that just covers the bottom of the funnel is selected, placed in the funnel and made damp with a little of the solvent to be used in the filtration. The Buchner funnel is placed over a vacuum filtration flask with a rubber gasket, called a filtervac, making an airtight connection between the Buchner funnel and the filter flask. A vacuum hose, which is the thicker walled type of rubber hose, is connected from the side arm of the filter flask to the vacuum outlet. Be sure to clamp the filter flask to a support so that the flask and Buchner funnel do not fall over and break (or spill your product).
Check to see that the filter paper is seated properly in the funnel and a good seal is made by wetting the filter paper with the solvent. If this is not done, the solution being filtered may flow under the filter paper and down into the filter flask. With the vacuum hose connected and the vacuum on, pour the solution which is to be filtered onto the filter paper in the funnel, scraping any solid remains from the beaker into the funnel. Rinse the beaker with cold solvent and add these washings to the funnel. The solid collected on the filter paper in the funnel will dry when drawing air through the funnel for a few minutes. The solid can then be removed from the funnel by first releasing the vacuum by lifting the funnel from the apparatus, then turning it off and carefully lifting out one edge of the filter paper with your spatula. The solid can then be transferred from the filter paper to a preweighed container.
NOTE: Vacuum filtration method should not be used for filtration of hot concentrated solutions.
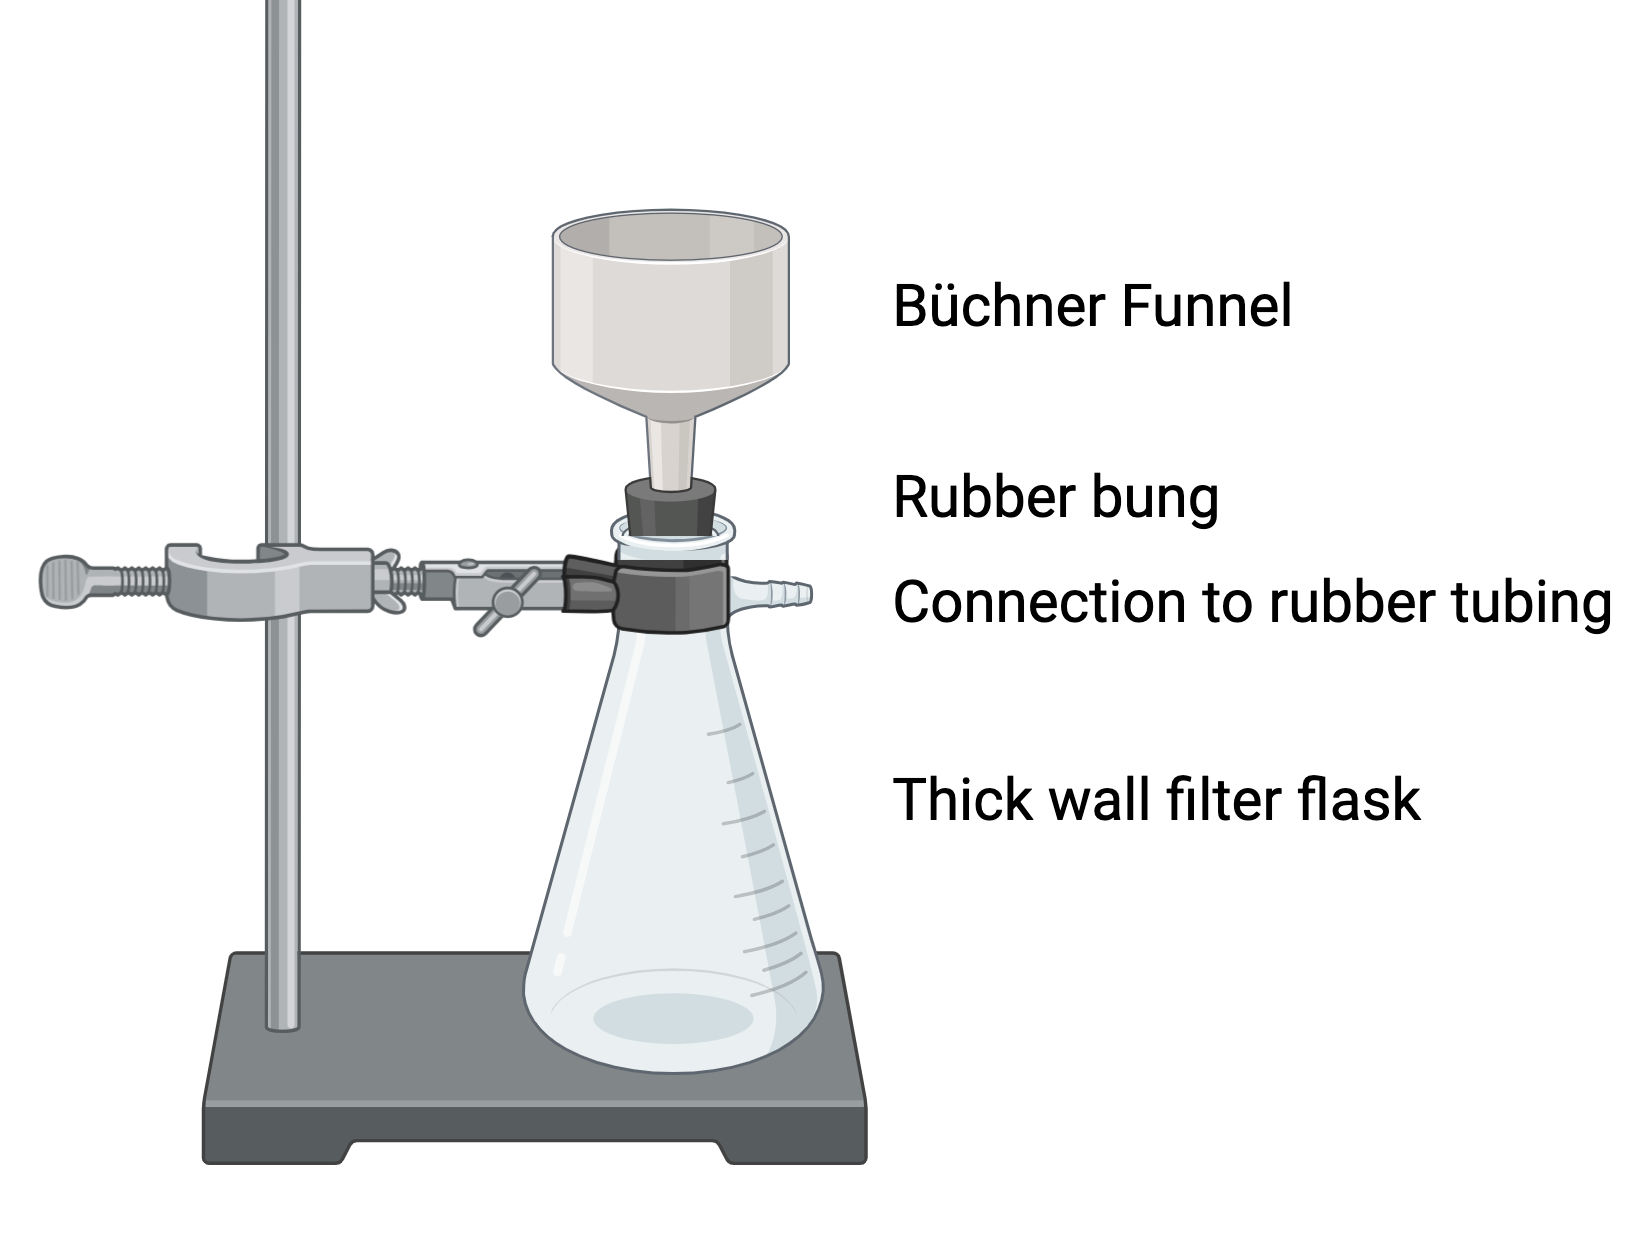
Figure 13 – Vacuum filtration apparatus
Thin Layer Chromatography
Thin Layer Chromatography (TLC) is a method used to separate chemical mixtures. TLC is performed on a plastic or aluminum sheet which is coated with a thin layer of silica gel.
A sample is dissolved in a suitable solvent and then a glass capillary tube is used to spot a small circle of sample onto the plate. The spot should be as small as possible. The plate is then placed into a glass chamber that contains a small amount of solvent (for example, 8:1 methanol:hexanes). The solvent is drawn up the plate via capillary action. Different chemicals will travel up the TLC plate at different rates. As silica gel is polar, a polar chemical will have a stronger interaction with the silica on the TLC plate. This means that it will not travel as far up the plate as a less polar molecule.
Sometimes the molecules being observed on a TLC plate are colourless and must be viewed under a UV-light. A small amount of a fluorescent compound is added to the silica allowing the visualization of spots under a black-light. The silica layer looks green by itself, but spots of other molecules quench this fluorescence and often appear purple.
TLC has several different uses. In organic chemistry, it is used to monitor the completion of a reaction. A spot of starting material, a spot from the reaction mixture, and sometimes a spot of the purified final product (if available) are plated and then compared. This allows a comparison between the reaction spot that can help determine whether the reaction is complete or still needs to be left for a longer period of time
TLC can also be used to determine the purity of a final product. A small, round spot may be an indication of a pure product, while smears can indicate the presence of impurities. If a separation column is used for purification of a crude product, TLC may be run first to determine a suitable solvent that will give good separation.
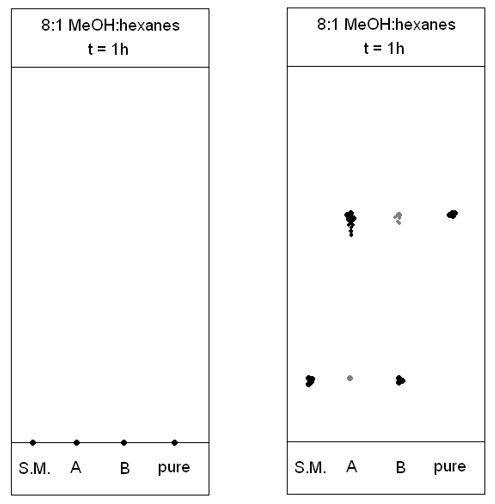
Figure 14 – Example TLC plates