23.2
Mandibular Occlusal Projections
The topographic projection is used to examine the anterior teeth of the mandible. The cross-sectional projection is utilized to examine the buccal and lingual aspects of the mandible. The pediatric projection is specifically recommended for examining the anterior teeth of the mandible in children aged 5 years old or younger.
Vertical Angulations
| Occlusal Projection Angulation | Vertical Placement (Long Edge) | Film |
| Maxillary topographic | +65 | side to side |
| Maxillary lateral (rt or lt) | +60 | front to back |
| Maxillary pediatric | +60 | side to side |
| Mandibular topographic | -55 | side to side |
| Mandibular cross-sectional | 90 | side to side |
| Mandibular pediatric | -55 | side to side |
Localization Techniques
Localization techniques are a method used to locate the position of a tooth or object in the jaws, which requires a thorough understanding of basic concepts. Additionally, a knowledge of step-by-step procedures is essential.
Purpose and Use
The dental image is a two-dimensional picture of a three-dimensional object, which does not depict the depth of the object or its buccal-lingual relationship. Localization techniques can be employed to locate the object. A radiograph depicts an object in the superior-inferior relationship, indicating positions towards the head or away from the head. Additionally, it shows the anterior-posterior relationship, which relates to positions toward the front or the back of the body.
Localization techniques may be used to locate the following:
- Foreign bodies
- Impacted teeth
- Unerupted teeth
- Retained roots
- Root positions
- Salivary stones
- Jaw fractures
- Broken needles and instruments
- Dental restorative materials
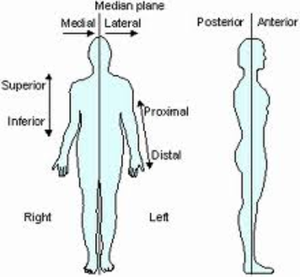
The diagram below displays the anatomical positions of the human body.
Buccal Object Rule
The buccal object rule governs the orientation of structures portrayed in two images that are exposed at different angulations. One periapical or bite-wing receptor is initially exposed using the proper technique and angulation. Subsequently, a second periapical or bite-wing receptor is exposed after changing the direction of the X-ray beam. After taking the first radiograph, a different horizontal or vertical angulation is used for the second exposure. Once both radiographs are exposed and processed, they are compared with each other to analyze the structures.
When the dental structure or object seen in the second image appears to have moved in the same direction as the shift of the Position Indicating Device (PID), the structure or object in question is positioned to the lingual. Conversely, when the dental structure or object seen in the second image appears to have moved in the opposite direction as the shift of the PID, the structure or object in question is positioned to the buccal.
A mnemonic: SLOB (to help you with orientation of the object in question)
- S = same
- L = lingual
- O = opposite
- B = buccal
Same = Lingual; Opposite = Buccal
Right-Angle Technique
The right-angle technique is another rule for the orientation of structures seen on images involves the use of specific receptors and techniques. One periapical receptor is exposed using the proper technique and angulation to show the position of an object in the superior-inferior and anterior-posterior relationship. An occlusal receptor is then exposed by directing the central ray perpendicular to the receptor. These images are compared to locate the object in three dimensions. This technique is primarily used to locate objects in the mandible. Specifically, the occlusal image shows the object in the buccal-lingual and anterior-posterior relationships.
Step-by-Step Procedures
The step-by-step procedures include:
- Patient and equipment preparations
- Receptor placements and comparisons
- Buccal object rule
- Right-angle technique
Patient and Equipment Preparations
Refer to earlier in the chapter for patient and equipment preparations. These are the following steps to prepare the patient and the equipment.
- Briefly explain the procedure to the patient.
- Adjust the chair.
- Adjust the headrest.
- Place and secure the lead apron.
- Request the patient remove eyeglasses and any objects in the mouth.
Receptor Placements and Image Comparisons
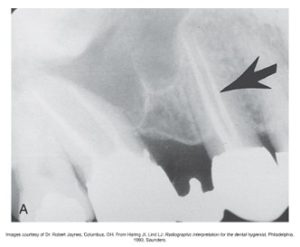
The Buccal Object Rule can be utilized to determine the position of a tooth treated endodontically with gutta percha, particularly in a case involving a maxillary second premolar. To apply this rule, first position the patient so that the maxillary arch is parallel to the floor. Then, expose one molar periapical receptor using proper technique and position. Next, shift the Position Indicating Device (PID) in a mesial direction and expose a premolar periapical receptor. In the resulting second image, when the PID is moved in a mesial direction, the gutta percha will appear to have moved in the opposite direction.
 |
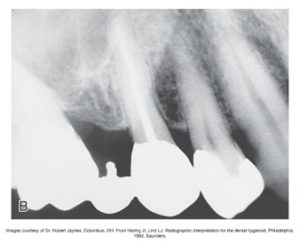 |
| A. Note the two root canals filled with gutta-percha in the maxillary second premolar (arrow). | B. The PID was shifted in a mesial direction, and the gutta-percha moved in a distal direction. The gutta percha in the original root labeled by the arrow is located on the buccal. |
 |
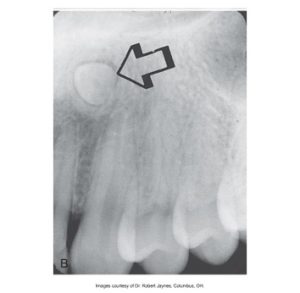 |
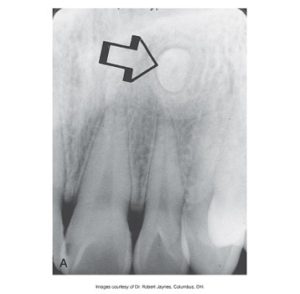
| A. Note the impacted tooth (arrow). | B. The position-indicating device (PID) was shifted in a distal direction, so the tooth moved in a distal direction. The tooth is located lingual to the adjacent teeth. |

