10.1
Film Processing Fundamentals
The steps that produce a visible image on a dental image are to convert the latent image to a visible image and preserve the image so it is permanent.
Why is it necessary to know how to process the film manually in practices that have an automatic processor? There are two reasons:
- To be able to identify and correct errors in processing
- The ability to develop a film more quickly, as with endodontics (root canal), is needed. A film can be developed manually in about 2 minutes.
The continued steps are to take it from a latent image to a visible image – stored energy during exposure forms a pattern and creates an invisible image. This is termed the latent image. Lastly, a chemical reaction takes place when the latent image is submersed in a series of chemicals, and this process produces a visible image.
| Silver halide crystals |
|
| Latent image |
|
From Latent Image to Visible Image
A chemical reaction is a reduction, which is when the halide portion of the exposed, energized silver halide crystal is removed. The results are precipitated black metallic silver. This process has to take place under special darkroom conditions.
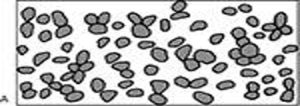
In the Iannucci & Howerton, Dental Radiography Principles & Techniques, 6th Edition textbook on page 90, refer to Figure 10-1.
Here is a graphic displaying the schematic distribution of silver halide grains. The gray areas indicate a latent image produced by exposure.

For selective reduction, energized, exposed silver halide crystals are converted into black metallic silver. It is unenergized; unexposed silver halide crystals are removed from the film and the latent image is made visible through processing procedures.
The film is then placed in a developer solution, rinsed in water, is placed in a fixer solution, and then is washed in water. This is a simplified version of the processing procedures that make the latent image visible.
The Visible Image
The visible image is made of black, white, and gray areas.
| Radiolucent |
|
| Radiopaque |
|
Automatic Film Processing
Automatic film processing is often preferred over manual film processing because less processing time is required, time and temperature are automatically controlled, less equipment is used, and less space is required. Note that many dental practices using digital imaging choose to maintain automatic processing equipment as a backup option in the event of computer or software failures.
Automatic film processing consists of four steps: Development, Fixing, Washing, and Drying.
Automatic Processors
An automatic processor automates all film-processing steps, which may be limited to specific sizes of films and may require a darkroom. It is usually the typical automatic processor in a dental office.
In the Iannucci & Howerton, Dental Radiography Principles & Techniques, 6th Edition textbook on page 31, refer to Figure 10-2.
A daylight loader may be used in a room with white light and might be attached to the top of an automatic processor.
In the Iannucci & Howerton, Dental Radiography Principles & Techniques, 6th Edition textbook on page 31, refer to Figure 10-3.
Automatic Processor Equipment Requirements
The requirements for automatic processors are component parts of the automatic processor, step-by-step procedures, and care and maintenance. When it is first turned on, most automatic processors require a period of time before they are ready to process, and as a result, it is best to turn on the automatic processor first thing in the morning.
Component Parts of the Automatic Processor
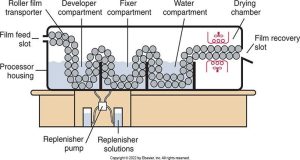
Automatic processors use a roller transport system to move dental x-ray film through developer, fixer, water, and drying compartments. The film feed slot is for the unwrapped films to be inserted into the automatic processor. The roller film transporter is a system of rollers that rapidly moves the film through the compartments. Then, to the processor housing, the film feed slot is for the unwrapped films to be inserted into the automatic processor. The roller film transporter is a system of rollers that rapidly moves the film through the compartments. The developer and fixer compartments hold the solutions. The film is transported directly from the developer into the fixer without the rinsing step. Then, move on to the fixer compartment, the water compartment, which holds circulating water, and the drying chamber, which holds heated air to dry the film. Finally, goes through the replenisher pump/replenisher solutions and to the film recovery slot.
Here is a diagram of an automatic film processor showing the roller transport system, chemical compartments, water compartments, drying chamber, and film recovery slot.

Step-by-Step Procedures
Before automatic film processing, the exposed dental x-ray film and automatic processor (without daylight loader) must be present in the darkroom.
The following steps are:
- Prepare the darkroom
- Prepare the films
- Insert the films
- Process and retrieve the films
This process must be done in a dark room with safelight conditions or with a daylight loader.
Care and Maintenance
The care and maintenance of automatic film processing are the automatic processor and processing solutions.
Automatic processor requires routine preventive maintenance, which means a cleaning and replenishment schedule must be established, and it may require daily or weekly cleaning. Cleaning film is used to clean the rollers of an automatic processor and the amount of film being processed determines how often the processor will need to be cleaned.
Processing solutions are levels that must be checked at the beginning of each day and replenished as necessary. Failure to add replenisher results in exhausted solutions and nondiagnostic images. You should make this part of your morning routine in a dental office.
Practice Makes Perfect
Drag and drop the system component name to its proper place on the automatic film processor diagram.
Media Attributions
- Iannucci & Howerton: Dental Radiography Principles and Techniques, 6th Edition, Chapter 10, CC BY-NC-ND

