Experiment #1: The light microscope
2. What to do during the lab?
If you are waiting to perform your lab, read Diatoms and Using ImageJ to set image scale.
2.1 Check the alignment of the microscope
Perfect alignment of optical components (see Fig. 5 below for identification of these components) should be achieved for optimal contrast and resolution. This alignment somewhat depends on the objective used and should be quickly reconsidered each time one switches objectives.
> Get ready. Start by choosing an easy sample to look at, and place it under the microscope. Select the objective with the lowest magnification available by rotating the objective turret (⑪). Turn on the lamp (①). Open the field diaphragm completely (③). Select the aperture diaphragm (position “A” on the selection ring ⑤) and open it completely (⑥).
> Focus. Bring the sample into focus, by turning first the coarse focus knob (⑧) then the fine focus knob (⑨). This ensures that the object and image planes are conjugated. At this point you might also want to adjust the diopter ring and interpupillary distance on the eyepiece.
> Condenser position. To adjust the condenser position in order to ensure optimal sample illumination, slowly close the field diaphragm (③) until you can see it in the field of view. Bring it into focus by adjusting the condenser height with the condenser focus knob (⑩). The field diaphragm plane is now conjugated with the other three field planes. You might also need to center the field diaphragm using the centering screws (④).
Figure 4: Images of the condenser in the (1) MISALIGNED position, and in the (2) ALIGNED position.
> Field diaphragm adjustment. Open the field diaphragm just enough so that it comes out of your field of view. This allows for the largest possible field of view while minimizing stray light and therefore improving contrast.
> Aperture diaphragm adjustment. Replace one of the eyepiece by the eyepiece telescope and adjust its focus to bring the objective back aperture into focus (its built-in diaphragm will then appear as a small disc of light). When looking through the eyepiece telescope, you are now looking at the four aperture planes. Close the aperture diaphragm (⑥) until it appears in the field of view in the eyepiece lens (the aperture diaphragm should be in focus if the previous steps have been performed correctly). The aperture diaphragm controls the numerical aperture of the condenser, and therefore influence resolution (the larger the condenser diaphragm the higher the resolution) as well as the contrast and depth of field of the image (the smaller the condenser diaphragm the higher the contrast). Close it until you’ve reduced the apparent size of the objective diaphragm by 25%. This represents a good compromise between resolution and contrast, although it can be altered to improve either. You might also need to center the aperture diaphragm using the centering screws (⑦). See the video below.
> Phase ring: To further improve contrast, switch from the aperture diaphragm (“A” on the selection ring ⑤) to the appropriate phase ring (“Ph 1”, “Ph 2” or “Ph 3”) depending on the objective used. You should now see a ring of light through the eyepiece telescope (the phase ring), which must be aligned with the phase ring at the back aperture of the objective. This can be done using the centering screws ⑦. Switch from the phase ring to the aperture diaphragm and decide which gives you the best image (this will depend on which type of sample you are using).
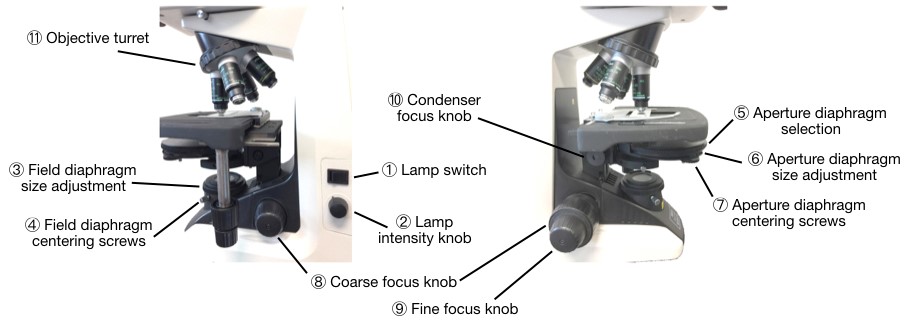
Figure 5: Possible adjustments on the Nikon Eclipse E200. The left panel shows the right side of the microscope, while the right panel shows its left side.
> Illumination. Adjust the lamp brightness using the intensity control knob ②. The optimal intensity will depend on the sample you are looking at, objective you are using, whether you are using a phase ring, and whether you are looking at the image through the eyepiece or the camera.
> Digital camera. Switch from eyepiece viewing to the camera by pulling the knob on the right side of the microscope. To record images we will be using the Motic Images Plus 3.0 software.
a) Activate the camera: To get images from the camera, go to File > Capture, or directly select the “Live Image Window” icon ( ) from the icon bar on the left. A new window will open (called “Motic Live Imaging Module”). In the upper right corner of that new window, in the “Video Device” area, switch from “Motic Demo” to the camera attached to the top of your microscope. Then click “Open” to start viewing the sample.
b) Adjust brightness: If the image is too dim or too bright, the brightness has to be adjusted. One method is changing the exposure time. Longer exposure times let the camera collect more light. This will improve image quality at the cost of a loss in time resolution. A second way of optimizing brightness is to modify the gain setting. The higher the gain, the more the signal received by the camera gets amplified, resulting in a brighter but noisier image.
c) Capture the image: Enter the “Capture” tab by clicking on the camera icon found on the icon bar on the right ( ). Click “Capture” to make a snap shot. The image you just acquired should show at the bottom of the original “Motic Images Plus 3.0 ML” window.
d) Saving images: Go to the original “Motic Images Plus 3.0 ML” window, which should have all the captured images showing in its lower area. Select the image you want to save then go to File Save as. Use the “tiff” format for uncompressed image processing. “bmp”/”jpg” are compressed formats, which you should use only for easier uploading and sharing – not for quantitative analysis.
2.2 Image a calibration slide
Do not forget to record everything you are doing in your lab notebook, according to the tips given in Section 3 of the Introduction to this lab manual.
> Capture an image of a calibration slide using the 10x objective.
> Repeat the same procedure for one or several higher magnification objectives of your choice.
> The images of these calibration scales can later be used to calibrate the scale of all your images, so that scale bar can be added using ImageJ as explained in Tutorial 2.
2.3 Image a biological sample
> Choose one of the biological samples at your disposal (diatom, butterfly scale, bird feather, beggartick seed), which have all been chosen to present features at several different scales. Capture the best image(s) you can of this specimen. You can analyze these images later with ImageJ to determine the size and/or the period of the features that can be observed.
> Repeat the procedure with one or several different objectives to see how the image resolution changes when the properties of the imaging system are changed.