Zoom Video Conferencing
35 Using Zoom for Live Sessions
As a McMaster instructor, you have access to Zoom videoconferencing software to host live sessions for course-related activities. At MCE, we encourage our online instructors to incorporate the use of this tool into their course delivery because it will allow you to:
- Enhance your presence in the online learning environment
- Enrich your communication with students (chatting individually or in groups, collecting immediate feedback, etc.)
- Address effectively and directly unforeseen issues that may emerge during the course, whether administrative, technical, or academic.
- Actively “teach” more effectively by adding additional insights, expanding on challenging concepts, or providing explanation on specific course content or assignments.
Ideas for Live Sessions
- Course introduction/welcome
- Instructor-led discussions
- Small group discussions (‘breakout’ groups)
- Guest speakers
- Student-led presentations
- Case study/analysis
- Q & A sessions (e.g. reviewing assignment expectations)
- Virtual office hours
- Webinar/mini-lecture on a specific topic
- Demonstrations (e.g. step-by-step problem solving)
- Screen-sharing (e.g. to show how to use an online tool)
Live Sessions and MCE Course Design
Our course design strategy seeks to leverage the benefits of using videoconferencing tools by integrating live sessions into the course delivery. These sessions should be:
- customized according to the organization and content of the course, in collaboration between the SME and ID,
- scheduled in advance and noted in the Detailed Course Schedule document, and
- entered (manually) in the Avenue to Learn Calendar.
Instructors should inform students of the topic and format of the live sessions via the Avenue to Learn Announcements tool.
In addition to the scheduled sessions, instructors may wish to include additional “ad-hoc” sessions to address specific issues that may arise (e.g. questions re assignments, guest speakers, etc.).
Scheduling a Meeting
Meetings can be scheduled in the Zoom web portal at https://mcmaster.zoom.us/. Sign into the web portal with your username and password.
Once logged in, you will need to
- Select Meetings from the left side menu and then click Schedule a Meeting in top right of the page.
- If your meeting is for a weekly/recurring class, check off the box next to Recurring meeting. Setting up a meeting as recurring will allow you and your attendees to use the same link and password for each meeting, making it easier for students to join weekly classes. A new page will open where you can add in all the details for your meeting.
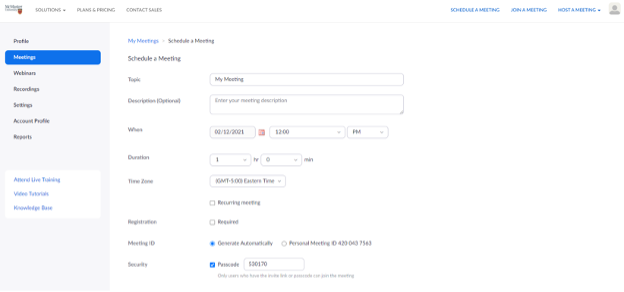
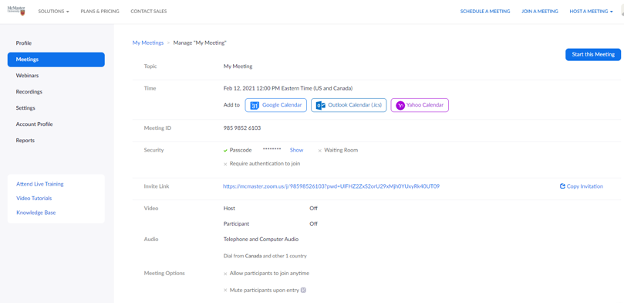
- Once you have input all the meeting information, scroll to the bottom of the page and click Save.Once the meeting is scheduled, you will be brought to a new page displaying all the information for the newly scheduled meeting, including the meeting link and password which must be shared with anyone who needs to attend.
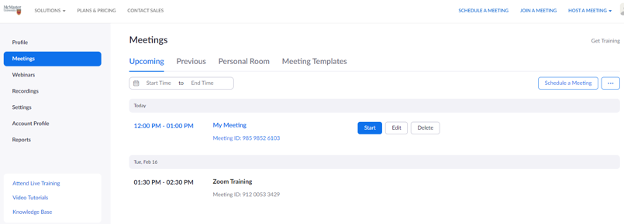
If you navigate back to the main Meetings page, you will see your new meeting(s) added to the list of upcoming meetings. - When it is time to start your meeting, hover your cursor over the meeting you need to start, and click the blue start icon.
You can also launch meetings from the Zoom Desktop Application – this first needs to be downloaded to your device and you will need to select SSO login to login with your McMaster credentials. To download the Desktop Application head to the Download Center and select the first option: Zoom Client for Meetings.
For more information about scheduling a Zoom meeting, check out the video below:
View Video
Zoom Live Closed Captioning and Transcription Service
Live transcription is now available for the McMaster community. This feature generates an AI-powered live transcription and is enabled by the meeting host or co-host for all meeting participants. Once enabled, participants have the option of hiding the live transcription or displaying the transcription in a chat-like format.
To activate this feature:
- Login to your zoom account settings on the McMaster Zoom portal by selecting the ‘sign -in’ option near the bottom of the menu options.
- After login, navigate to ‘Settings’.
- Select ‘In Meeting (Advanced)’ from the sub-menu.
- Navigate down the page to the ‘Manual captions’ section and ensure the following options are active:
- Allow host to type of assign a participant to type
- Allow use of caption API Token to integrate with 3rd-party Closed Captioning services
- Enable Automated captions
- Enable Full transcript
- Enable Save Captions

For more information, please visit Zoom: Live Captions now Available for the McMaster Community, or check out the How to Enable Live Captions in Zoom video below:
View Video
Recording Zoom Sessions
Since some students may not be available during a Zoom session, it is important that you record the session and share it so that students may view the session after it has concluded. The following steps outline how to record and share a Zoom session in your course.
Recording to the Cloud
Enabling Cloud Recording & Changing Cloud Recording Settings
- Sign in to McMaster’s Zoom Portal using a valid MAC ID and Password
- Select the Settings Tab
- Select the Recording Tab
- Make sure Cloud Recording is enabled.
- Select Audio transcript for accessibility.
Recording a Live Session
- Start your Zoom Session as a Host
- Select Record
- Select Record to the Cloud. A notification will pop up somewhere on the screen indicating that the recording is in progress.
- If your live session contains breakout rooms, you can pause the recording for the duration of the breakout room portion of the live session and then when everyone returns to the main room, resume the recording.
- The recording will always follow the host that initiated the recording (e.g., If the host remains in the main room, the recording will continue to record the activity in the main room. If the host visits breakout room 3, it will record the activity/conversation in breakout room 3) and will not record all of the breakout rooms.
- You may stop the recording at any time using the Pause/Stop Recording, or simply by ending the meeting.
- Once the meeting is ended, the recording must be processed before viewing. Zoom will send you an email to your McMaster email account when the process is completed.
Sharing a Recorded Live Session with Your Students
- To access your live session recording, sign in to McMaster’s Zoom Portal using your MAC ID and Password and select Recordings in the left hand menu.
- Find the recording you want to view and click the topic
- Copy the Shareable Link associated with the recording and select one of the options below to share the recording with students:
- Option A) Paste it into a new announcement using the Avenue to Learn Announcements
- Option B) Paste it within a module or sub-module in Avenue to Learn:
- Go to the sub-module or module in Avenue to Learn where you want to add the recording
- Select Upload/Create
- Select Create a Link
- Add a Title – (e.g., Name of Live Session (Date/Time))
- Paste the URL (i.e., shareable link)
- Select Open as External Resource
- Select Create
References
McMaster University. (2020, June 29). Zoom at McMaster. MacVideo. https://www.macvideo.ca/playlist/dedicated/168494501/1_d2wmlxij/1_b9ofn39y
McMaster University. (2022, September 21). Zoom. UTS. https://uts.mcmaster.ca/services/computers-printers-and-software/zoom/
Zoom. (2021, December 12). Recording to the cloud. YouTube. https://youtu.be/9wjrQAAi0DU
Zoom. (2021e, December 12). Schedule a meeting from the web or desktop. YouTube. https://youtu.be/Cbw1UhvSQRU
