During Your Course
16 Assignments: Viewing, Grading and Special Access
Viewing and Grading Assignments
To grade an assignment, take the steps outlined below and as demonstrated in the video:
- Select Assessments in the navbar, and then Assignments
- Select an assignment folder link
- Scroll down to the table to view users’ submissions
- Select the link to a submitted file to view it
- If using Turnitin, refer to Similarity Reports and Score to better understand similarity ranges before continuing with the steps below
Enter a score using one of the two following workflows:
Option A) Using the Rubric
If using the Avenue to Learn rubric tool:
Read more
- In the Evaluation and Feedback panel, select the rubric title (below the grid icon*) to open the rubric in a pop-up window
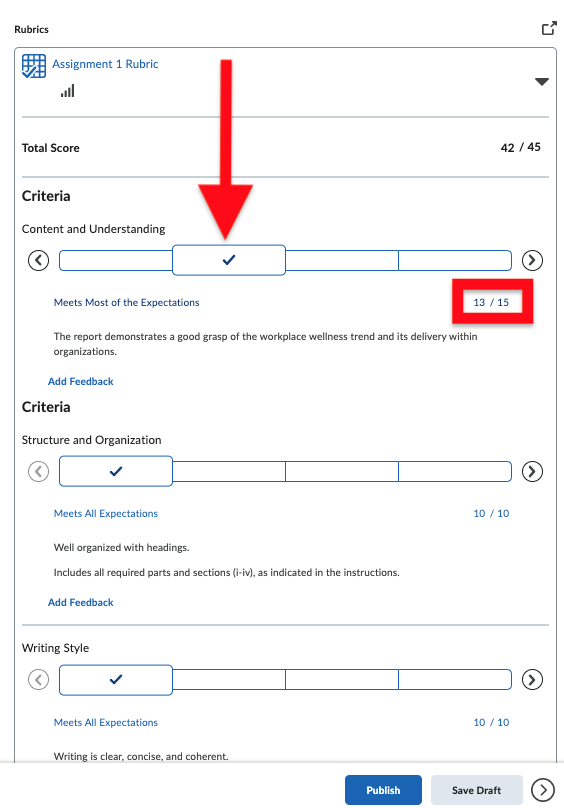
- Select a score for each criterion by selecting a box in each row; at the bottom of the rubric, the Overall Score will be tallied automatically
- Selecting an Add Feedback link will open an input area for feedback; clicking an ‘out of’ score will allow you to adjust the points
- When done, select the Close button to close the rubric pop-up and transfer the score to the Evaluation and Feedback panel
- The rubric score will now be displayed in the Evaluation and Feedback panel; additional Feedback can be added here (scroll down, if necessary, to see the Feedback input area)
- When done, select the Save Draft button to record the information (publish releases the score immediately for student viewing; however, it is recommended that all students be graded first in draft mode before publishing the grades in bulk)
- Proceed to the next student and repeat steps until all submissions have been evaluated
- When done, select the Back to Folder Submissions button
- On the Folder Submissions screen, select the checkbox in the first table row (the header row) to select all rows
- Select Publish Feedback to release all scores for student viewing
- The word Published, and the publishing date and time, will be displayed beside each user’s name to indicate a successful release of scores
View Video
Adjusting the Criteria Score
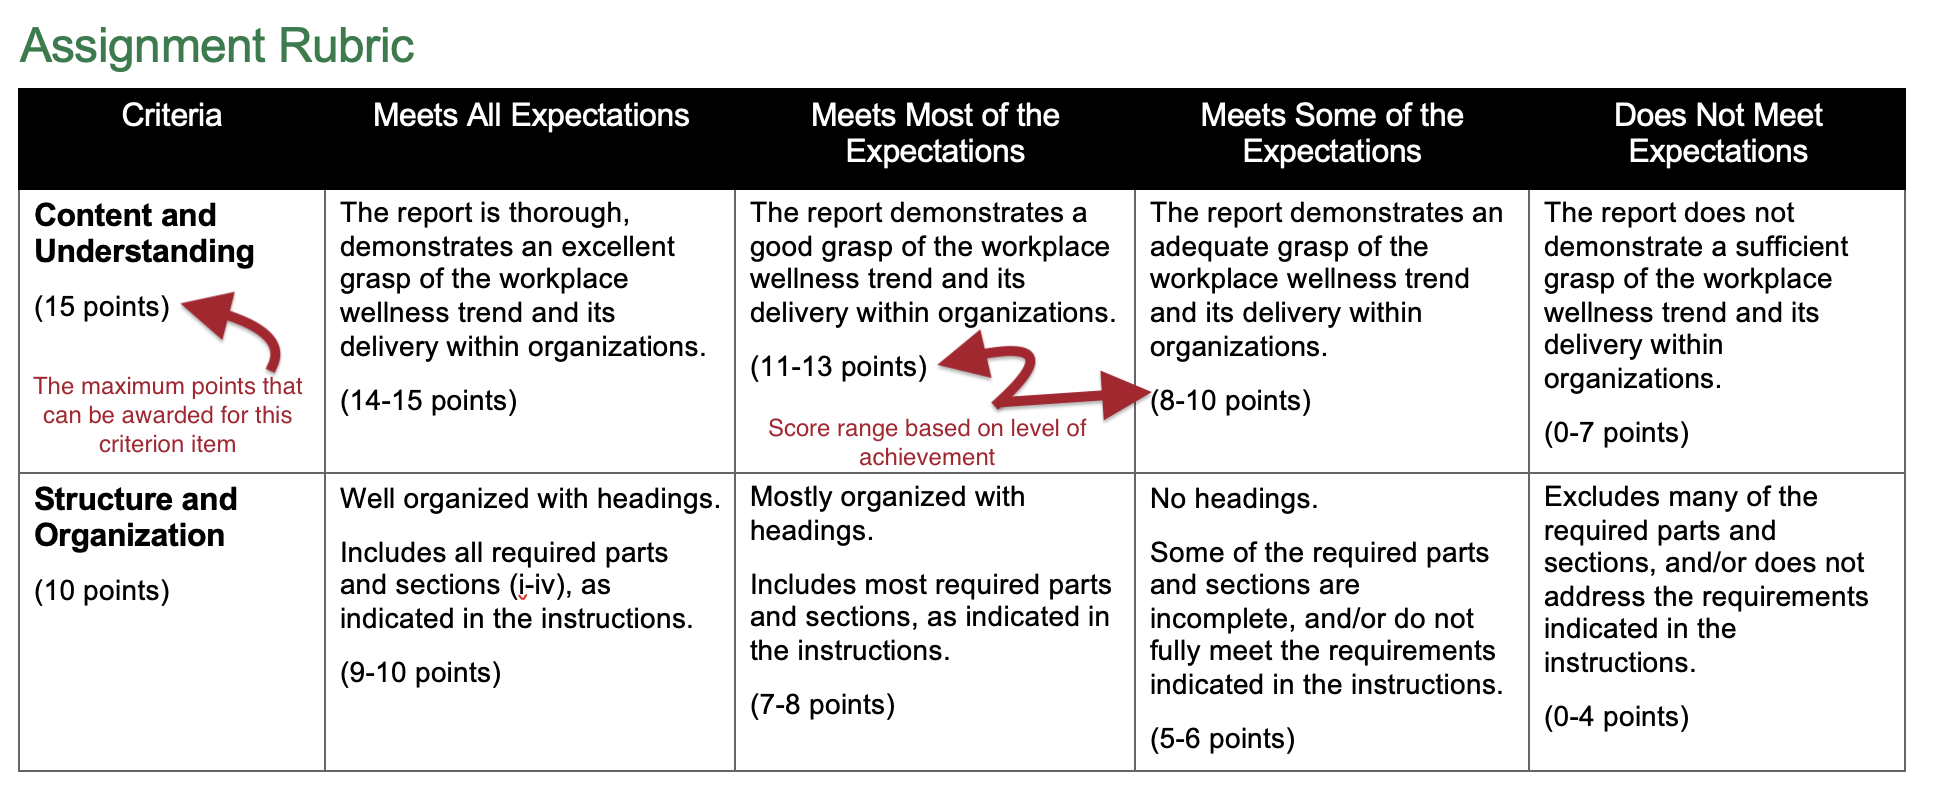
The rubric is organized by criteria and levels. Each level of achievement (e.g., meets all expectations, meets most expectations, meets some expectations, and does not meet expectations) is defined by an overall score range (e.g, does not meet expectations has score range of 0 – 7 points) and overall descriptions of what each level looks like.

Option B) No Rubric
If not using the Avenue to Learn rubric tool:
Read more
- In the Evaluation and Feedback panel, enter a Score and Feedback
- When done, select the Save Draft button to record the information (publish releases the score immediately for student viewing; however, it is recommended that all students be graded first in draft mode before publishing the grades in bulk)
- Proceed to the next student and repeat steps until all submissions have been evaluated
- When done, select the Back to Folder Submissions button
- On the Folder Submissions screen, select the checkbox in the first table row (the header row) to select all rows
- Select Publish Feedback to release all scores for student viewing
- The word Published, and the publishing date and time, will be displayed beside each user’s name to indicate a successful release of scores
Publishing Grades
- Publish releases the score immediately for student viewing
- It is recommended that all students be graded first in draft mode before publishing the grades in bulk
- Once published, the grades and rubric feedback are both released to students and copied to Grades; each student will be able to view their grade, graded rubric, and general feedback from both the Grades tool and the Assignments tool.
Granting Special Access
“Special Access” is a tool allowing instructors to set distinct availability dates and times for specific students. It may be used to extend the deadline for students needing extra support or to grant a deadline extension. It’s also applicable after an assignment’s end date has passed, aiding students with valid reasons for missing the deadline or those required to submit additional materials.
To add special access to an assignment using the new assignment creation experience:
Read more
-
- On the navbar, click Assignments.
- On the Assignments page, from the context menu of the assignment you want to set release conditions for, click Edit Assignment.
- Expand Availability Dates & Conditions.
- Select Manage Special Access and select one of the following options:
- Allow users with special access to submit outside the normal availability dates for this folder
- Allow only users with special access to see this folder
- Select Add Users to Special Access.
- To give learners that have special access a different assignment due date, select the Has Due Date check box and set the due date for the assignment.
- Under Availability, select the Has Start Date and Has End Date check boxes and set the date availability for when you want users to have special access to the assignment.
- In the Users area, select the users you want to give special access to.
- Select Save and Close. The special access icon, the number of users with special access, and the condition appear under Special Access.
View Video
Viewing an Assignment Submission Log
Assignments have a log that allow you to filter and determine when a learner submitted a file, and whether the learner or instructor deleted the submission.
- On the Assignments page, from the context menu of an assignment, click Submission Log.
- Filter the log as applicable, by Submitted (shows all submissions), Deleted, Restored, or Started.
- Sort by Date.
Frequently Asked Questions
Is the late penalty automatically applied? Do late penalties need to be manually calculated?
No, late penalties are not automatically applied in Avenue to Learn. When an assignment is submitted after the due date, the instructor is responsible for manually calculating and applying the late penalty to adjust the assignment grade.
To apply the late penalty:
Read more
- Initially, grade the submission without considering its lateness, following the rubric or grading criteria (i.e., 15/20).
- Record this original grade score in the feedback section for the student’s understanding of their mark before the late penalty is applied.
- Calculate the percentage (%) score of the original grade (i.e., 15/20 = 75%).
- Deduct the late penalty from this percentage (i.e., 75% – 4% late penalty = 71%). Convert this final percentage back to a score out of the total (i.e., 71% of 20 = 14.2).
- Record the late penalty calculation in the feedback section and enter the final grade with the penalty applied in the grade book.
Note: While the grade book is programmed to round grades to the nearest whole number for display, the precise grade (i.e., 14.2/20) is used when calculating the final grade.
Why does selecting “does not meet expectations” on the rubric award a passing grade?
Analytic rubrics are structured with various levels of achievement and their corresponding point ranges. For example, these levels might be “Does Not Meet Expectations,” “Meets Some of the Expectations,” “Meets Most of the Expectations,” and “Meets All Expectations.” Each level has an associated point range, such as 0-4, 5-6, 7-8, and 9-10, respectively.
When you select a level on the rubric, like “Does Not Meet Expectations,” the system automatically assigns the highest point value within that level’s range — in this case, 4. This is why even a “Does Not Meet Expectations” level can still award a non-zero grade.
However, this score isn’t locked in. If you wish to adjust it, click on the score in the text input box and assign the appropriate point value. Remember, the full point ranges for each level are outlined in the assignment guidelines.

Using Rubrics
For more information about how to evaluate and assess using rubrics, check out the video below:
View Video
References
Brightspace Tutorials. (2017, June 1). Assignments (Dropbox) – grade submissions in assignments – instructor. YouTube. https://youtu.be/PONZCLWVThg
Brightspace Tutorials. (2019, September 4). Assignments – add restrictions to an assignment – instructor. YouTube. https://youtu.be/bA9Z20y_nIY
D2L. (2020, April 16). Easily evaluate and assess students with rubrics in Brightspace. YouTube. https://youtu.be/BbZ10LqIskY
D2L Knowledge. (2023, July 7). Set release conditions and special access in assignments. Brightspace. https://community.d2l.com/brightspace/kb/articles/3406-set-release-conditions-and-special-access-in-assignments

