Implementing Pipeline 1

Establish your learning objectives according to the needs of your faculty and students. Review Chapter 1 of this toolkit as you develop your learning objectives.
Installing Software
You have two options that you can use to develop content: H5P using Lumi, or the Open eLearning Authoring Tool.
You can download the Lumi Editor for Mac, Linux or Windows here: Download
You can download the Open eLearning Authoring Tool for Mac, Linux, or Windows here: Download
H5P
The Lumi Editor
Open eLearning Authoring Tool
Exporting Content
Exporting content is an important step because it has a direct effect on how and what users will be able to do with your learning material. If you wish for content to be formative in nature without a directly evaluative component (for instance, a gradebook item or a release condition in an LMS), then embedding H5P content should suffice. However, if you’d prefer to have evaluative components, then you will want to take advantage of the SCORM format.
Exporting .h5p files from Lumi
Lumi Editor allows you to export three types of files: .h5p files, HTML5 files, and SCORM files. Here’s how to export .h5p files.
When you are finished editing your content, simply click on File → Save as → Save the file. The native extension for H5P files is .h5p, and these are editable documents (meaning, you’ll be able to edit them in the future by opening them with Lumi).
Upload .h5p files to a repository
H5P content on its own cannot be displayed in a browser: .h5p files need to be uploaded to a repository first and then embedded in other places. Depending on where you are located, you have options.
- If you are located in Ontario, eCampus Ontario offers access to the H5P Studio content repository: H5P Studio This platform is both a repository of content and a web editor (although we recommend you develop content on your machine and then upload your content to the repository).
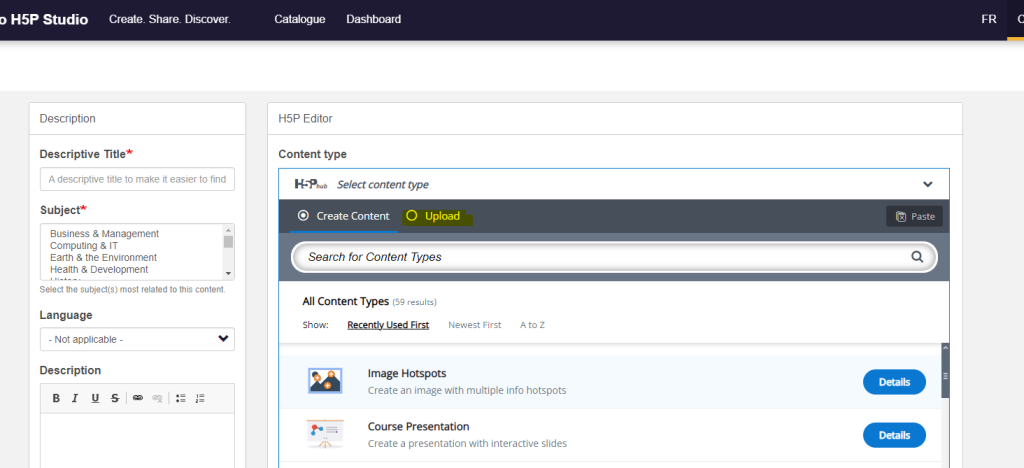
First, log in and create a new item. Select “Upload”
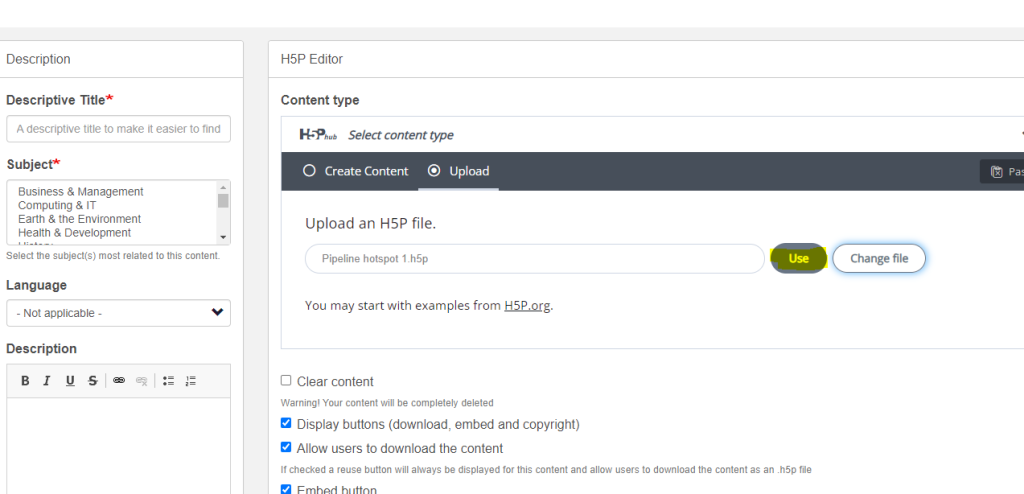
Second, locate the appropriate .h5p file and upload it. Save the file.
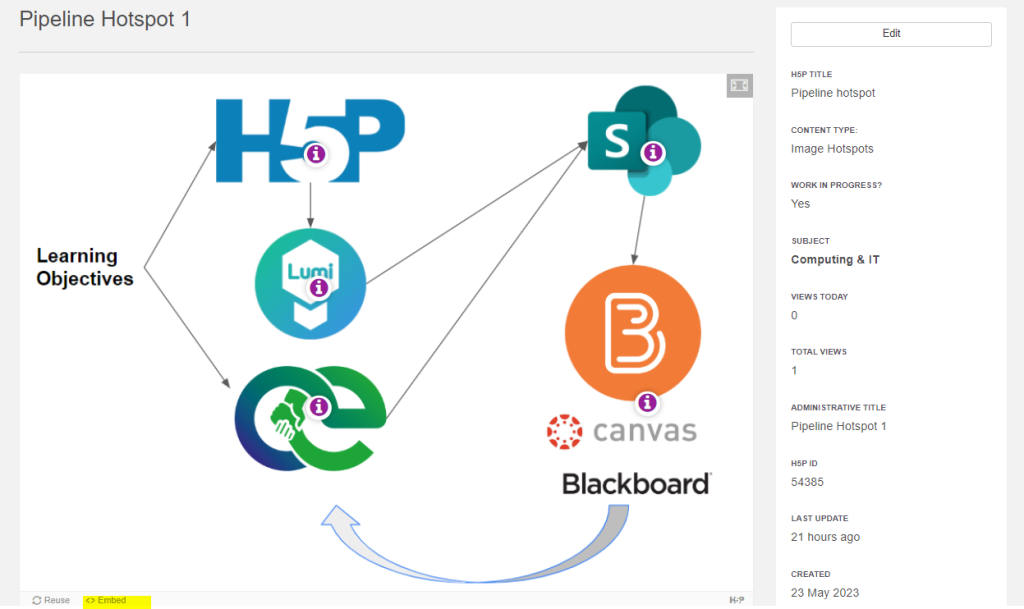
Upon saving you will be redirected to the H5P object. Click on “Embed” in the bottom left corner and embed the iFrame wherever you wish.
- If you are not in Ontario, you can use the Lumi Cloud.
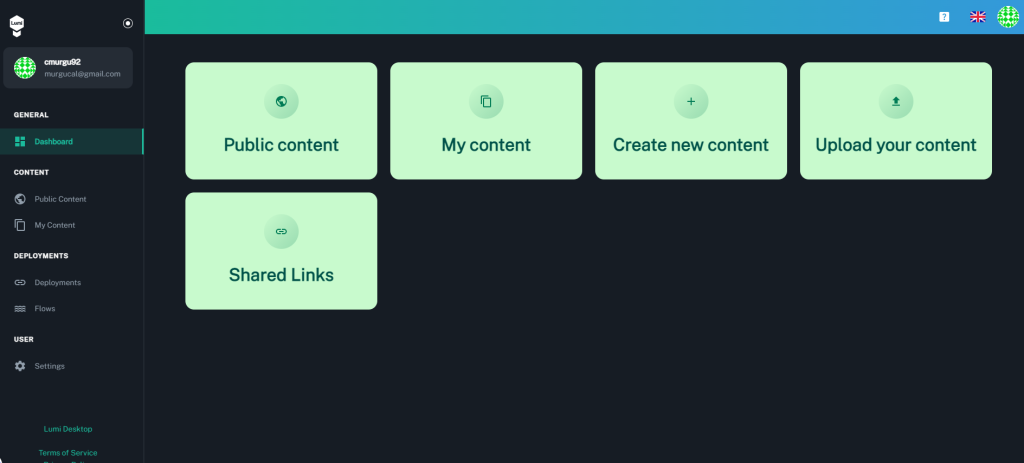
Create an account and upload your content by clicking the “Upload content” button. Lumi Cloud will process your .h5p file.
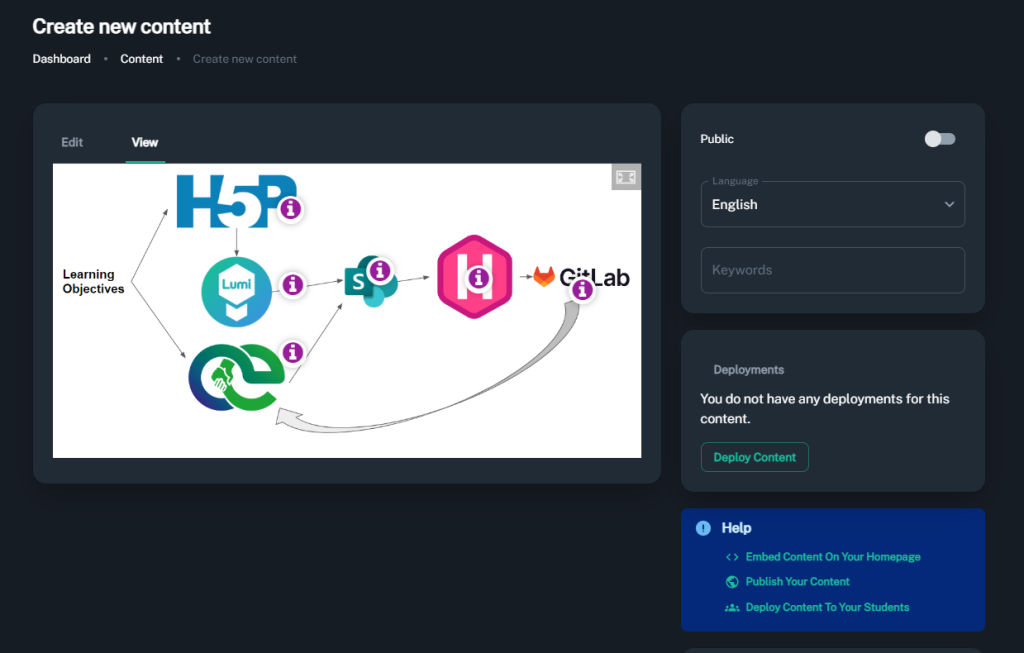
Lumi Cloud will host your content, provide options for embedding and publishing on different websites or LMS.
- Finally, H5P is almost done with the H5P OER Hub, which will be available for everyone. More information here.
Exporting SCORM files from Lumi and eLearning Author Tool
Embedding iFrames will work in a lot of different instances, particularly if the learning is formative. However, you will require additional functionality from time to time. Consider, for instance, if you’d like to offer release conditions (i.e., content will only be served if, for instance, a quiz is completed and passed), or if you’d like to connect a learning object to a gradebook item. To do this, we need to use SCORM. Both software provide SCORM outputs.
Exporting SCORM files from Lumi
- Once you’ve completed your learning object, you can export this item as a SCORM object. Please note that not all content types will work in a SCORM environment. There needs to be a ‘completion’ mechanism – some form of interaction for the student. For instance, an accordion content type will not be be able to represent a completion state, but a T/F quiz or interactive video will.
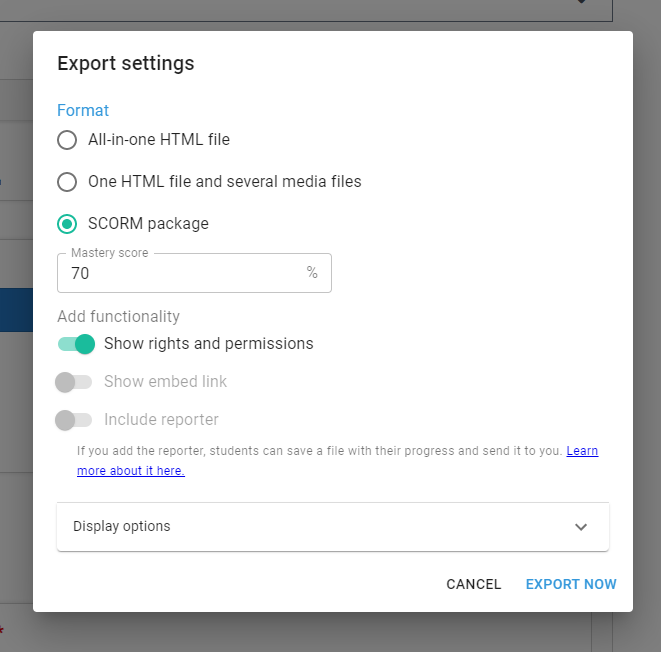
When ready to export, click on File → Export → SCORM package (and select a mastery). This will save a .zip file in your directory. That is your SCORM package, which we can now upload to our LMS.
Exporting SCORM files from Open eLearning Authoring Tool
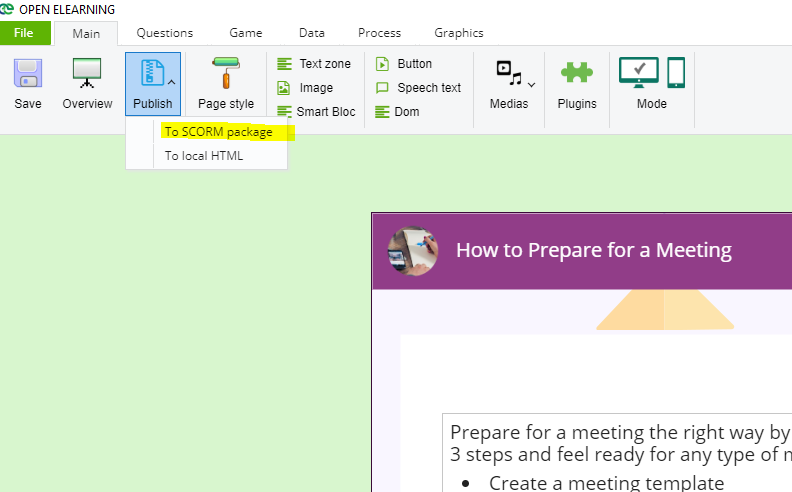
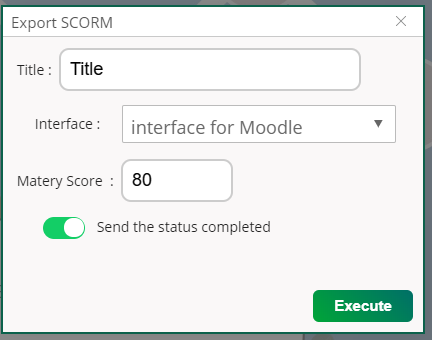
Include a title in the Export menu, and select “Interface for Moodle.” It doesn’t matter which LMS you use — this format will work.
Tracking Learning Objects and Revision Schedule
Establishing a revision schedule for e-learning objects is crucial as it ensures the ongoing relevance and accuracy of the content. Regular revisions enable the identification and correction of outdated information, improvement of instructional design, and alignment with evolving educational standards, ultimately enhancing the effectiveness and value of the e-learning materials.
Tracking Learning Objects with SharePoint Lists
It is likely that you are already using SharePoint as a storage system for documents and other content. You can leverage SharePoint Lists to create a tracking system for all of your learning objects.
- Create Lists: Within your SharePoint site, create a list to track different aspects of learning object development, maintenance, and revision. Here’s a suggested approach to creating a local Learning Object Repository: This list will contain details about each learning object, such as its title, description, author, creation date, and status (e.g., in development, published, under revision). Be sure to include the following columns as well: Responsibility (who is responsible for the object?); Maintenance Schedule (when will the LO be reviewed?); Implementation (In what courses/spaces is this LO been implemented?); A link to the file in SharePoint.
- Customize List Columns: Customize each list with columns to capture the specific information you need. SharePoint allows you to create various column types, such as single-line text, choice, date and time, person or group, etc. Tailor the columns to match the data you need to track for each list.
- Configure List Views: Set up different views for each list to present data in a way that suits your needs. For example, you might create views to display learning objects by status, sort tasks by due date, or filter revisions by date range.
- Enable Alerts and Notifications: Take advantage of SharePoint’s alert and notification features to keep stakeholders informed about changes or updates. Configure alerts to send email notifications when specific events occur, such as a new task assignment or a change in learning object status.
- Apply Permissions: Define appropriate permissions and access levels for different user groups to ensure data security and privacy. Grant permissions to authorized individuals who need to contribute to or access specific lists while restricting access to others.
- Utilize Workflow Automation: SharePoint allows you to create workflows to automate processes and streamline tasks. You can configure workflows to trigger actions based on specific conditions or events, such as sending approval requests when a learning object is ready for review.
- Collaboration and Version Control: SharePoint’s collaboration features enable multiple team members to work together on learning object development. Leverage features like document libraries to store related files, co-authoring capabilities, and version control to maintain a record of changes made to documents.
- Reporting and Analytics: SharePoint provides built-in reporting and analytics capabilities. You can create reports or dashboards using tools like SharePoint’s built-in charts, Power BI integration, or third-party reporting solutions to gain insights into learning object development progress, task completion rates, or revision trends.
- Continual Monitoring and Improvement: Regularly review your tracking system, gather feedback from users, and make adjustments as necessary to ensure it remains effective and aligned with your organization’s evolving needs.
Tracking Learning Objects with Notion
Notion is a versatile productivity tool that allows you to create databases and tables to organize and aggregate data (among other things!) Here’s how you can achieve the aggregation of multiple lists or databases in Notion:
- Create Database: In Notion, start by creating a database to record the learning objects that you’re intending to upkeep.
- Define Properties: Customize the properties or columns to capture the relevant information for each learning object. For example, you can add properties like title, description, author, review status, due dates, or any other specific details relevant to your local learning object context.
- Populate the Databases: Add records or entries, filling in the necessary information for each item. You can create new records manually or import data from other sources using CSV or other compatible file formats.
- Create Views: Utilize Notion’s flexible view options to create different views for consolidated data. You can create a master view that shows all records from various databases, or create specific filtered views based on criteria like status, dates, or assigned personnel.
- Link and Embed Views: Notion enables you to embed or link views from one database to another. For example, you can embed a view of the learning object development database within the maintenance or revision database, providing a consolidated view of relevant information.
- Apply Filters and Sorts: Use Notion’s filtering and sorting options to customize how the aggregated data is displayed. You can filter records based on properties, apply sorting criteria, or group records by specific properties to view the data effectively.
- Collaborate and Update Data: Notion provides real-time collaboration features, allowing multiple team members to contribute to and update the aggregated lists. Collaborators can add new records, make edits, or provide comments within the shared databases.
- Visualize Data: Notion offers various visualization options, such as Kanban boards, calendars, or gallery views. Utilize these options to visualize and analyze the aggregated data in different formats based on your preferences and requirements.
Importing SCORM into LMS
Now that you have your SCORM object, it’s time to implement. To import SCORM objects into an LMS, follow these steps:
- Prepare the SCORM Package: Ensure that you have a SCORM-compliant package (.zip) ready for import. This package should contain the necessary files, such as the SCORM manifest file (.xml), HTML files, multimedia assets, and any other resources required for the learning content. This should all be there if you followed the exporting instructions above.
- Access LMS: Log in to your LMS account using your credentials as an instructor or administrator.
- Navigate to the Course: Locate the course where you want to import the SCORM object. You can access the course by browsing the courses or through the administrative dashboard, depending on your role and access privileges.
- Enter Course Content: Once you are inside the desired course, navigate to the area where you want the SCORM object to be imported.
- Add Learning Object: Look for the option to add a new learning object or content item. In Brightspace, this may be called “Add Existing Activities” or “Add Content.” Click on this option to proceed.
- Choose SCORM Package: In the content selection dialog box or menu, choose the option to import a SCORM package. It may be listed as “Import SCORM” or “Upload SCORM Package.” Select this option to proceed with the import process.
- Upload SCORM Package: Click on the option to upload the SCORM package file (.zip) from your computer. Browse and select the SCORM package you prepared earlier.
- Configure SCORM Object: Once the SCORM package is uploaded, you may be prompted to configure additional settings for the SCORM object. These settings can vary depending on the LMS, but they may include options for naming the object, setting visibility, specifying prerequisites, or choosing display options.
- Save and Publish: After configuring the settings, review them to ensure they match your requirements. Then, save and publish the SCORM object to make it available for learners.
- Test the SCORM Object: Access the course as a student or use the LMS’s preview feature to test the SCORM object. Verify that it functions correctly, including interactive elements, assessments, and tracking features. Make any necessary adjustments if issues are identified.
It’s important to note that the exact steps and terminology might differ slightly in Brightspace LMS based on the specific version or customization of your institution’s setup. If you encounter any difficulties or need further assistance, referring to Brightspace LMS’s documentation or contacting their support team can provide you with detailed instructions tailored to their platform.
Gradebook and Release Conditions
SCORM is an old standard but a useful one, because it allows us to associate gradebook items and release conditions to particular content that would otherwise be ‘view only.’ This way, we can ensure that students are at the very least completing the content.
Depending on the LMS your institution is using, setting these elements to active will be different. In general, though, when uploading a SCORM object (prior step), you’ll be asked if you’d like to associate a gradebook item with the content. At that point, you’ll have a decision to make regarding the type of completion: Pass/Fail, points, etc.
Release conditions do not have to be associated with a gradebook item but can be. Essentially, release conditions are just that: a series of IF conditions that tell the LMS to serve content when something happens. Here are some examples:
a) Imagine we have 3 lessons, and you want students to go through them in order before having to complete a formative assessment. You could set a Release Condition that reads: IF Lesson 1 is completed → Release Lesson 2; IF Lesson 2 is completed → Release Lesson 3; IF Lesson 3 is completed → Release Formative Assessment.
