Ch. 4.3: Using Prebuilt Models from Hugging Face Hub – Object detection with Transformers using the Facebook DETR Model
Hugging Face is a company that provides a wide range of tools and libraries for natural language processing (NLP) and machine learning. Their platform includes the Hugging Face Hub, which is a repository of pre-trained models that can be easily integrated into various applications. These models can be used for a variety of tasks such as text classification, translation, summarization, and more. By using pre-built models from the Hugging Face Hub, researchers and developers can save time and resources, allowing them to focus on fine-tuning and deploying models for their specific needs.
Object detection with Transformers using the Facebook DETR Model from Hugging Face
The DETR (DEtection TRansformer) model is a state-of-the-art object detection model developed by Facebook AI Research. It is designed to detect and classify objects in images using a transformer-based architecture. The DETR model has gained popularity due to its ability to handle complex scenes and its end-to-end training approach, which simplifies the object detection pipeline. By leveraging the power of transformers, DETR can achieve high accuracy and robustness in various object detection tasks.
The DETR model available in the hugging face hub (in this link) is a pre-trained version of the original DETR model. It has been trained on a large dataset, making it suitable for various object detection tasks without the need for extensive fine-tuning. The pre-trained model can be easily integrated into applications for tasks such as image segmentation, object localization, and instance segmentation. By using the pre-trained DETR model from Hugging Face, developers can save time and resources while achieving high-quality results in their object detection projects. A detailed guide about using hugging face models in DRAC resources can be found here.
The COCO dataset is a large-scale dataset commonly used for training and evaluating object detection models. It contains over 330,000 images with more than 2.5 million object instances labeled across 80 different categories. The COCO dataset provides a diverse set of images, making it an ideal benchmark for evaluating the performance of object detection models like DETR. By using the COCO dataset, researchers and developers can train and fine-tune their models to achieve better accuracy and robustness in real-world applications. You can find more information about the COCO dataset in this link.
In this section, we will explore how to use the DETR model from Hugging Face to perform object detection tasks. We will cover the steps to set up the environment, load the model, and perform object detection on images using the COCO dataset.
Running Locally
There are multiple ways of accessing the model from Hugging Face. In this chapter, we will not focus on running it locally, but will explore how to run it in the DRAC resources. The examples below can be explored on your local machine. To run the model locally, you can either use a pipeline:
# Use a pipeline as a high-level helper
from transformers import pipeline

pipe = pipeline("object-detection", model="facebook/detr-resnet-50")
Or load the model with:
# Load model directly
from transformers import AutoImageProcessor, AutoModelForObjectDetection

processor = AutoImageProcessor.from_pretrained("facebook/detr-resnet-50")
model = AutoModelForObjectDetection.from_pretrained("facebook/detr-resnet-50")
To test the model with an image from the COCO dataset, you can try the python script below:
from transformers import DetrImageProcessor, DetrForObjectDetection
import torch
from PIL import Image
import requests

url = "http://images.cocodataset.org/val2017/000000039769.jpg"
image = Image.open(requests.get(url, stream=True).raw)

# you can specify the revision tag if you don't want the timm dependency
processor = DetrImageProcessor.from_pretrained("facebook/detr-resnet-50", revision="no_timm")
model = DetrForObjectDetection.from_pretrained("facebook/detr-resnet-50", revision="no_timm")

inputs = processor(images=image, return_tensors="pt")
outputs = model(**inputs)

# convert outputs (bounding boxes and class logits) to COCO API
# let's only keep detections with score > 0.9
target_sizes = torch.tensor([image.size[::-1]])
results = processor.post_process_object_detection(outputs, target_sizes=target_sizes, threshold=0.9)[0]

for score, label, box in zip(results["scores"], results["labels"], results["boxes"]):
    box = [round(i, 2) for i in box.tolist()]
    print(
        f"Detected {model.config.id2label[label.item()]} with confidence "
        f"{round(score.item(), 3)} at location {box}"
    )
Exercises
1. Create a Virtual environment and install the required packages.
2. Run the script and verify the boxes detected with the DETR model.
Running on the DRAC resources
In this section we will not focus on training the DETR model. Instead, we will focus on testing the model using pre trained weights on the validation set from the COCO dataset. The goal is to use the model to predict the classes of the objects in the images, create and store an image of the results, and save the results in a JSON formatted file.
Downloading the weights and dataset files
In many resources available in the DRAC cluster, the internet access is restricted. We need to download the model and processor weights to the local node. To download the model, we can use the python script below from a login node. Notice that the model name is being used to download the model. We will have a bash script to create the virtual environment, install the required packages, execute the script below, and download part of the COCO dataset. Make sure to save this script as detr-download.py.
# Load model directly
from transformers import AutoImageProcessor, AutoModelForObjectDetection

processor = AutoImageProcessor.from_pretrained("facebook/detr-resnet-50", revision="no_timm")
model = AutoModelForObjectDetection.from_pretrained("facebook/detr-resnet-50", revision="no_timm")
The script below will create the environment, execute the script detr-download.py (which downloads the weights from Huggingface), and download a portion of the COCO dataset. This step is required to execute the next subsection, which copies the data and uses the model weights. You can also find the script in this link.
#!/bin/bash
set -ex

# Directory to store COCO data

# Environment name
ENVNAME=".env-detr"

# Environment directory
ENVDIR=$HOME

# Load Python
module load python

# Prepare virtualenv
virtualenv --no-download $ENVDIR/$ENVNAME

# Activate virtualenv and install dependencies
source $ENVDIR/$ENVNAME/bin/activate
pip install --no-index --upgrade pip
pip install --no-index torch torchvision transformers

python detr-download.py

echo "Model weights downloaded."

# Cleanup environment
deactivate
rm -rf $ENVDIR/$ENVNAME

echo "Checking for data directory..."
[ -d $DATADIR ] || mkdir $DATADIR

echo "Checking for data files..."
[ -e $DATADIR/val2014.zip ] || wget -P $DATADIR --no-check-certificate  https://images.cocodataset.org/zips/val2014.zip
[ -e $DATADIR/annotations_trainval2014.zip ] || wget -P $DATADIR --no-check-certificate https://images.cocodataset.org/annotations/annotations_trainval2014.zip

echo "Data files downloaded."
To execute the script above, make sure you are logged in a login node, then in a terminal, use the following command:
bash drac-detr-download.shThe inference python script
Model inference is the process of using a trained model to make predictions on new data. In this case, we will use the pre-trained DETR model to perform object detection on images from the COCO dataset. The inference script will load the model, process the input images, and generate predictions. The output will include the detected objects, their bounding boxes, and class labels. The script will also save the output images with the detected objects and a JSON file with the predictions. Take a look at the arguments used in the script. Notice that a threshold can be used to filter the predictions. The threshold is used to filter out low-confidence predictions. The default value is 0.7, which means that only predictions with a confidence score greater than 0.7 will be considered valid. You can adjust this value to filter out more or fewer predictions based on your requirements. Increasing the threshold will result in fewer predictions but with higher confidence.
The python script seen below can also be found in this link. Make sure to save it as drac-detr.py, since it will be used in a sbatch script in the next section.
import os
import argparse
from transformers import DetrImageProcessor, DetrForObjectDetection, AutoImageProcessor, AutoModelForObjectDetection
from torchvision import datasets, transforms
import torch
from torchvision.transforms import v2

import matplotlib
from matplotlib import pyplot as plt
import matplotlib.patches as patches
import json

# Set the backend to Agg for non-interactive use
# This is useful for saving figures to files without displaying them
# in a window
matplotlib.use("Agg")

home_dir = os.getenv("HOME")

parser = argparse.ArgumentParser()

parser.add_argument(
    "--data-dir",
    type=str,
    default=os.path.join(os.getenv("SLURM_TMPDIR", home_dir), "data", "val2014"),
    help="Path to the data directory",
)

parser.add_argument(
    "--annotation-file",
    type=str,
    default=os.path.join(
        os.getenv("SLURM_TMPDIR", home_dir),
        "data",
        "annotations",
        "instances_val2014.json",
    ),
    help="Path to the annotation file",
)

parser.add_argument(
    "--output-dir",
    type=str,
    default=os.path.join(home_dir, "output"),
    help="Path to the output directory where the results will be saved",
)

parser.add_argument(
    "--model-threshold",
    type=float,
    default=0.9,
    help="Threshold for the model to consider a detection as valid",
)

parser.add_argument(
    "--limit",
    type=int,
    default=None,
    help="Limit the number of images to process",
)


class StoreOutput:
    """
    A utility class for storing object detection results, including visualizations and JSON data.
    This class is designed to work with the COCO dataset format and save the results in a specified directory.
    It provides methods to save images with bounding boxes and labels, as well as to store the results in JSON format.
    The class is initialized with the output directory, and it creates the directory if it does not exist.
    """

    def __init__(self, output_dictory: str):
        """
        Initializes the StoreOutput instance and creates the output directory if it doesn't exist.
        Args:
            output_dictory (str): The directory where output files will be saved.
        """
        self._output_dir = output_dictory
        self._prefix = "COCO_val2014_"
        if not os.path.exists(self._output_dir):
            os.makedirs(self._output_dir)

    def _save_fig(self, model, data, results):
        """
        Saves the image with bounding boxes and labels.
        """

        fig, ax = plt.subplots(1, 1)
        ax.imshow(data[0][0].permute(1, 2, 0).cpu().numpy())

        for score, label, box in zip(
            results["scores"], results["labels"], results["boxes"]
        ):
            box = [round(i, 2) for i in box.tolist()]

            rect = patches.Rectangle(
                xy=(box[0], box[1]),
                width=box[2] - box[0],
                height=box[3] - box[1],
                linewidth=1,
                edgecolor="red",
                facecolor="none",
            )

            ax.add_patch(rect)

            ax.text(
                box[0],
                box[1],
                f"{model.config.id2label[label.item()]}: {round(score.item(), 3)}",
                fontsize=12,
                bbox=dict(facecolor="yellow", alpha=0.5, edgecolor="red"),
            )

        fig.savefig(
            os.path.join(
                self._output_dir,
                f'{self._prefix}{str(data[1][0]["image_id"].tolist()[0]).zfill(12)}.jpg',
            )
        )

        # Close the figure to free up memory
        plt.close(fig)

    def _store_json(self, data, results):
        """
        Stores the results in JSON format.
        """
        filename = os.path.join(
            self._output_dir,
            f'{self._prefix}{str(data[1][0]["image_id"].tolist()[0]).zfill(12)}.json',
        )

        jsonresults = {k: v.tolist() for k, v in results.items()}

        with open(filename, "w") as f:
            json.dump(jsonresults, f, indent=4)

    def store(self, model, data, results):
        """
        Stores the results of the object detection in both image and JSON formats.
        """
        try:
            if len(data[1]) == 0:
                print("No annotations found for image")
                return
            self._save_fig(model, data, results)
            self._store_json(data, results)
        except Exception as e:
            print(f"Error storing results: {e}")
            print(data[1])


def main():
    # Parse command line arguments
    args = parser.parse_args()
    print(args)

    # Set the device to GPU if available, otherwise use CPU
    device = torch.device("cuda" if torch.cuda.is_available() else "cpu")
    print("Using device: ", device)

    # # Load the processor from pre-downloaded model in cache directory
    processor = DetrImageProcessor.from_pretrained(
        'facebook/detr-resnet-50',
        revision="no_timm",
        local_files_only=True,
    )

    # Load the model from pre-downloaded model in cache directory
    model = DetrForObjectDetection.from_pretrained(
        'facebook/detr-resnet-50',
        revision="no_timm",
        local_files_only=True,
        )

    # Set the model to evaluation mode
    model.to(device)

    # Define the transformations to be applied to the images
    # In this case, we are converting the images to tensors
    transforms = v2.Compose(
        [
            v2.PILToTensor(),
        ]
    )

    # Load the COCO dataset
    dataset = datasets.CocoDetection(
        args.data_dir, annFile=args.annotation_file, transform=transforms
    )

    # Create a DataLoader for the dataset
    # This will allow us to iterate through the dataset in batches
    # Here we are using a batch size of 1 since images have different sizes
    data_loader = torch.utils.data.DataLoader(
        dataset,
    )

    # Create an instance of the StoreOutput class
    # This will be used to store the output of the model
    # The output will be saved in the directory specified by the user
    # in the command line arguments
    store_output = StoreOutput(args.output_dir)

    # Iterate through the dataset
    for idx, data in enumerate(data_loader):
        if args.limit is not None and idx >= args.limit:
            break

        if idx % 10 == 0:
            print(f"Processed {idx} images")

        # Get the image and the annotations from the dataset
        inputs = processor(images=data[0], return_tensors="pt")

        # Move the inputs to the device (GPU or CPU)
        inputs_to = {k: v.to(device) for k, v in inputs.items()}

        # Get the annotations for the image
        outputs = model(**inputs_to)

        # Post-process the outputs to get the bounding boxes, labels, and scores
        # The target sizes are the original sizes of the images
        target_sizes = torch.tensor([data[0].size()[::][-2:]])

        # Post-process the outputs to get the bounding boxes, labels, and scores
        # The threshold is the minimum score for a detection to be considered valid
        results = processor.post_process_object_detection(
            outputs, target_sizes=target_sizes, threshold=args.model_threshold
        )[0]

        # Store the results
        store_output.store(model, data, results)


if __name__ == "__main__":
    main()
The sbatch script
At this point, we should have the model weights and data downloaded, as well as the python script drac-detr.py. The next step is to create a sbatch script that will run the inference script on the DRAC resources.
The sbatch script will specify the required resources, load the necessary modules, and execute the inference script. The script will also copy the output images and JSON file to your home directory to avoid data deletion once the job is finalized. The sbatch script will be submitted using the sbatch command, which will schedule the job to run on the DRAC resources. The sbatch script seen below is also available in this link. Make sure to store it as drac-detr-sbatch.sh.
#!/bin/bash
#SBATCH --gpus-per-node=1
#SBATCH --time=03:00:00
#SBATCH --cpus-per-task=1
#SBATCH --nodes=1
#SBATCH --mem-per-gpu=5G
set -ex

# Environment name
ENVNAME=".env-detr"
# Environment directory
ENVDIR="$SLURM_TMPDIR"
# Store output in $SLURM_TMPDIR
TMPOUTPUTDIR="$SLURM_TMPDIR/output-detr"
# Directory to copy the output to when done
OUTPUTDIR="$HOME/output-detr"
# The model threshold
MODELTHRESHOLD=0.9

EXTRA_ARGS=""

# Check if the user provided any extra arguments
while [[ $# -gt 0 ]]; do
    case $1 in
        --threshold)
            MODELTHRESHOLD="$2"
            shift 2
            ;;
        --limit)
            EXTRA_ARGS="$EXTRA_ARGS $1 $2"
            shift 2
            ;;
    esac
done

echo "Model threshold set to: $MODELTHRESHOLD"
if [ -n "$EXTRA_ARGS" ]; then
    echo "Extra arguments provided: $EXTRA_ARGS"
fi


# Source data directory downloaded from local node
DATADIR="$HOME/data-detr"

[ -n "$ENVDIR" ] || ENVDIR="$HOME"
echo "Environment name: $ENVNAME, Environment directory: $ENVDIR"

# Load Python and CUDA
module load python cuda cudnn

# Prepare virtualenv
virtualenv --no-download $ENVDIR/$ENVNAME

# Activate virtualenv and install dependencies
source $ENVDIR/$ENVNAME/bin/activate
pip install --no-index --upgrade pip
pip install --no-index torch torchvision transformers pycocotools

if [ -e $DATADIR/val2014.zip ] && [ -e $DATADIR/annotations_trainval2014.zip ]; then
    echo "Both val2014.zip and annotations_trainval2014.zip already exist in $DATADIR."
else
    echo "One or both of the required files are missing in $DATADIR."
    echo "Plase download the model and data with: bash drac-detr-download.sh"
    exit 1
fi

# Prepare data directory in $SLURM_TMPDIR
[ -d $SLURM_TMPDIR/data ] || mkdir $SLURM_TMPDIR/data

# Copy data to $SLURM_TMPDIR
cp $DATADIR/val2014.zip $SLURM_TMPDIR/data/
cp $DATADIR/annotations_trainval2014.zip $SLURM_TMPDIR/data/

# Unzip data
echo "Unzipping data..."
unzip -q $SLURM_TMPDIR/data/val2014.zip -d $SLURM_TMPDIR/data
unzip -q $SLURM_TMPDIR/data/annotations_trainval2014.zip -d $SLURM_TMPDIR/data

# Prepare the output directory, cleaning up if it exists
[ -d $TMPOUTPUTDIR ] && rm -rf $TMPOUTPUTDIR
mkdir $TMPOUTPUTDIR

# Run the drac-detr script
python drac-detr.py \
    --data-dir $SLURM_TMPDIR/data/val2014 \
    --annotation-file $SLURM_TMPDIR/data/annotations/instances_val2014.json \
    --output-dir $TMPOUTPUTDIR \
    --model-threshold $MODELTHRESHOLD \
    $EXTRA_ARGS \

# Clean up the output directory
[ -d $OUTPUTDIR ] && rm -rf $OUTPUTDIR/*
[ -d $OUTPUTDIR ] || mkdir $OUTPUTDIR

# Zip all files in TMPOUTPUTDIR
zip -rjq $TMPOUTPUTDIR/out.zip $TMPOUTPUTDIR/

# Copy the output directory to the home directory\
cp $TMPOUTPUTDIR/out.zip $OUTPUTDIR/
unzip -q $OUTPUTDIR/out.zip -d $OUTPUTDIR
rm $OUTPUTDIR/out.zip

echo "Finished processing. Output files are in $OUTPUTDIR."
Submitting the job
To submit the job to a DRAC cluster, you can use the sbatch command. The command below will submit the job using a threshold of 0.8, and will limit the object detection to 100 images using the drac-detr-sbatch.sh script. If you have only one account, you can dismiss the keyword argument --account. If you omit the --limit argument, all images will be classified, however, there are a large number of images in the COCO dataset and the job can take a while to run.
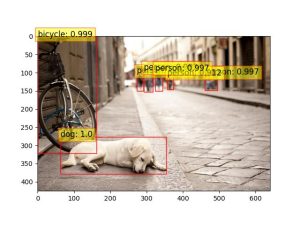
sbatch --account=def-$USER drac-detr-sbatch.sh --threshold 0.8 --limit 100This job can take a while to run since the images in the COCO dataset vary. Because of that, we cannot load multiple images (batch_size > 1) at once. Inspect the sbatch script (drac-detr-sbatch.sh) and notice that the outputs are being stored in the $SLURM_TMPDIR, then are later copied over to your home directory ($HOME/output-detr). Once your sbatch job is complete, go to the directory and look at the files. You will find the output images with the detected objects and a JSON file with the predictions. You can see below examples of the image and json output generated after running the job.
{
  "scores": [
    0.9974979758262634,
    0.9995833039283752,
    0.9908080697059631,
    0.9819869995117188,
    0.99868243932724,
    0.9121922254562378,
    0.9966950416564941
  ],
  "labels": [
    1,
    18,
    1,
    1,
    2,
    1,
    1
  ],
  "boxes": [
    [
      460.6408386230469,
      105.46017456054688,
      495.5872802734375,
      148.6663818359375
    ],
    [
      63.154144287109375,
      276.5394592285156,
      354.3094482421875,
      378.490234375
    ],
    [
      273.4327392578125,
      101.56887817382812,
      291.2597961425781,
      149.7725372314453
    ],
    [
      292.8945617675781,
      92.10859680175781,
      316.64990234375,
      152.85508728027344
    ],
    [
      0.5181312561035156,
      1.3523808717727661,
      162.6413116455078,
      321.7767028808594
    ],
    [
      357.292236328125,
      107.25900268554688,
      373.6153564453125,
      146.15829467773438
    ],
    [
      323.7909240722656,
      94.43266296386719,
      344.25128173828125,
      149.67640686035156
    ]
  ]
}
Questions
1. Summarize what the sbatch script does.
Solution
The sbatch script is used to submit a job to the DRAC cluster. It specifies the required resources and configurations for running the script. The script loads the required modules, sets up the environment, and runs the drac-detr.py script using the python command. In addition, the script downloads a portion of the COCO dataset, and copies it over to the compute node in the DRAC cluster. It also download the model weights for the DETR model. The script then runs the drac-detr.py script and generates the predictions for the images in the COCO dataset. The output image with the predictions is saved in the output folder, and the predictions are saved in a JSON formatted file. The output folder, which was set in the compute node, are then copied over to the $HOME/output-detr folder to avoid data deletion once the job is finalized.
2. What is the memory requirements to execute this script?.
Solution
The memory requirements can be verified while the job is running using the nvidia-smi tool and the srun command to attach to a running job. This model required less than 4GB of memory to run.
3. Try different images from the COCO dataset and verify the boxes detected with the DETR model.
Solution
The output images were copied over to your $HOME/output-detr directory. You can now inspect the output images and the JSON file with the predictions. The output images will show the boxes detected by the DETR model, and the JSON file will contain the predictions for each image.
4. Once the job is complete, verify the resources allocated for this job.
Solution
To verify the resources allocated for the job, you can use the seff command followed by the job ID. For example:
seff <job-id>This will display information about the job’s resource usage, including CPU efficiency, memory efficiency, and the total resources allocated. Analyze the output to determine if the resources were utilized efficiently. Once running the command, you will be able to see an output similar to the one below:
Job ID: 28291057
Cluster: graham
User/Group: someuser/someuser
State: COMPLETED (exit code 0)
Cores: 1
CPU Utilized: 02:04:12
CPU Efficiency: 95.32% of 02:10:18 core-walltime
Job Wall-clock time: 02:10:18
Memory Utilized: 5.00 GB
Memory Efficiency: 100.00% of 5.00 GB (5.00 GB/node)
If you did not save the job-id, you can verify the completed jobs using the sacct command. For example, you can format the output to show the job ID, job name, allocated CPUs, elapsed time, and state of the job:
sacct -n --format="JobId,JobName%30,AllocCPUS,Elapsed,State"Natural Language Processing
Detection Transformer
Artificial Intelligence
Digital Research Alliance of Canada
Common Objects in Context
Central Processing Unit
