Ch. 3.7: Parallel Programming Examples and Exercises
The following examples and exercises will demonstrate data and task parallelism design patterns using both shared memory and distributed computing paradigms. Though the distributed computing exercises will be run on a single node to allow for easy of execution, the lessons are applicable to a truly distributed setting. All the exercises revolve around the same task: a series of files containing floating-point numbers is provided, and the goal is to read these files, sort the numbers, and then write them back to disk. Before looking at the code, you will need to retrieve the code and input data by cloning the git repository containing the scripts on to the DRAC cluster. To do this, the reader must first login to one of the DRAC servers (ex. Cedar) and run the following command in their project directory:
git clone https://github.com/ResearchComputingServices/Intro-ARC-DRAC-resources.git
This will create a directory called Intro-ARC-DRAC-resources and download all of the necessary code for these exercises. Navigate to the Intro-ARC-DRAC-resources/parallel-examples/ directory. This is the root directory for the parallel coding examples we will work on here. In this directory there are exercises directories (exercise-0, exercise-1, exercise-2 and exercise-3), a utilities directory (utils), and a setup script. Each exercise directory contains the files required to run each exercise. The utilities directory contains code common to all exercises. It should also be noted that each exercise directory also contains the solution.
To run the exercises first the ‘setup-exercises.sh’ script must be executed, to do this submit the script to SLURM using the ‘sbatch’ command.
sbatch setup-exercises.sh
The script will take a few minutes to complete. Afterwards there should be a tar archive file in the ‘parallel-examples‘ directory called ‘input-data.tar’. The exercises can now be attempted. It is recommended to start with the exercise in the ‘exercise-0‘ directory, before moving on to ‘exercise-1’ and so forth.
Note: If the following error occurs when submitting an exercise to SLURM:
sbatch: error: You are associated with multiple _cpu allocations...
The following line will need to be added to the top of each run script:
#SBATCH --account=<project name>
Where <project_name> should be replaced by the readers project name. Typically, these have the format def-<username>.
Before getting into the examples, let’s look at some of the more important utility functions. Navigate to the parallel-examples/utils directory and use a text editor or IDE to open the utils.py file. The main subtasks involved in our overall task are loading data from disk (load_data, line 38), converting the input data to floating point values (convert_data, line 82), sorting the data read from disk (sort_data, line 88) and finally writing the sorted data to disk (write_data, line 47). These functions are used as helper functions by the functions called process_file on line 96. As you can see, this function calls all the functions previously mentioned in their logical order and records the time each helper function took to run. These functions will form the backbone of the following exercises.
Exercise 0: Sequential Processing:
The script ‘sequential-code.py’ executes the sorting task using a sequential design pattern. This script processes the data files in four steps, using the utility functions described above. First a data file is read from the disk and stored as a list of strings. The strings are then converted to floating point values (this is not required, python can sort strings, but this is done to add extra CPU load to the task). Next the converted data is sorted from lowest to highest. Finally, the sorted data is written to disk. This process is then repeated for all the input files. This gives a baseline of execution time which the parallelized examples can be compared to. Navigate to the exercise-0 directory and open the sequential-code.py file using a text editor or IDE. The main function relies primarily on a loop that iterates over all input files in the input directory. For each of these files it calls the process_file function described above and records the time taken at each stage. These times are summed for all the input files and then displayed to the user. Run this example code by submitting the ‘sequential-code-run-script.sh’ to SLURM using the sbatch command:
sbatch sequential-code-run-script.sh
The output generated by this script will be saved to a file name ‘exercise-0-results.out’ in the same directory the sbatch command was called from. An example of the output generated by the script is shown in the table below.
|
Processing Step |
Run Time (s) |
|
Loading Data |
4.68 |
|
Converting Data |
4.79 |
|
Sorting Data |
8.75 |
|
Writing Data |
26.62 |
|
Total Time |
45.64 |
Example output from running the sequential-code.py python script.
As can be seen the total execution time for this run was roughly 46 seconds, of which 4.6 seconds were spent reading the data from the disk, it took 4.8 seconds for the strings to be converted to floating point values, and 8.8 seconds to sort those values from least to greatest. Finally, 26.6 seconds (more than half) of the time was spent saving the results to the disk. This is an example of an I/O bottleneck. Depending on the type of disk drive being written to, performing this in parallel could yield significant improvements. Please note that execution times may vary; however, the relative differences in runtime between the sections of code should remain fairly consistent.
Exercise 1: Task Parallelism with MPI
To run the following scripts, navigate to the parallel-examples/exercise-1/ directory. The script ‘exercise-1-MPI-task-parallelism.py’ uses the task parallelism design pattern to parallelize the sequential code in script ‘sequential-code.py’. This is accomplished using the point-to-point communication formalism in MPI as depicted in Figure. The example code contains 4 processes each executing a sub-task of the overall program. Examining the main function starting at line 178 shows how each process is identified based on the rank assigned when the code is executed. The root node (rank 0) reads the data from disk and then sends it to the converter process (rank 1), which converts the strings to floating-point numbers. The list of floats is then passed to the sorter process (rank 2), which arranges them in ascending order. The sorted list is subsequently transferred to the writer process (rank 3), which saves the results to disk. This code will produce an error if fewer than four processes are used. Any processes with a rank greater than 3 (i.e., any beyond the four described) will remain idle.

Figure. Illustration of the communication network used in example 1. Each process passes data forward to the next process after completing it’s subtask on the data. The final process sends an ‘all done’ signal to the Root Process after it has completed it’s final write subtask.
The code in ‘exercise-1-MPI-task-parallelism.py’ can be executed by running the ‘exercise-1-run-script.sh’ shell script. In its current state the script runs slightly faster than the sequential version. This is because of the hardware bottleneck of writing to disk as described above. Each process has a distinct task to perform and as soon as it finishes its task on its current data, it sends the intermediary result to the next process. This means that while the writing process may be waiting on the disk, the other processes are busy working on their data.
The objective of this exercise is to modify the script so that multiple writing processes can be utilized. This requires adjusting the destination to which the sorting process sends its sorted data. Currently, the data is sent to the process with rank 3 (line 140). Modify the code to distribute the sorted data to multiple writer processes. To achieve this, it is necessary to determine the total number of running processes to identify the appropriate number of writer processes (hint: use the comm.Get_size() function). When this is complete run the code using between 1 and 4 writer processes. To adjust the number of writer processes, edit the ‘--ntasks-per-node=4’ value on line 6 of the run script. Increasing the value from 4 to 5 will add one additional writer process. The results should look similar to those below.
|
# of Process’ |
# of Writers |
Load Time |
Convert Time |
Sort Time |
Write Time |
Total Time |
|
4 |
1 |
8.9 |
9.25 |
12.37 |
30.56 |
30.56 |
|
5 |
2 |
9.0 |
9.52 |
12.46 |
18.6 |
18.61 |
|
6 |
3 |
9.13 |
9.73 |
12.34 |
12.8 |
12.82 |
|
7 |
4 |
9.01 |
9.65 |
12.4 |
12.7 |
12.9 |
Table: Example results generated by running the exercise-1-MPI-task-parallelism.py script with between 4 and 7 process.
As can be seen in these results, there is a considerable improvement from the sequential runtime when only a single writer is used. This is because as the slow writing to disk sub task is being executed, the other processes are still running. The improvements continue when adding a second and third writing process. However, the improvements plateau at 4 writers.
Why is this?
Solution
The hardware bottleneck is now the speed at which the sorting algorithm can run.
Exercise 2: Data Parallelism with MPI
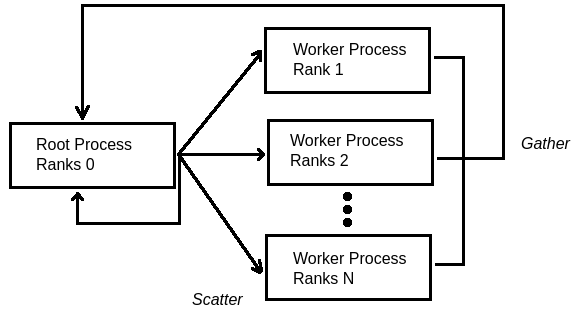
Figure: Diagram showing the flow of messages using the scatter and gather communication framework in MPI.
The script ‘exercise-2-MPI-data-parallelism.py’ sets up the scatter and gather communication framework available in MPI. In the example code the root process sends a value to all the processes (both workers and itself) using the scatter command. This causes all of the processes in the network to run the ‘wait_function’. After execution all processes respond using the gather command. This command allows each process to return data to the root process. The script can be executed by running the ‘exercise-2-run-script.sh’ shell script. To change the number of processes used edit the ‘--ntasks=4’ value on line 5 of the shell script. Figure shows a diagram of the message flows.
The scatter and gather communication framework is well suited for implementing a parallelized version of the sequential code in example 0. The root process passes a unique piece of data to each process which then run a common function on it. This is the very definition of data parallelism. Provided to you in the utils/utils.py file is a function called split_file_list. This function takes a list of filenames and a number n of processes and returns a list of n lists of filenames. In the ‘exercise-2-MPI-data-parallelism.py’ script you will need to have the root process generate a list of input files by using this function to split that list into separate lists to then send to all the other processes. Then use the ‘load_data’, ‘convert_data’, ‘sort_data’, and ‘write_data’ functions in the ‘utils.py’ file to replace the ‘dummy_processing’ function.
When this is complete run the scripts with 1 to 32 processes. The results should look similar to the graph below: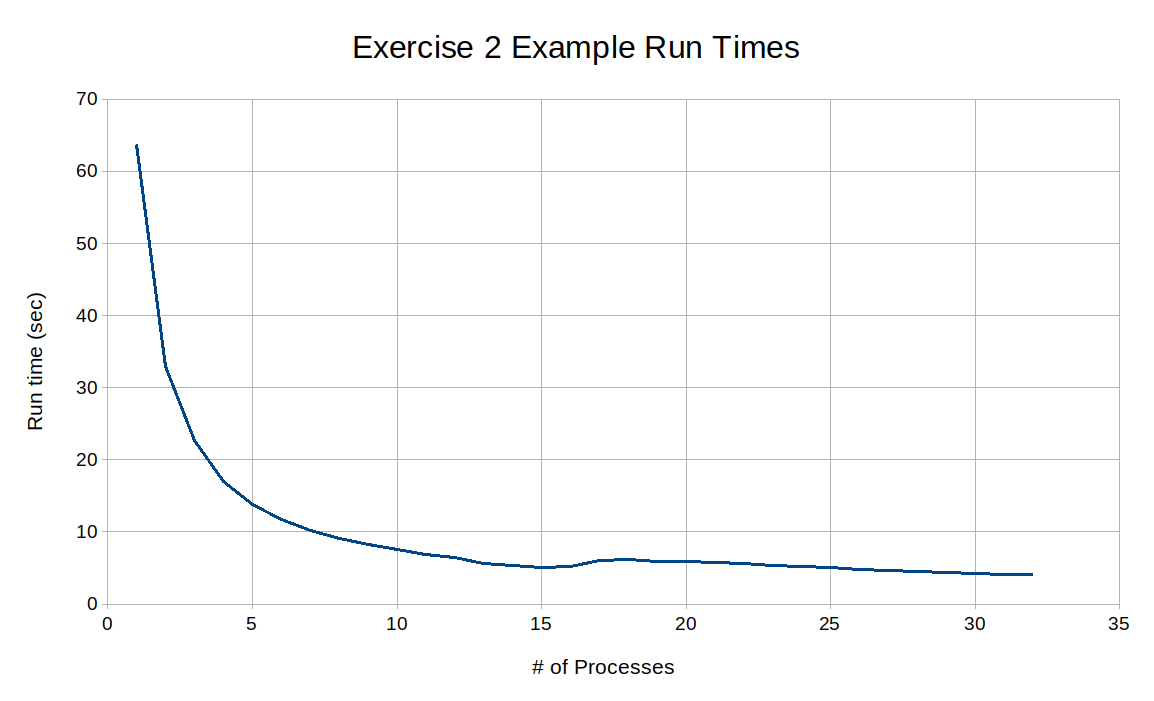 Run time vs # of processes when executing Exercise 2.
The runtime decreases steeply at first as a function of the number of processes, but eventually plateaus at around 2.4 seconds. This is because the time cost of starting new processes begins to outweigh the benefit of dividing the amount of work into smaller pieces. One particular point which is of interest is when 7 process’ are used in the data parallelism code. This is the same number of processes which, when used in the Task Parallelism code, stopped producing any performance increase.
Why were there improvements in the data parallelism but not the task parallelism code?
Solution
There is no processing bottleneck in the data parallelism code, since each process is doing the sorting in parallel.
Exercise 3: Multi-Threading C++ vs. Python
This exercise will introduce the reader to writing parallel code in a shared-memory environment. That is, writing parallel code that is executed entirely on a single node and which communicates through shared memory as opposed to through message passing as in the previous exercises. To start, run the shell script named ’exercise-3-python-run-script.sh’ by submitting it to SLURM using the ’sbatch’ command. This script executes the python code in file ’exercise-3-python-threads.py’ which uses the ThreadPoolExecutor to perform the sorting task using between 1 and 8 threads in a single process. When the job is finished running the results will be in the file ’ exercise-3-python-threads.out’.
As the results in the output file show, the number of threads used did not improve the runtime of the program. In fact, increasing the number of threads increased the time required to run the program. This is due to the time required to start, manage, and end a thread. This is an example of a hardware overhead which was introduced previously. Another reason the number of threads does not improve the performance is because of the Global Interpreter Lock (GIL) used by python. The GIL is a mechanism used by Python to simplify memory management and improve thread safety. It allows only a single thread to execute Python bytecode at a time. This means that even in a multi-threaded Python program, only one thread can run Python code at any given moment. A thread is only paused and another one allowed to run when it is waiting for a response from an I/O operation such as a network connection. Multi-Threading will not help improve the performance of a CPU-bound task such as the sorting task used here.
Other programming languages such as C++ do not use a GIL mechanism and can benefit from using multi-threading for CPU-bound tasks. The code contained in file ’exercises-3-ccp-threads.cpp’ creates a similar thread pool structure as the previous python script. Currently however, each thread only waits for a random amount of time before returning. Using the 3 helper functions ’read_data’, ’sort_data’, and ’write_data’ fill in the ’process_file” function so that each thread processes a single file. When complete the program can be compiled and run using the run script ’exercise-3-run-script.sh’. The results should look similar to the following:
|
# of Threads |
1 |
2 |
4 |
8 |
16 |
32 |
|
Processing Time |
64.62 |
32.77 |
16.70 |
8.64 |
4.21 |
2.89 |
Rewrite the program to assign multiple files to each thread instead of just one. Regardless of the number of files a thread processes, the hardware overhead of starting the thread remains the same. By distributing multiple files per thread, the startup cost can be amortized across many files, reducing its relative impact. After completing the updates to the code, run the program using different numbers of files per thread. The results should look similar to the following:
|
# of Threads |
1 |
2 |
4 |
8 |
16 |
32 |
|
Processing Time |
64.62 |
32.77 |
16.70 |
8.64 |
4.21 |
2.89 |
|
100 files per thread |
62.42 |
31.93 |
16.72 |
9.01 |
5.23 |
2.67 |
|
150 files per thread |
62.43 |
32.56 |
17.40 |
9.68 |
5.22 |
4.00 |
|
250 files per thread |
54.47 |
27.76 |
13.97 |
8.41 |
5.72 |
3.05 |
|
500 files per thread |
54.49 |
27.81 |
16.66 |
11.13 |
5.63 |
5.62 |
Digital Research Alliance of Canada
Integrated Development Environment
Central Processing Unit
Input/Output
Message Passing Interface
