Chapter 3: Developing Study Skills
Note-Taking Methods
One final valuable tool to have in your arsenal as a student is a good note-taking system. Just the act of converting a spoken lecture to notes helps you organize and retain information, and of course, good notes also help you review important concepts later. Although taking good notes is an essential study skill, many students have never received guidance on note taking.
Marking, note making, or note taking is a matter of personal preference in terms of style. The most important thing is to do something. Again we stress that reading is like a dialogue with an author. The author wrote this material. Pretend you are actually talking to the author.
- Do not let an idea pass without noting it.
- Do not let an ambiguity go by without questioning it.
- Do not let a term slip away if context does not help you understand it; look it up!
- Engage and you will both understand and remember.
Use consistent symbols to visually help you identify what is happening on the page:
- Circle central themes or write at the beginning of the section if it is not directly stated.
- [Bracket] main points.
- Underline key words or phrases for significant details.
- Put numbers 1, 2, 3 for items listed.
- Put square brackets or highlights for key terms when the definition follows.
- Use stars (*), question marks (?), or diagrams in the margins to show relevance.
- Use key word outlines in the margins for highlighting.
- Write questions in the margin that test your memory of what is written right there.
- Use blank spaces indicating the number of ideas to be remembered, forcing you to test yourself versus just rereading.
The following sections discuss different strategies you can use to take notes efficiently. No matter which system you choose, keep these general note-taking guidelines in mind.
General Note-Taking Guidelines
Before class, quickly review your notes from the previous class and the assigned reading. Fixing key terms and concepts in your mind will help you stay focused and pick out the important points during the lecture.
Come prepared with paper, pens, highlighters, textbooks, and any important handouts.
Come to class with a positive attitude and a readiness to learn. During class, make a point of concentrating. Ask questions if you need to. Be an active participant.
During class, capture important ideas as concisely as you can. Use words or phrases instead of full sentences, and abbreviate when possible.
Visually organize your notes into main topics, subtopics, and supporting points, and show the relationships between ideas. Leave space if necessary so you can add more details under important topics or subtopics.
Record the following:
- Ideas that the instructor repeats frequently or points out as key ideas
- Ideas the instructor lists on a whiteboard or transparency
- Details, facts, explanations, and lists that develop main points
- Review your notes regularly throughout the semester, not just before exams.
Organizing Ideas in Your Notes
A good note-taking system needs to help you differentiate among major points, related subtopics, and supporting details. It visually represents the connections between ideas. Finally, to be effective, your note-taking system must allow you to record and organize information fairly quickly. Although some students like to create detailed, formal outlines or concept maps when they read, these may not be good strategies for class notes because spoken lectures may not allow time for to create them.
Instead, focus on recording content simply and quickly to create organized, legible notes. Try one of the following techniques.
Modified outline format
A modified outline format uses indented spacing to show the hierarchy of ideas without including roman numerals, lettering, and so forth. Just use a dash or bullet to signify each new point unless your instructor specifically presents a numbered list of items.
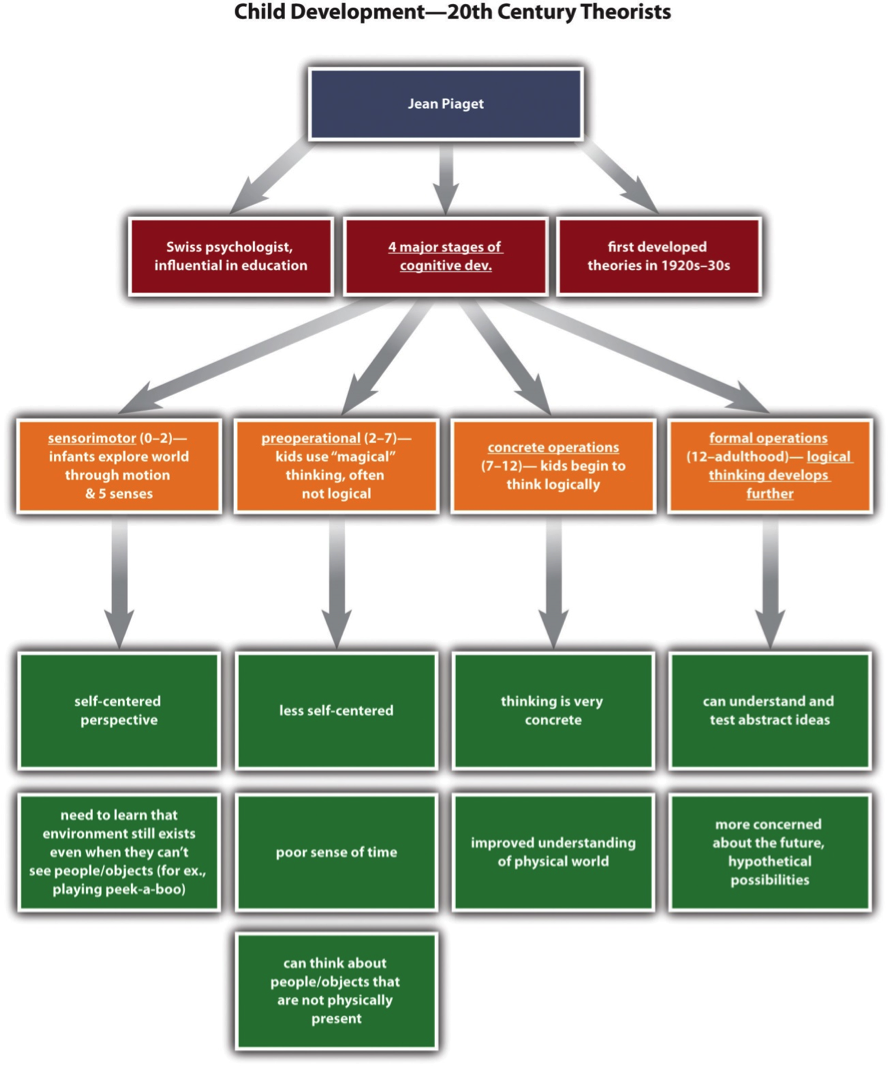
The first example shows Crystal’s notes from a developmental psychology class about an important theorist in this field. Notice how the line for the main topic is all the way to the left. Subtopics are indented, and supporting details are indented one level further. Crystal also used abbreviations for terms like development and example.
Child Development – 20th Century Theorists
- Jean Piaget
- Swiss psychologist, influential in education
- First developed theories in 1920s–30s
- 4 major stages of cognitive dev.
- sensorimotor (0–2) – infants explore the world through motion and 5 senses
- self-centred perspective
- need to learn that environment still exists even when they can’t see people/objects (for ex., playing peek-a-boo)
- preoperational (2–7) – kids use “magical” thinking, often not logical
- less self-centred
- poor sense of time
- can think about people/objects that are not physically present
- concrete operations (7–12) – kids begin to think logically
- thinking is very concrete
- improved understanding of physical world
- formal operations (12–adulthood) – logical thinking develops further
- can understand & test abstract ideas
- more concerned about the future, hypothetical possibilities
- sensorimotor (0–2) – infants explore the world through motion and 5 senses
Mind mapping/clustering
If you are a visual learner, you may prefer to use a more graphic format for notes, such as a mind map. The next example shows how Crystal’s lecture notes could be set up differently. Although the format is different, the content and organization are the same.
Charting
If the content of a lecture falls into a predictable, well organized pattern, you might choose to use a chart or table to record your notes. This system works best when you already know, either before class or at the beginning of class, which categories you should include. The next figure shows how this system might be used.
| Theorist | Country of Origin | Years Active | Stages of Child Development |
|---|---|---|---|
| Jean Piaget | Switzerland | 1920s through 1970s |
|
| Erik Erikson | Denmark (studied in Austria, emigrated to US in 1930s) | 1930s through 1980s |
***See also stages of adult development |
The Cornell note-taking system
In addition to the general techniques already described, you might find it useful to practise a specific strategy known as the Cornell note-taking system. This popular format makes it easy not only to organize information clearly but also to note key terms and summarize content.
To use the Cornell system, begin by setting up the page with these components:
- The course name and lecture date at the top of the page
- A narrow column (about two inches) at the left side of the page
- A wide column (about five to six inches) on the right side of the page
- A space of a few lines marked off at the bottom of the page
During the lecture, you record notes in the wide column. You can do so using the traditional modified outline format or a more visual format if you prefer.
Then, as soon as possible after the lecture, review your notes and identify key terms. Jot these down in the narrow left-hand column. You can use this column as a study aid by covering the notes on the right-hand side, reviewing the key terms, and trying to recall as much as you can about them so that you can mentally restate the main points of the lecture. Uncover the notes on the right to check your understanding. Finally, use the space at the bottom of the page to summarize each page of notes in a few sentences.
The next figure shows what Crystal’s notes would look like using the Cornell system.

