The Technique
Back in March, I tried to use the document camera in my Zoom sessions, but it required many interfaces to navigate while teaching. This Fall, I replaced the document camera with a pen tablet to help me incorporate, during and after my Zoom sessions, more of the whiteboard work that I would normally be able to do in my on-campus classroom.
I have a limited view of all elements on my screen, so this switch also had a big impact on how I could access and interact with content (fewer items open = more screen space). Some of my lectures are long, so I have to deliver them across a few sessions. These days, if a learner asks me a question about a previous part, within seconds, I can jump back to it within the slides for review and easily move back to where we are currently (as my pen work is still captured). In lectures during the Spring, I had to leave the current view to go find the work done previously, taking at least twice as long to respond to the questions asked.
The slides are being shared within the D2L course, and adding this technique of ‘showing my work’ on screen during lectures has also helped me to use mycourselink better. I’ve re-structured my course by week so that all the resources connected to the lesson delivery are together (i.e. notes before lectures and annotated notes after).
My writing and comfort with the pen tablet have improved throughout the semester and, therefore, for next term, I will use more than one color in my on-screen whiteboard work to show connected concepts and further improve upon my penmanship in the digital space.
An important discovery: I have a tablet, not the skills to be an artist, but my students don’t expect me to be an artist, just able to teach concepts that they want and need to learn — and to provide study aids in time to help them learn.
How I Use It
The first thing I do before a week begins is to post notes that relate to that week. My sessions are in my course calendar and linked in my weekly structure. The notes/slides that I will use during live lecture sessions will have information missing (i.e. no problem statements or examples). They will also be missing additional ‘whitespace’ where I will demonstrate how to solve problems. I use that space as a whiteboard with the help of the pen tablet.
- My lectures are recorded so learners can watch the videos to see this whiteboard work as they watch the lecture again ‘offline’.
- Once the session is done, I go back in to mycourselink and share the slides I used (with the digital writing added). This way, the learners can choose one of two ways to review these additions.
NOTE: If I have a concept being taught in a couple of classes, after the second lecture, I replace the original part A notes (shared in D2L) with the file that contains the notes for both part A/B.
My new ‘whiteboard’:

Feedback from Learners
I wasn’t sure at first if students even noticed the change until several students contacted me, worried, when one of the after-lecture files did not show the writing portion of the problems in-text but at the end. A quick lesson learned. They just needed to download the file and the process/writing was viewable.
I did a quick poll in two of my late November lectures to share learner feedback with you. I asked 69 students if they felt that the use of the pen tablet during teaching was helping them learn. I had a quick response with 34 students giving a big ‘thumbs up’, and one student commented that “the pace and clarity of the pen tablet use is better than other aids” they’ve experienced.
A Short Task to Challenge You
In the spirit of the season, post a note with one thing you want for the holidays.
Not everyone has their own pen tablet, though many ARE working from a laptop with a trackpad built in. If you have a mouse connected, you can use this to complete the task also.
- Open Powerpoint, or Word if you prefer. You will see that the third ‘tab’ is DRAW. Click on it to get your tools:

- Choose the color you want to draw/write with, and give it a try. Write one thing you want and, to give your readers a smile, draw out what it looks like.
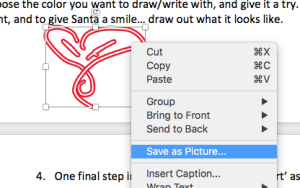
- Your final step will be to ‘export’ your creation as an image. Take a screen grab, or you can right click on your drawing and choose ‘save as picture’:

- If you are brave, share your artistic work on twitter with a link back to this lesson for context.
One Final Task
Is this something you can use in your online classroom? How might you utilize it? If you want to share your results on social media, include a link to this lesson for context.


Feedback/Errata